> ## Documentation Index
> Fetch the complete documentation index at: https://docs.testsprite.com/llms.txt
> Use this file to discover all available pages before exploring further.
# Installation
> Get TestSprite MCP Server up and running in your IDE in under 2 minutes.
## Prerequisites
Before installing TestSprite MCP Server, ensure you have:
1. **Compatible IDEs**
2. **TestSprite Account** - [Sign up for free ](https://www.testsprite.com/auth/cognito/sign-up)
3. **Node.js >= 22** - [Download Node.js ](https://nodejs.org/) (required for running MCP server)
TestSprite supports **Trae**, **Cursor**, **Claude Code**, **Windsurf**, **VS Code**, and **GitHub Copilot**. Simply install our MCP Server get started.
Run `node --version` to check your version. For detailed setup instructions, see [Node.js Configuration](../troubleshooting/installation-issues#node-js-version-compatibility).
## Get Your API Key
First, you'll need a TestSprite API key for any installation method:
 1. Sign in to your [TestSprite Dashboard ](https://www.testsprite.com/dashboard)
2. Navigate to **API Keys** under Settings
3. Click **"New API Key"**
4. **Copy** your API key (you'll need it for installation)
## Installation
Follow the instructions for your specific client to add the TestSprite MCP server.
1. Sign in to your [TestSprite Dashboard ](https://www.testsprite.com/dashboard)
2. Navigate to **API Keys** under Settings
3. Click **"New API Key"**
4. **Copy** your API key (you'll need it for installation)
## Installation
Follow the instructions for your specific client to add the TestSprite MCP server.
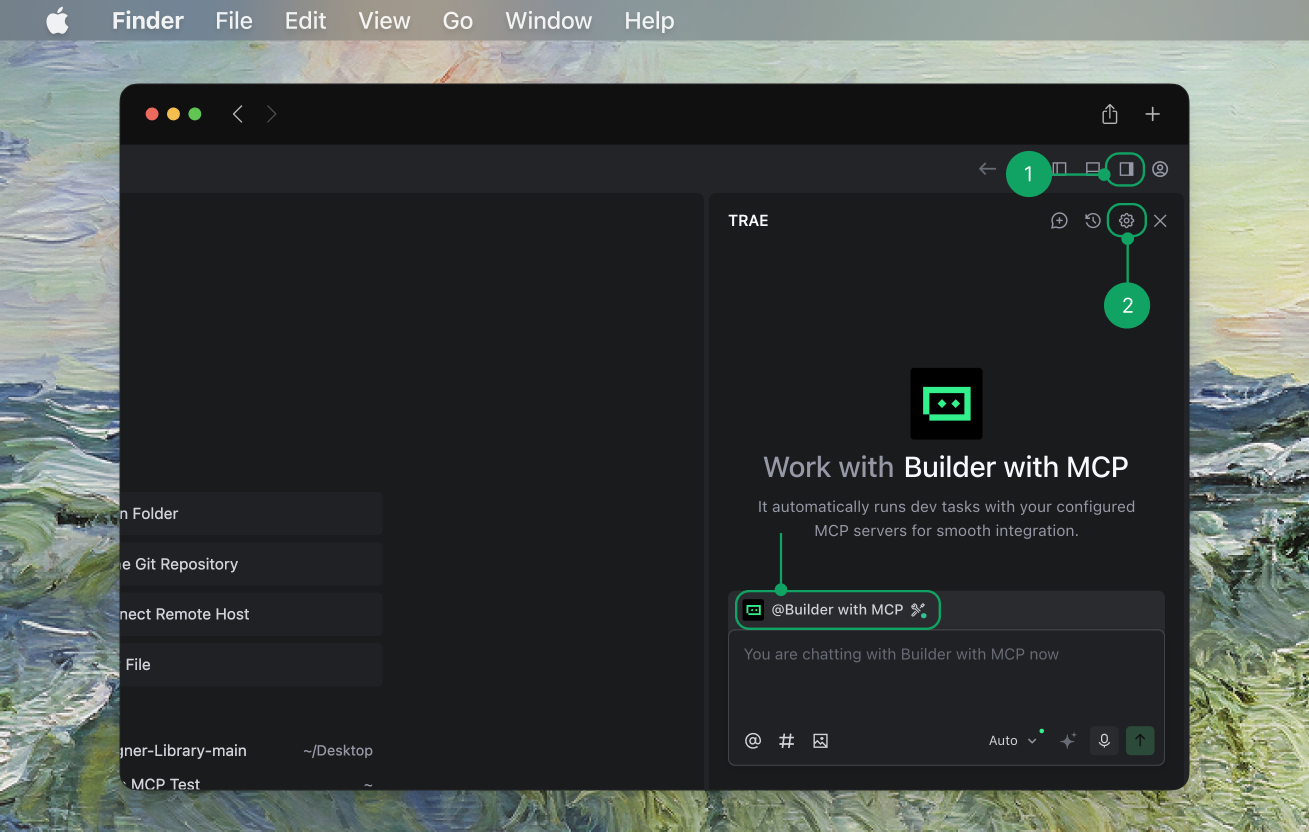 1. Get your [**API key**](#get-your-api-key).
2. In Trae, navigate to `AI Sidebar > AI Management`.
3. Select `MCP > Add > Add from Marketplace`.
4. Search for **TestSprite** and add to your MCP list.
1. Get your [**API key**](#get-your-api-key).
2. In Trae, navigate to `AI Sidebar > AI Management`.
3. Select `MCP > Add > Add from Marketplace`.
4. Search for **TestSprite** and add to your MCP list.
 5. **Enter your API key** in Trae and hit **Confirm**
6. Select **Builder with MCP** and start testing.
**Important:** Cursor's default "Run in Sandbox" mode limits TestSprite's functionality. See [Cursor Sandbox Mode Configuration](#cursor-sandbox-mode-configuration) below for setup instructions.
You can install TestSprite MCP Server in Cursor using either **one-click installation** for quick setup or **manual installation** for full control.
The easiest way to install TestSprite MCP Server in Cursor:
1. Get your [**API key**](#get-your-api-key).
2. Click this [one-click install link ](cursor://anysphere.cursor-deeplink/mcp/install?name=TestSprite\&config=eyJjb21tYW5kIjoibnB4IEB0ZXN0c3ByaXRlL3Rlc3RzcHJpdGUtbWNwQGxhdGVzdCIsImVudiI6eyJBUElfS0VZIjoiIn19).
3. **Enter your API key** in Cursor.
4. Start testing.
1. Open Cursor Settings ( ⌘⇧J )
2. Navigate to **Tools & Integration**
3. Click **Add custom MCP**
4. **Add** the following configuration:
```json icon="code" Cursor Configuration theme={null}
{
"mcpServers": {
"TestSprite": {
"command": "npx",
"args": ["@testsprite/testsprite-mcp@latest"],
"env": {
"API_KEY": "your-api-key"
}
}
}
}
```
5. Check if the green dot shows up on the TestSprite MCP server icon, and the tools have been loaded successfully.
5. **Enter your API key** in Trae and hit **Confirm**
6. Select **Builder with MCP** and start testing.
**Important:** Cursor's default "Run in Sandbox" mode limits TestSprite's functionality. See [Cursor Sandbox Mode Configuration](#cursor-sandbox-mode-configuration) below for setup instructions.
You can install TestSprite MCP Server in Cursor using either **one-click installation** for quick setup or **manual installation** for full control.
The easiest way to install TestSprite MCP Server in Cursor:
1. Get your [**API key**](#get-your-api-key).
2. Click this [one-click install link ](cursor://anysphere.cursor-deeplink/mcp/install?name=TestSprite\&config=eyJjb21tYW5kIjoibnB4IEB0ZXN0c3ByaXRlL3Rlc3RzcHJpdGUtbWNwQGxhdGVzdCIsImVudiI6eyJBUElfS0VZIjoiIn19).
3. **Enter your API key** in Cursor.
4. Start testing.
1. Open Cursor Settings ( ⌘⇧J )
2. Navigate to **Tools & Integration**
3. Click **Add custom MCP**
4. **Add** the following configuration:
```json icon="code" Cursor Configuration theme={null}
{
"mcpServers": {
"TestSprite": {
"command": "npx",
"args": ["@testsprite/testsprite-mcp@latest"],
"env": {
"API_KEY": "your-api-key"
}
}
}
}
```
5. Check if the green dot shows up on the TestSprite MCP server icon, and the tools have been loaded successfully.

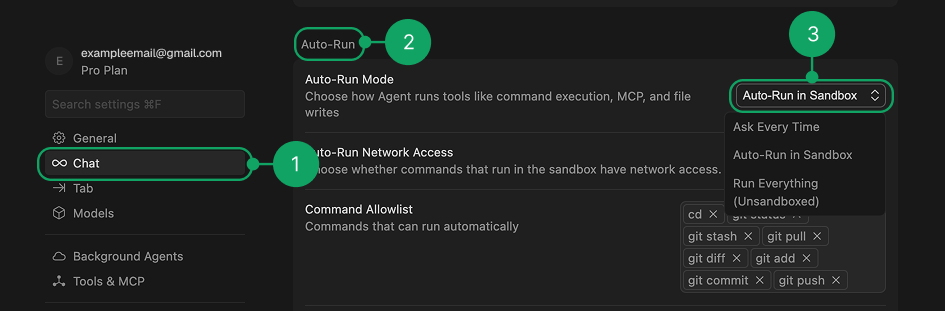
Cursor Sandbox Mode Configuration
Cursor has recently updated and by default will run MCP tools in the allowlist in “Run in Sandbox” mode. This mode limits the MCP tools’ functionalities and will prevent successful invocations of TestSprite’s testing procedures.
To ensure full functionality of TestSprite MCP Server in Cursor:
1. Go to `Cursor` → `Settings` → `Cursor Settings`
 2. Go to `Chat` → `Auto-Run` → `Auto-Run Mode` and change the setting to **"Ask Everytime"** or **"Run Everything"**
 1. **Navigate to your project directory** in terminal:
```bash theme={null}
cd /path/to/your/project
```
2. **Paste the installation command into your terminal**:
```bash theme={null}
claude mcp add TestSprite --env API_KEY=your_api_key -- npx @testsprite/testsprite-mcp@latest
```
3. **Replace `your_api_key`** with your actual TestSprite API key
4. **Run** the installation command
5. **Verify the installation** by running this command in your project directory:
```bash theme={null}
claude mcp list
```
You should see:
```json Example Terminal Output theme={null}
TestSprite: npx @testsprite/testsprite-mcp@latest - ✓ Connected
```
Installing the MCP server this way adds TestSprite only to Claude Code under the **current project directory**. If you're using Claude Code in another project directory, you'll need to add the MCP server again. For installing the MCP server under different scopes (e.g. global), refer to the [Claude Code MCP documentation ](https://docs.anthropic.com/en/docs/claude-code/mcp)
1. **Open** the MCP store via the `...` dropdown at the top of the editor's agent panel.
2. **Click** on **"Manage MCP Servers"**.
3. **Click** on **"View raw config"**.
4. **Add** the following configuration to `mcp_config.json`:
```json icon="code" Antigravity Configuration theme={null}
{
"mcpServers": {
"TestSprite": {
"command": "npx",
"args": ["@testsprite/testsprite-mcp@latest"],
"env": {
"API_KEY": "your-api-key"
}
}
}
}
```
1. **Open** the Command Palette ( ⌘⇧P )
2. **Run** the **MCP: Add Server** command
3. **Choose** Command (stdio) installation type
4. **Type** `npx @testsprite/testsprite-mcp@latest` for Command to run
5. **Type** TestSprite for the MCP server identifier/name
6. **Choose** the scope where you want the MCP server to be configured
7. **Add** the `env` configuration:
```json icon="code" VS Code Configuration theme={null}
{
"servers": {
"testsprite": {
"command": "npx",
"args": ["-y", "@testsprite/testsprite-mcp@latest"],
"env": {
"API_KEY": "your-api-key"
}
}
},
}
```
8. After installation, click the `start` button above the TestSprite MCP entry in the `mcp.json` file you have just configured. If the server started with no errors and all the tools have been loaded, you have installed the MCP server successfully.
Add this configuration to your MCP settings:
```json icon="code" Other IDE Configuration theme={null}
{
"mcpServers": {
"TestSprite": {
"command": "npx",
"args": ["@testsprite/testsprite-mcp@latest"],
"env": {
"API_KEY": "your-api-key"
}
}
}
}
```
## Installation Verification
### Success Indicators
* Your AI assistant can see **TestSprite MCP tools**
* No **"command not found"** errors
* Ready to start testing your projects
### Quick Test
Try prompting:
```json icon="file-lines" theme={null}
Help me test this project with TestSprite.
```
Your assistant should offer to use TestSprite MCP tools.
## Uninstallation
To remove TestSprite MCP Server:
1. **Remove the configuration** from your IDE's MCP settings
2. **Restart your IDE**
1. **Navigate to your project directory** in terminal:
```bash theme={null}
cd /path/to/your/project
```
2. **Paste the installation command into your terminal**:
```bash theme={null}
claude mcp add TestSprite --env API_KEY=your_api_key -- npx @testsprite/testsprite-mcp@latest
```
3. **Replace `your_api_key`** with your actual TestSprite API key
4. **Run** the installation command
5. **Verify the installation** by running this command in your project directory:
```bash theme={null}
claude mcp list
```
You should see:
```json Example Terminal Output theme={null}
TestSprite: npx @testsprite/testsprite-mcp@latest - ✓ Connected
```
Installing the MCP server this way adds TestSprite only to Claude Code under the **current project directory**. If you're using Claude Code in another project directory, you'll need to add the MCP server again. For installing the MCP server under different scopes (e.g. global), refer to the [Claude Code MCP documentation ](https://docs.anthropic.com/en/docs/claude-code/mcp)
1. **Open** the MCP store via the `...` dropdown at the top of the editor's agent panel.
2. **Click** on **"Manage MCP Servers"**.
3. **Click** on **"View raw config"**.
4. **Add** the following configuration to `mcp_config.json`:
```json icon="code" Antigravity Configuration theme={null}
{
"mcpServers": {
"TestSprite": {
"command": "npx",
"args": ["@testsprite/testsprite-mcp@latest"],
"env": {
"API_KEY": "your-api-key"
}
}
}
}
```
1. **Open** the Command Palette ( ⌘⇧P )
2. **Run** the **MCP: Add Server** command
3. **Choose** Command (stdio) installation type
4. **Type** `npx @testsprite/testsprite-mcp@latest` for Command to run
5. **Type** TestSprite for the MCP server identifier/name
6. **Choose** the scope where you want the MCP server to be configured
7. **Add** the `env` configuration:
```json icon="code" VS Code Configuration theme={null}
{
"servers": {
"testsprite": {
"command": "npx",
"args": ["-y", "@testsprite/testsprite-mcp@latest"],
"env": {
"API_KEY": "your-api-key"
}
}
},
}
```
8. After installation, click the `start` button above the TestSprite MCP entry in the `mcp.json` file you have just configured. If the server started with no errors and all the tools have been loaded, you have installed the MCP server successfully.
Add this configuration to your MCP settings:
```json icon="code" Other IDE Configuration theme={null}
{
"mcpServers": {
"TestSprite": {
"command": "npx",
"args": ["@testsprite/testsprite-mcp@latest"],
"env": {
"API_KEY": "your-api-key"
}
}
}
}
```
## Installation Verification
### Success Indicators
* Your AI assistant can see **TestSprite MCP tools**
* No **"command not found"** errors
* Ready to start testing your projects
### Quick Test
Try prompting:
```json icon="file-lines" theme={null}
Help me test this project with TestSprite.
```
Your assistant should offer to use TestSprite MCP tools.
## Uninstallation
To remove TestSprite MCP Server:
1. **Remove the configuration** from your IDE's MCP settings
2. **Restart your IDE**