> ## Documentation Index
> Fetch the complete documentation index at: https://docs.testsprite.com/llms.txt
> Use this file to discover all available pages before exploring further.
# Managing Test Cases
> Edit a single test case, batch-edit the whole plan in form or YAML mode, add tests by hand or with AI, and delete what you no longer need.
 ## Overview
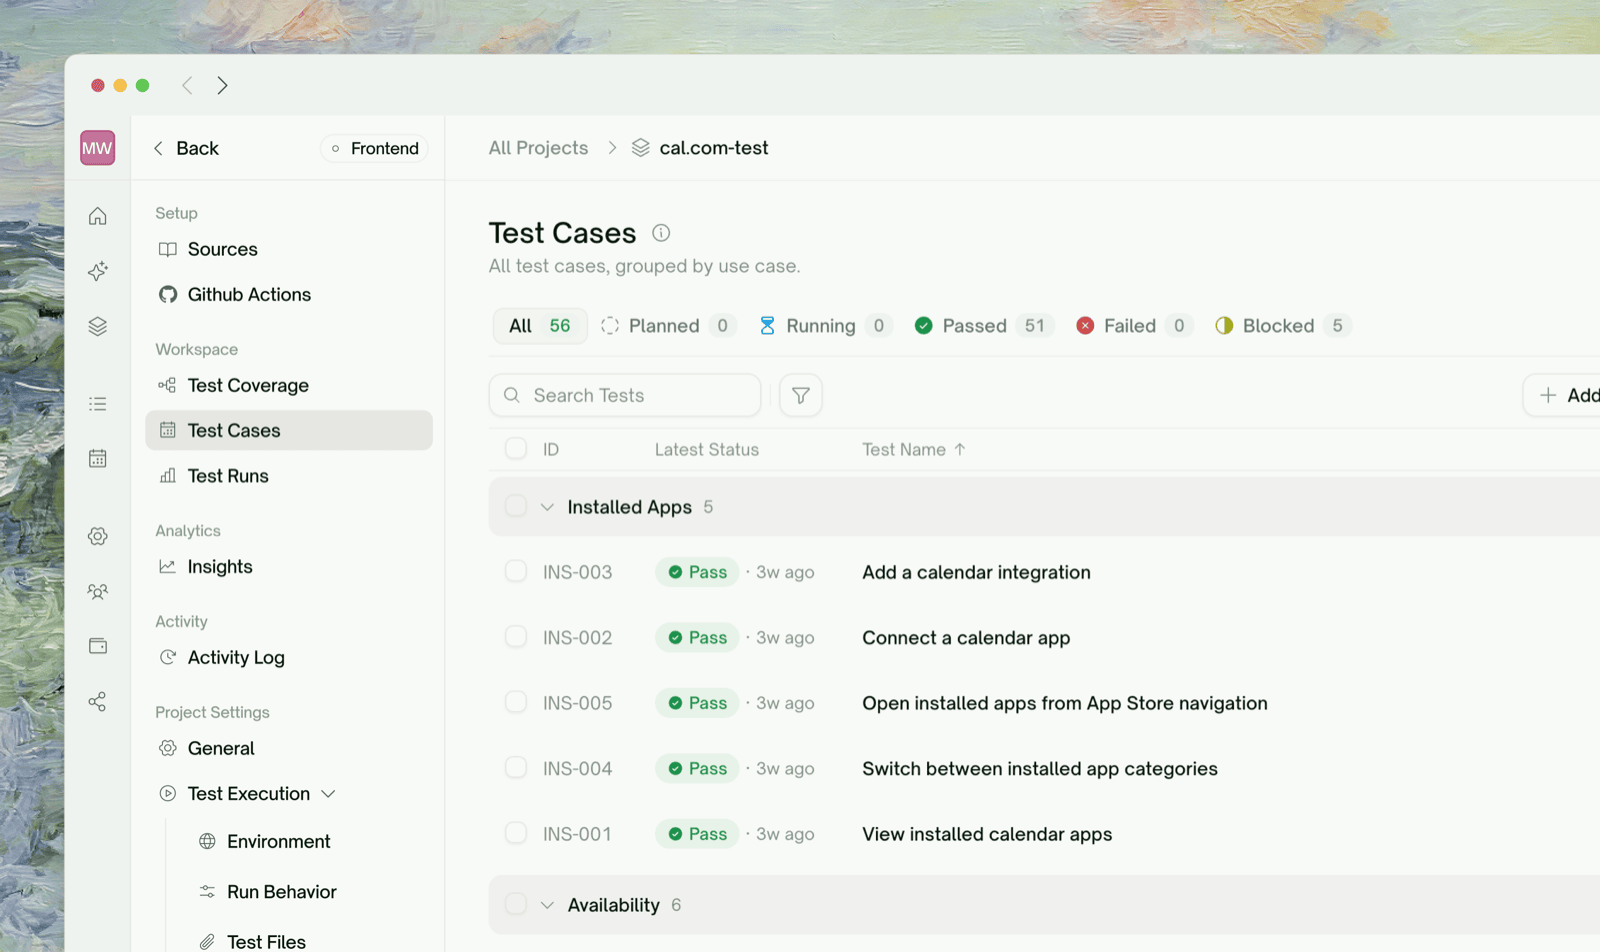
The Test Cases page is the working list of every test in the project, grouped by use case. This page covers keeping that list right: editing what a test does, adding new ones, and pruning old ones.
Everything here changes the *plan* — what the test intends to do. To make a change count, re-run the test afterward; that's why saving a single case is wired as **Save & Run**.
## Editing a Single Test Case
## Overview
The Test Cases page is the working list of every test in the project, grouped by use case. This page covers keeping that list right: editing what a test does, adding new ones, and pruning old ones.
Everything here changes the *plan* — what the test intends to do. To make a change count, re-run the test afterward; that's why saving a single case is wired as **Save & Run**.
## Editing a Single Test Case
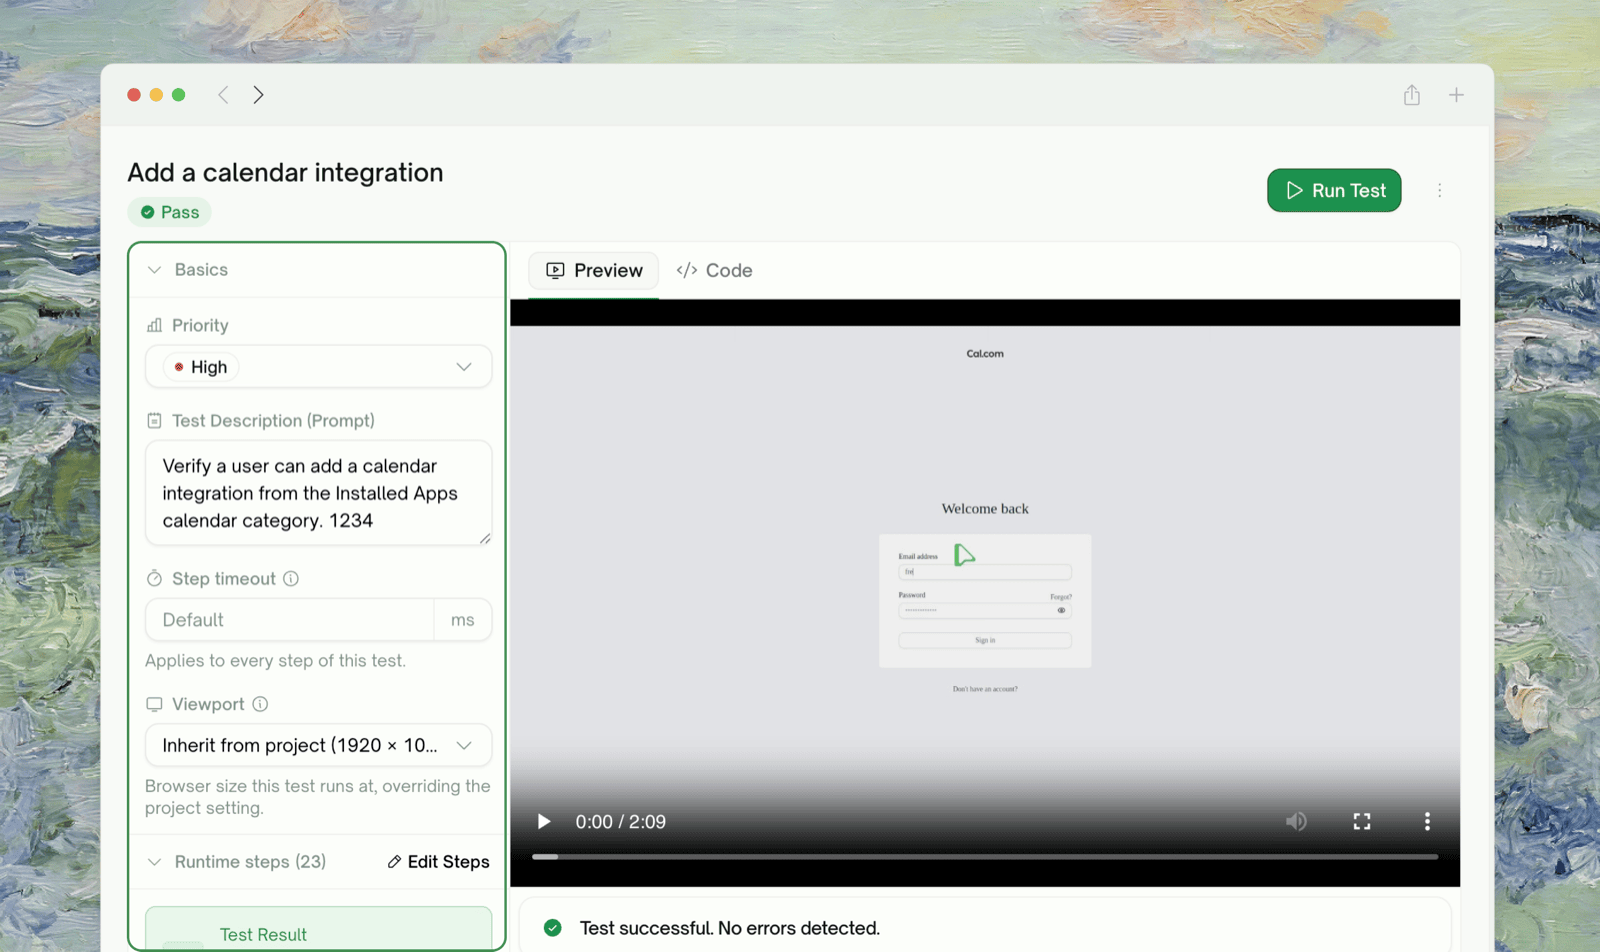 Click any row to open the test case — as a drawer over the list, expandable to a full page. What you can change, and where:
| What | Where |
| :- | :- |
| **Priority** | The Basics section — High / Medium / Low |
| **Test Description (Prompt)** | The Basics section — the natural-language statement of what the test verifies; the judge scores the run against it |
| **Steps** | The Edit steps modal — see below |
| **Code** | The Code tab |
### Editing steps and re-running
Click any row to open the test case — as a drawer over the list, expandable to a full page. What you can change, and where:
| What | Where |
| :- | :- |
| **Priority** | The Basics section — High / Medium / Low |
| **Test Description (Prompt)** | The Basics section — the natural-language statement of what the test verifies; the judge scores the run against it |
| **Steps** | The Edit steps modal — see below |
| **Code** | The Code tab |
### Editing steps and re-running
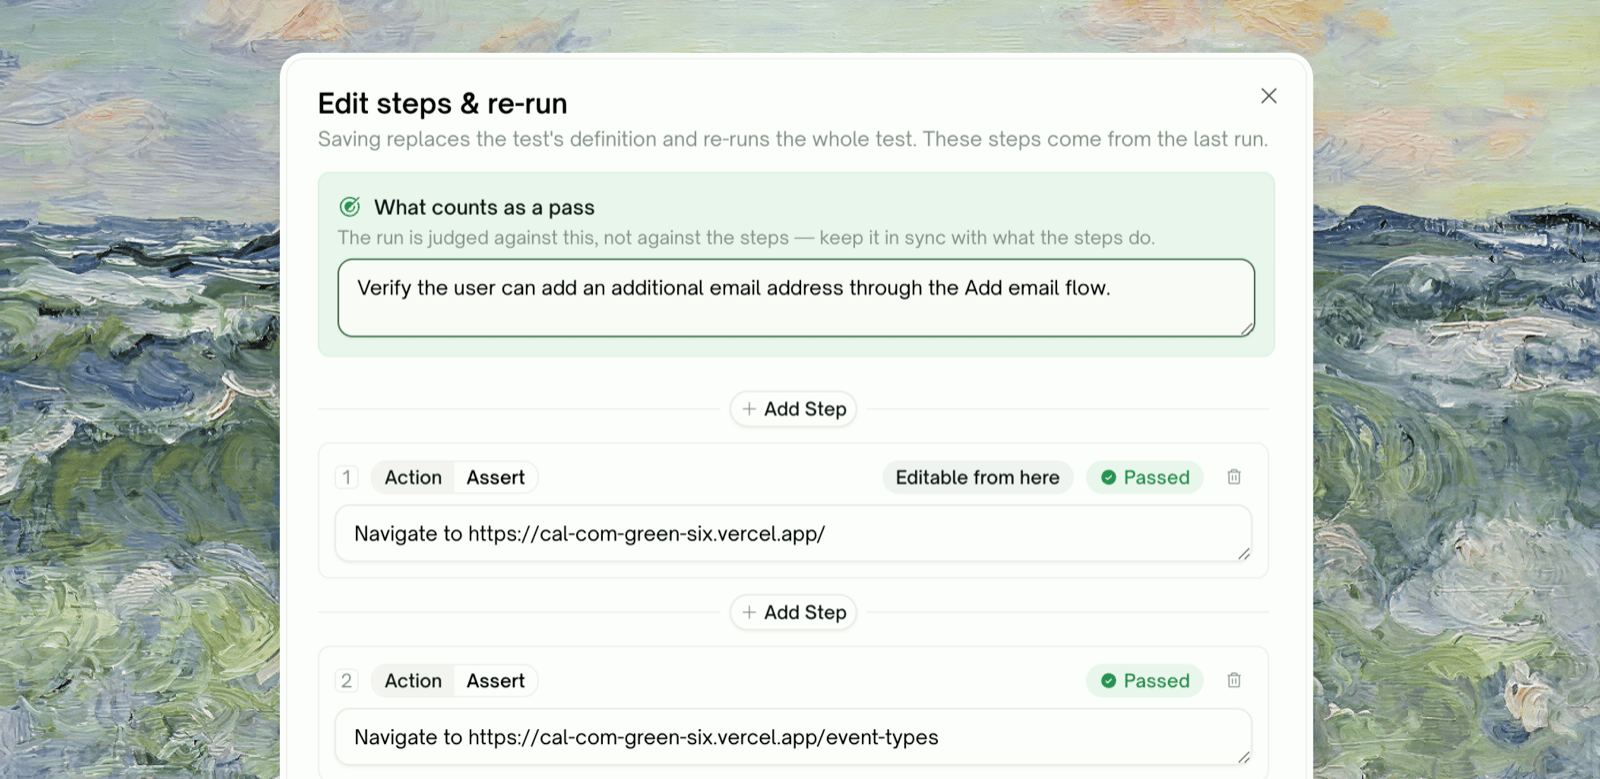 The Edit steps modal lets you rewrite the flow from any step onward: steps **before** the one you picked stay locked (they're still executed, just not editable), and everything after is free-text — add, remove, or rewrite steps, each typed as an *action* or an *assertion*. You can adjust the pass criterion in the same modal. Saving starts a run with the new steps immediately.
For UI tests, edited steps run directly — there's no code-generation step in between. For API tests, editing the prompt pairs with a Regenerate button right under it: **Save & Run replays the existing stored code**, while **Regenerate** rewrites the code from your edited prompt first and then runs. Reach for Regenerate whenever your edit changes what the code must do.
## Batch Editing
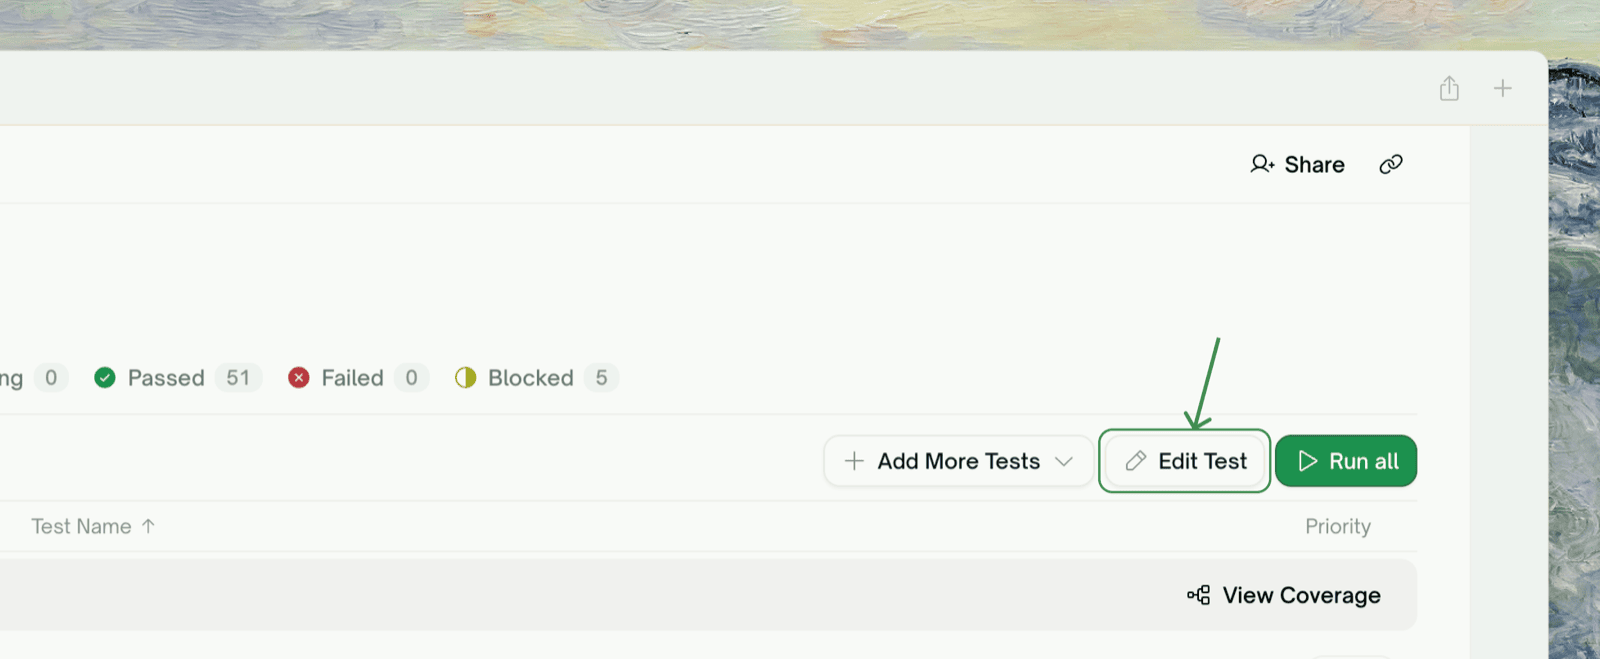
Click Edit Test on the toolbar to open the batch editor — every test case in the plan on one screen, with a use-case nav on the left. It has two modes:
The Edit steps modal lets you rewrite the flow from any step onward: steps **before** the one you picked stay locked (they're still executed, just not editable), and everything after is free-text — add, remove, or rewrite steps, each typed as an *action* or an *assertion*. You can adjust the pass criterion in the same modal. Saving starts a run with the new steps immediately.
For UI tests, edited steps run directly — there's no code-generation step in between. For API tests, editing the prompt pairs with a Regenerate button right under it: **Save & Run replays the existing stored code**, while **Regenerate** rewrites the code from your edited prompt first and then runs. Reach for Regenerate whenever your edit changes what the code must do.
## Batch Editing
Click Edit Test on the toolbar to open the batch editor — every test case in the plan on one screen, with a use-case nav on the left. It has two modes:
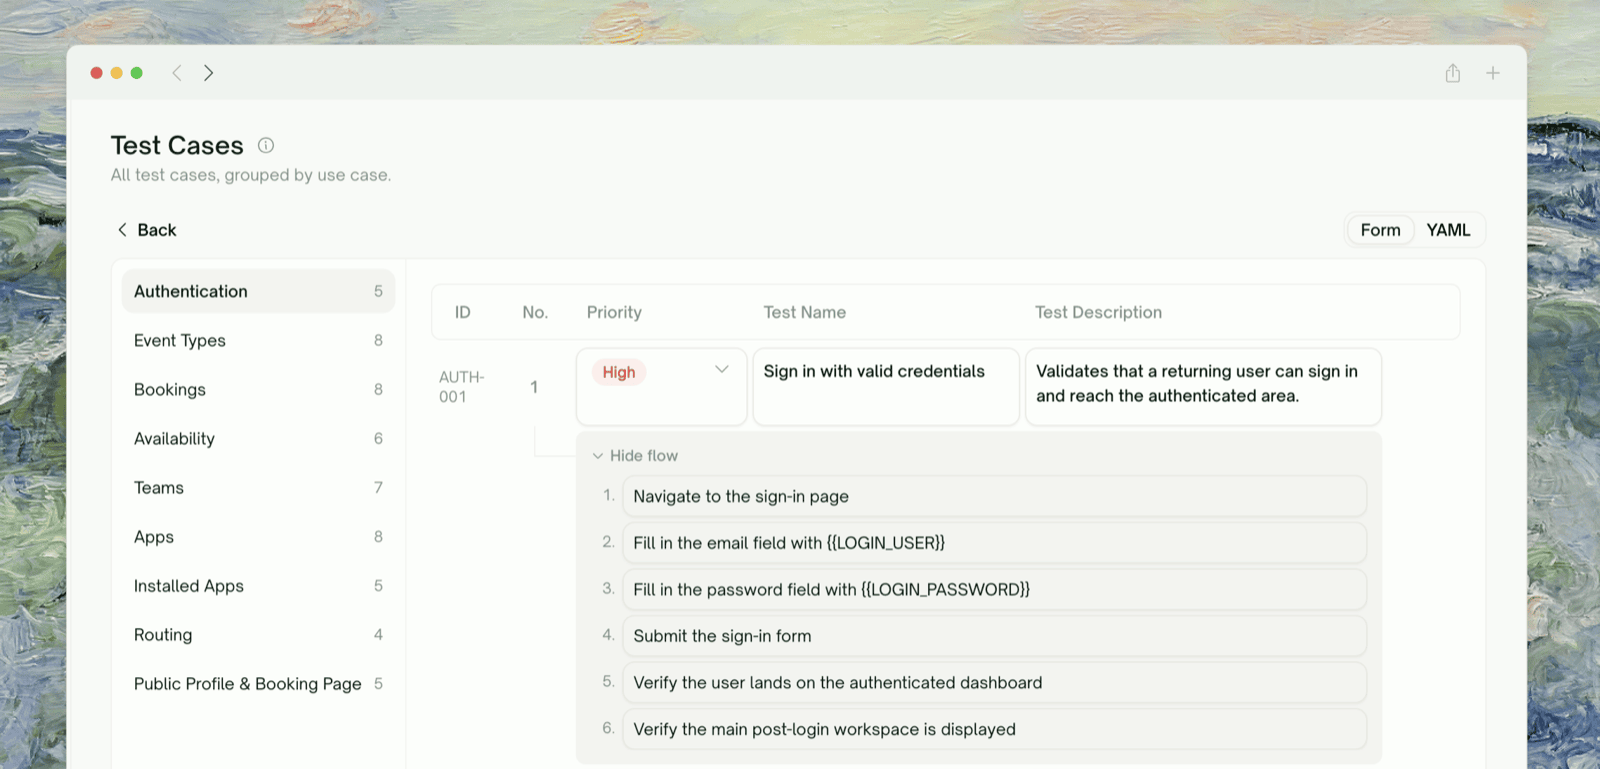 A table of every case with **test name, priority, description, and each flow step** editable in place, steps expanded by default. Best when you're touching a handful of cases and want to see them in context.
Save writes only the rows you actually changed, and reports per-case if any row fails to save — a partial save never silently loses the rest.
A table of every case with **test name, priority, description, and each flow step** editable in place, steps expanded by default. Best when you're touching a handful of cases and want to see them in context.
Save writes only the rows you actually changed, and reports per-case if any row fails to save — a partial save never silently loses the rest.
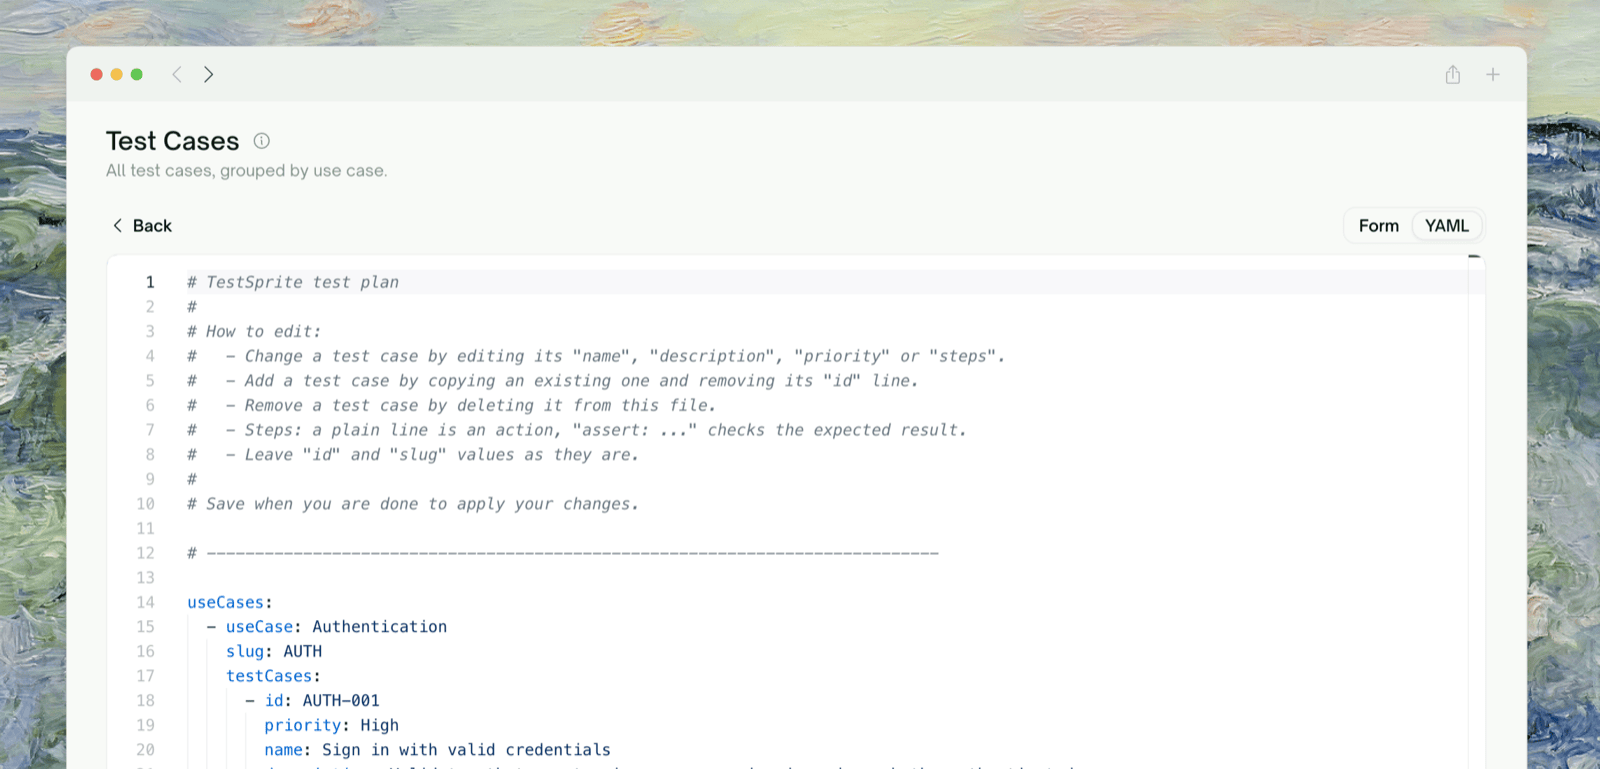 The whole plan as one YAML document — best for sweeping edits: renumbering steps across many cases, find-and-replace on a URL, or pasting cases between projects.
```yaml theme={null}
useCases:
- useCase: Authentication
slug: authentication
testCases:
- id: TC001
priority: High
name: Login with valid credentials
description: Verify that submitting valid credentials lands the
user on the dashboard.
steps:
- Navigate to the login page
- Enter "user@example.com" and the test password
- Click the Sign In button
- assert: The dashboard page is displayed
```
The rules, straight from the editor's header comment:
* A plain step line is an **action**; `assert: ...` marks an **assertion**.
* **Add** a case by copying an existing one and removing its `id` line.
* **Remove** a case by deleting its block.
* Leave `id` and `slug` values as they are — they're how your edits map back to existing cases.
Switching between the two modes discards unsaved edits in the mode you're leaving — the editor warns you first.
## Adding Test Cases
The Add More Tests dropdown on the toolbar has both paths:
The whole plan as one YAML document — best for sweeping edits: renumbering steps across many cases, find-and-replace on a URL, or pasting cases between projects.
```yaml theme={null}
useCases:
- useCase: Authentication
slug: authentication
testCases:
- id: TC001
priority: High
name: Login with valid credentials
description: Verify that submitting valid credentials lands the
user on the dashboard.
steps:
- Navigate to the login page
- Enter "user@example.com" and the test password
- Click the Sign In button
- assert: The dashboard page is displayed
```
The rules, straight from the editor's header comment:
* A plain step line is an **action**; `assert: ...` marks an **assertion**.
* **Add** a case by copying an existing one and removing its `id` line.
* **Remove** a case by deleting its block.
* Leave `id` and `slug` values as they are — they're how your edits map back to existing cases.
Switching between the two modes discards unsaved edits in the mode you're leaving — the editor warns you first.
## Adding Test Cases
The Add More Tests dropdown on the toolbar has both paths:
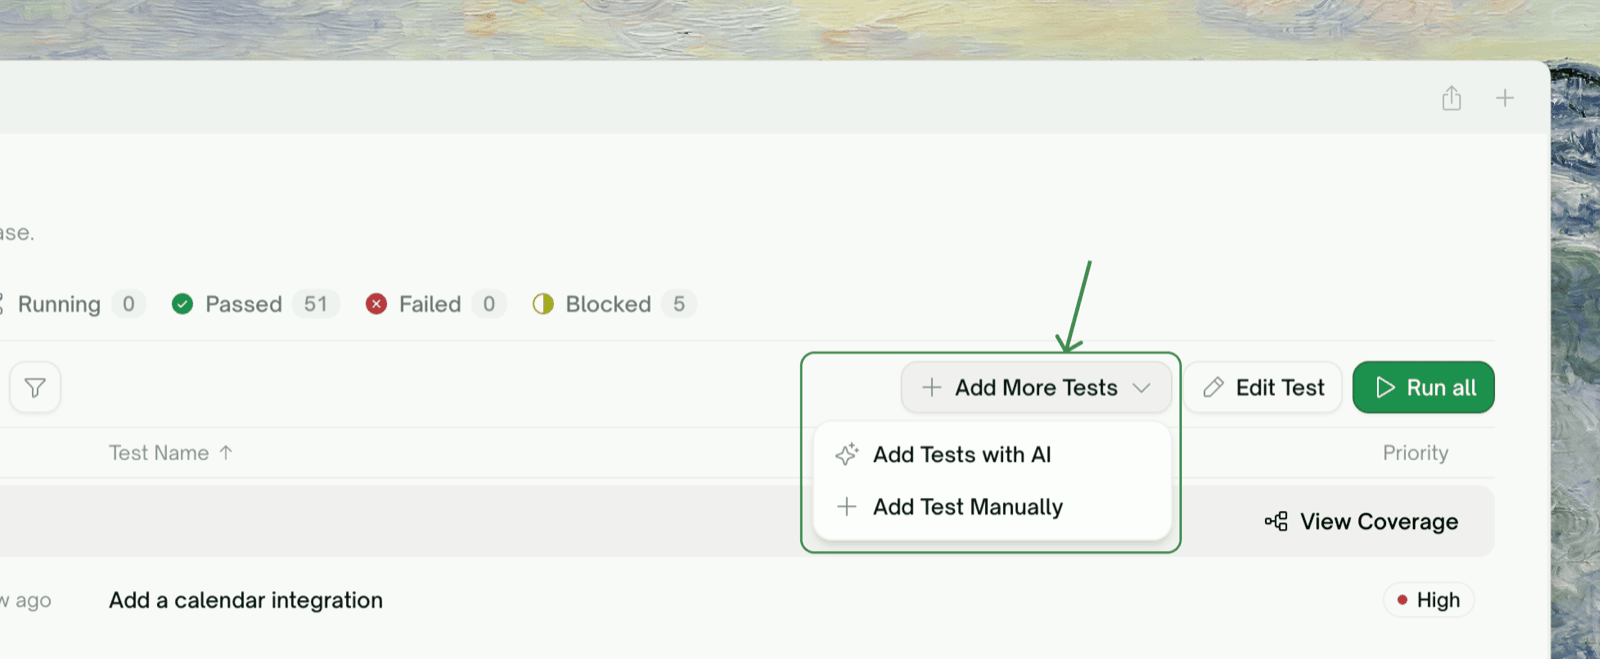 * **Add Tests with AI** — describe what you want covered (optionally scoped to one use case) and review the proposed batch before anything is created. In the review grid you can edit each proposal's title, description, priority, and steps, untick the ones you don't want, and even hand-add rows.
* **Add Test Manually** — a form with use case, title, priority, description, and a step list (action/assertion per step).
You can also add from the [Coverage Map](/web-portal/core/working-with-test/coverage-map) — per use case, or with the per-feature ✨ AI shortcut.
## Deleting Test Cases
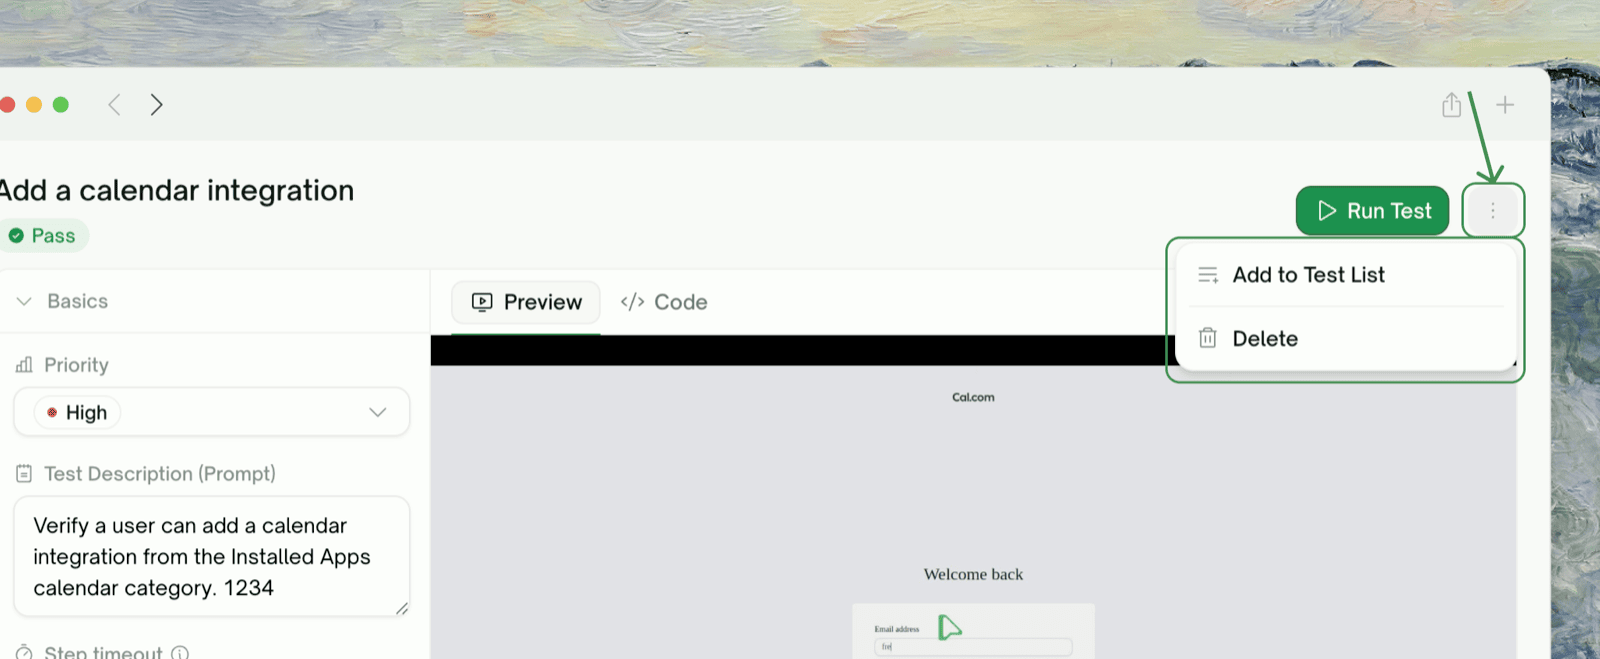
* **One case** — from the trash icon in its drawer, or the row's context menu in the list. A case that has never run is labeled "Remove from plan"; one with run history warns you the history goes with it.
* **Add Tests with AI** — describe what you want covered (optionally scoped to one use case) and review the proposed batch before anything is created. In the review grid you can edit each proposal's title, description, priority, and steps, untick the ones you don't want, and even hand-add rows.
* **Add Test Manually** — a form with use case, title, priority, description, and a step list (action/assertion per step).
You can also add from the [Coverage Map](/web-portal/core/working-with-test/coverage-map) — per use case, or with the per-feature ✨ AI shortcut.
## Deleting Test Cases
* **One case** — from the trash icon in its drawer, or the row's context menu in the list. A case that has never run is labeled "Remove from plan"; one with run history warns you the history goes with it.
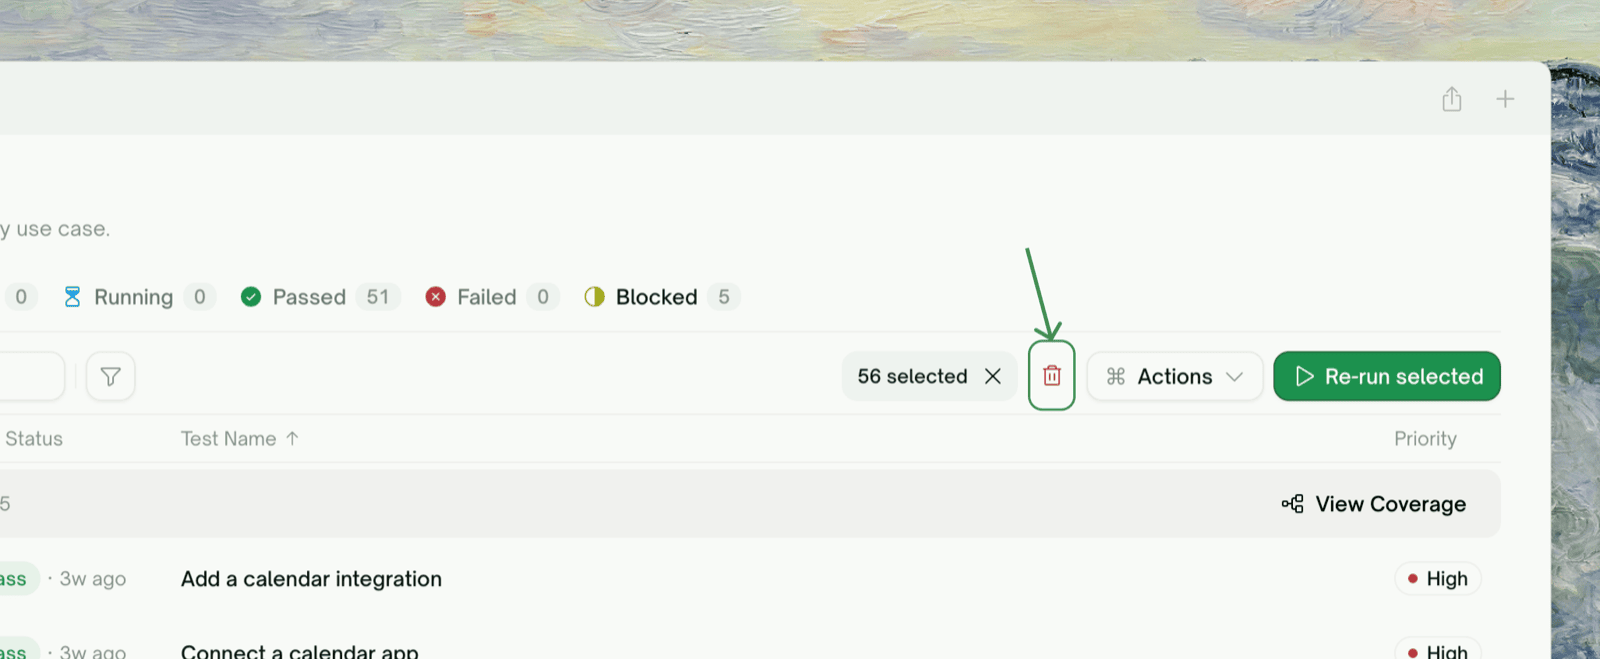
 * **Many cases** — select rows and use the trash button in the toolbar.
 Deleting a test case permanently removes its run history too. If you might want the history later, consider deprioritizing the case instead of deleting it.
## Where to Go Next
This page is "how to change it yourself" — that one is "how to have AI change it"
Manage the plan visually, use case by use case
Where the drawer, tabs, and run controls live
This documentation is built and hosted on [Mintlify](https://mintlify.com), a developer documentation platform.
Deleting a test case permanently removes its run history too. If you might want the history later, consider deprioritizing the case instead of deleting it.
## Where to Go Next
This page is "how to change it yourself" — that one is "how to have AI change it"
Manage the plan visually, use case by use case
Where the drawer, tabs, and run controls live
This documentation is built and hosted on [Mintlify](https://mintlify.com), a developer documentation platform.