> ## Documentation Index
> Fetch the complete documentation index at: https://docs.testsprite.com/llms.txt
> Use this file to discover all available pages before exploring further.
# Environments
> Define where your application runs — URLs, credentials, and environment variables — and run the same test suite against dev, staging, or production without touching a single test.
 ## What an Environment Is
An **environment** describes one place your application runs. Every project has at least one, and each environment bundles everything that differs between deployments:
| Field | What it holds |
| :- | :- |
| **Name** | A label like `dev`, `staging`, or `production` |
| **Website URL** | The base URL tests run against |
| **Authentication** | The credentials tests authenticate with (backend projects: bearer token / API key / basic; frontend projects: test account login) |
| **Custom Variables** | Your own key–value pairs — the environment variables this page is about |
Your tests themselves stay environment-agnostic: they describe *what* to verify, and the environment supplies *where* and *with which values*. That separation is what lets one suite cover several deployments.
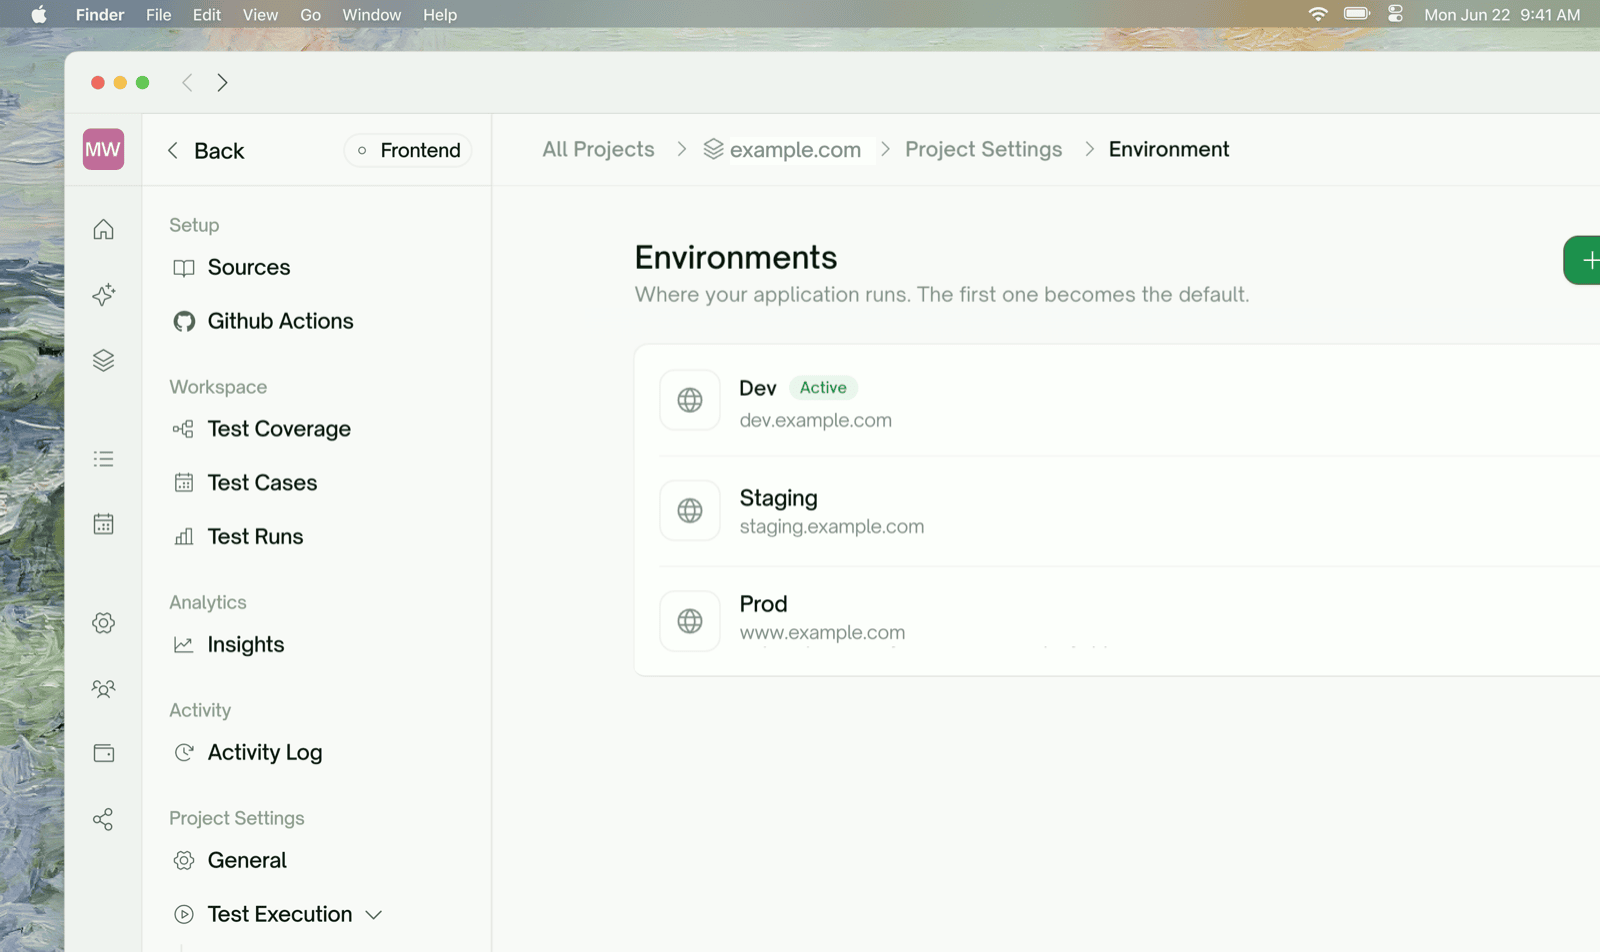
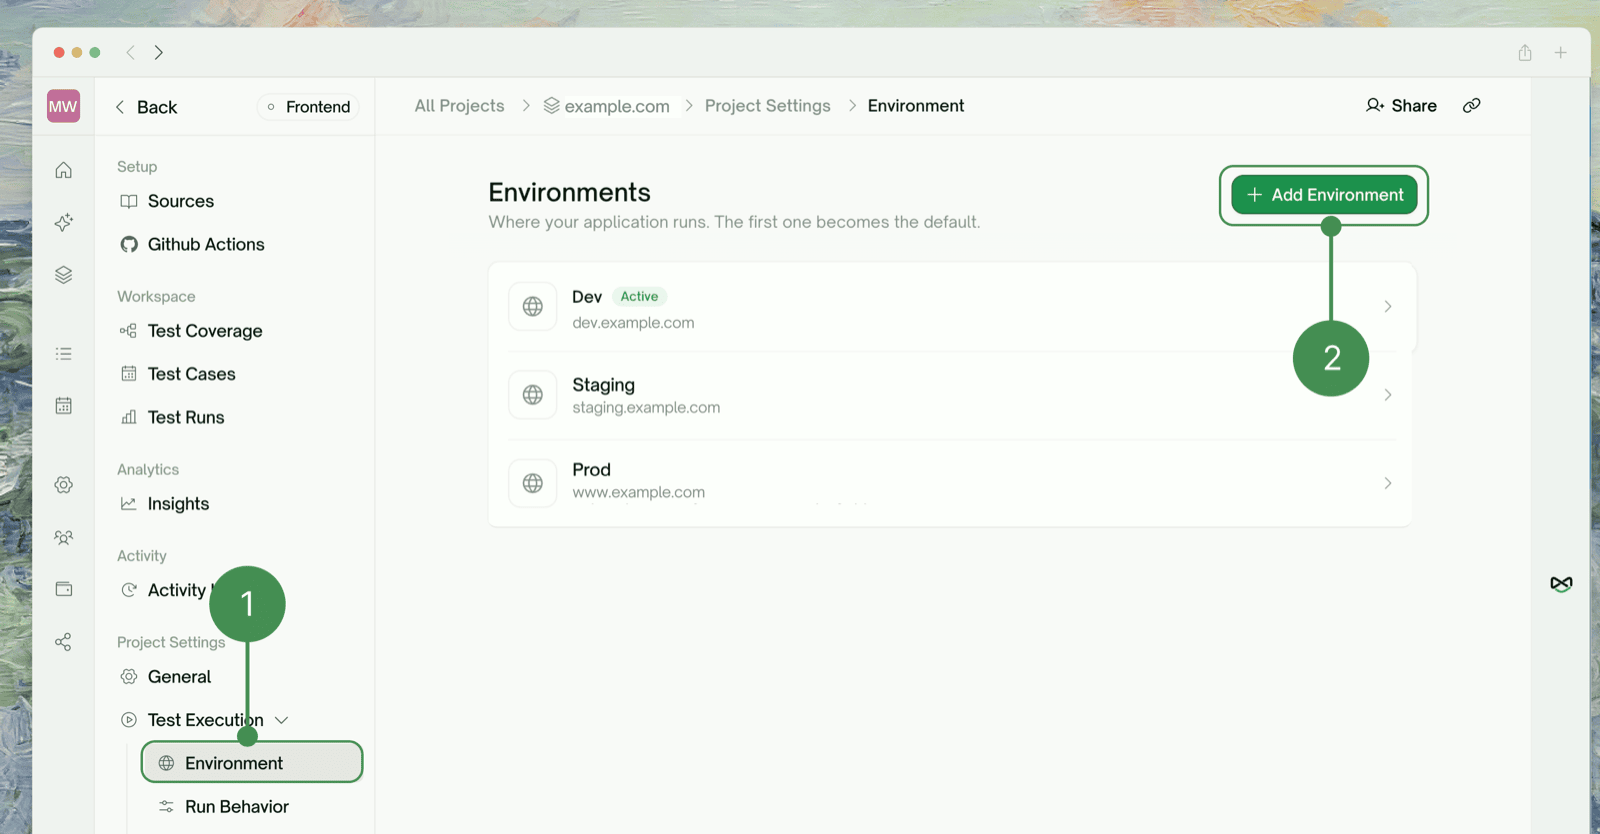
Environments live in **Project Settings → Test Execution → Environment**. Click any environment in the list to edit it.
## Creating an Environment
Click **Add Environment** in the top-right of the Environments page and fill in the deployment's details. A typical setup is one entry each for `dev`, `staging`, and `production`, with their own URLs, credentials, and variable values.
## What an Environment Is
An **environment** describes one place your application runs. Every project has at least one, and each environment bundles everything that differs between deployments:
| Field | What it holds |
| :- | :- |
| **Name** | A label like `dev`, `staging`, or `production` |
| **Website URL** | The base URL tests run against |
| **Authentication** | The credentials tests authenticate with (backend projects: bearer token / API key / basic; frontend projects: test account login) |
| **Custom Variables** | Your own key–value pairs — the environment variables this page is about |
Your tests themselves stay environment-agnostic: they describe *what* to verify, and the environment supplies *where* and *with which values*. That separation is what lets one suite cover several deployments.
Environments live in **Project Settings → Test Execution → Environment**. Click any environment in the list to edit it.
## Creating an Environment
Click **Add Environment** in the top-right of the Environments page and fill in the deployment's details. A typical setup is one entry each for `dev`, `staging`, and `production`, with their own URLs, credentials, and variable values.
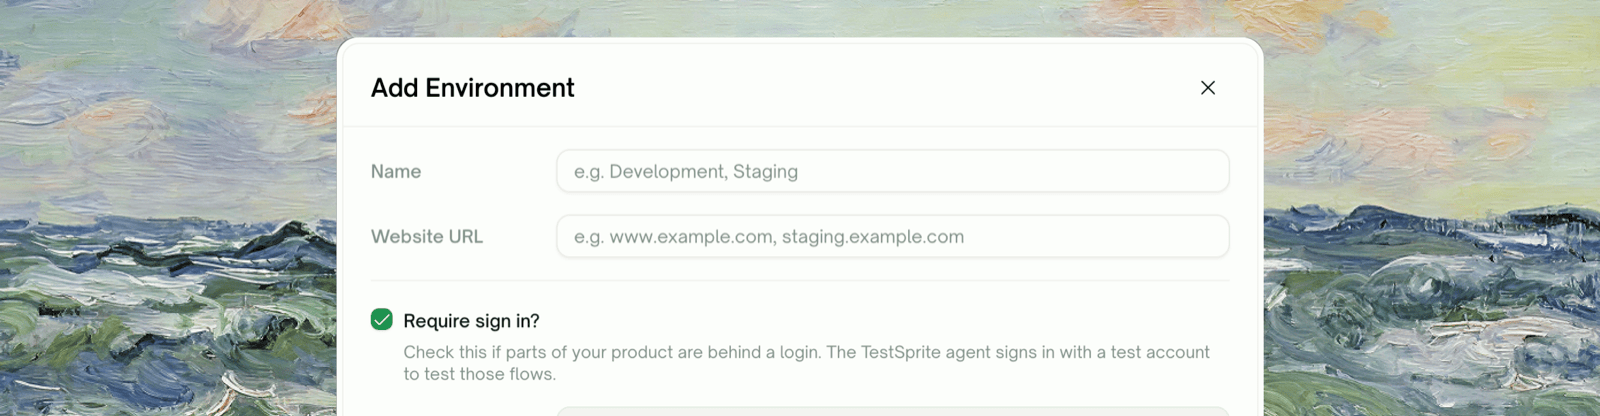 * **Authentication** picks how tests authenticate against this deployment: `None`, `Basic`, `Bearer Token`, or `API Key`. You can refine this per endpoint later (see below).
* **Auto-refresh Login** can be configured right away if the deployment's tokens expire — TestSprite then fetches a fresh token before every run. See [Auto-Auth](/web-portal/core/api/auto-auth).
* The first environment a project gets becomes the **Active** one automatically.
## Environment Variables (Custom Variables)
### Where they're defined
Open an environment and scroll to **Custom Variables**. Click **Add Variable** and enter a `KEY = value` pair. Variables are defined **per environment** — the same key can (and usually should) hold a different value in each environment:
```
# staging # production
TENANT_ID = acme-staging TENANT_ID = acme
SUPPORT_EMAIL = qa@acme.dev SUPPORT_EMAIL = support@acme.com
```
* **Authentication** picks how tests authenticate against this deployment: `None`, `Basic`, `Bearer Token`, or `API Key`. You can refine this per endpoint later (see below).
* **Auto-refresh Login** can be configured right away if the deployment's tokens expire — TestSprite then fetches a fresh token before every run. See [Auto-Auth](/web-portal/core/api/auto-auth).
* The first environment a project gets becomes the **Active** one automatically.
## Environment Variables (Custom Variables)
### Where they're defined
Open an environment and scroll to **Custom Variables**. Click **Add Variable** and enter a `KEY = value` pair. Variables are defined **per environment** — the same key can (and usually should) hold a different value in each environment:
```
# staging # production
TENANT_ID = acme-staging TENANT_ID = acme
SUPPORT_EMAIL = qa@acme.dev SUPPORT_EMAIL = support@acme.com
```
 ### How tests reference them
You don't paste variable values into test cases. When TestSprite generates test code, values that came from environment configuration are stamped as `VAR_{key}` placeholders — for example `VAR_{TENANT_ID}` — instead of literals. At run time, each placeholder is resolved from the **currently selected environment's** configuration right before the test executes.
Two things follow from this:
* **Switching environments never requires regenerating tests.** The stored code carries placeholders, not values; every run re-resolves them.
* **A variable referenced by a test must exist in every environment you run against**, or the placeholder has nothing to resolve to.
Environment variables are different from [Dynamic Variables](/web-portal/core/api/dynamic-variables). An environment variable is **static configuration you define** (a tenant ID, a support email). A dynamic variable is a **value captured at run time** from one test's response and fed into another (a freshly created `user_id`). If a value only exists after an API call, it's a dynamic variable, not configuration.
## Per-Endpoint Authentication and Headers (Backend)
A backend environment additionally carries the **Customize Header** panel — the same tool you used when reviewing the API doc. It configures authentication and extra request headers **per endpoint**, because real APIs are rarely uniform: most endpoints share one bearer token, a login route is public, an admin group needs a different key, and multi-tenant APIs want an `x-org-id` on every call.
### How tests reference them
You don't paste variable values into test cases. When TestSprite generates test code, values that came from environment configuration are stamped as `VAR_{key}` placeholders — for example `VAR_{TENANT_ID}` — instead of literals. At run time, each placeholder is resolved from the **currently selected environment's** configuration right before the test executes.
Two things follow from this:
* **Switching environments never requires regenerating tests.** The stored code carries placeholders, not values; every run re-resolves them.
* **A variable referenced by a test must exist in every environment you run against**, or the placeholder has nothing to resolve to.
Environment variables are different from [Dynamic Variables](/web-portal/core/api/dynamic-variables). An environment variable is **static configuration you define** (a tenant ID, a support email). A dynamic variable is a **value captured at run time** from one test's response and fed into another (a freshly created `user_id`). If a value only exists after an API call, it's a dynamic variable, not configuration.
## Per-Endpoint Authentication and Headers (Backend)
A backend environment additionally carries the **Customize Header** panel — the same tool you used when reviewing the API doc. It configures authentication and extra request headers **per endpoint**, because real APIs are rarely uniform: most endpoints share one bearer token, a login route is public, an admin group needs a different key, and multi-tenant APIs want an `x-org-id` on every call.
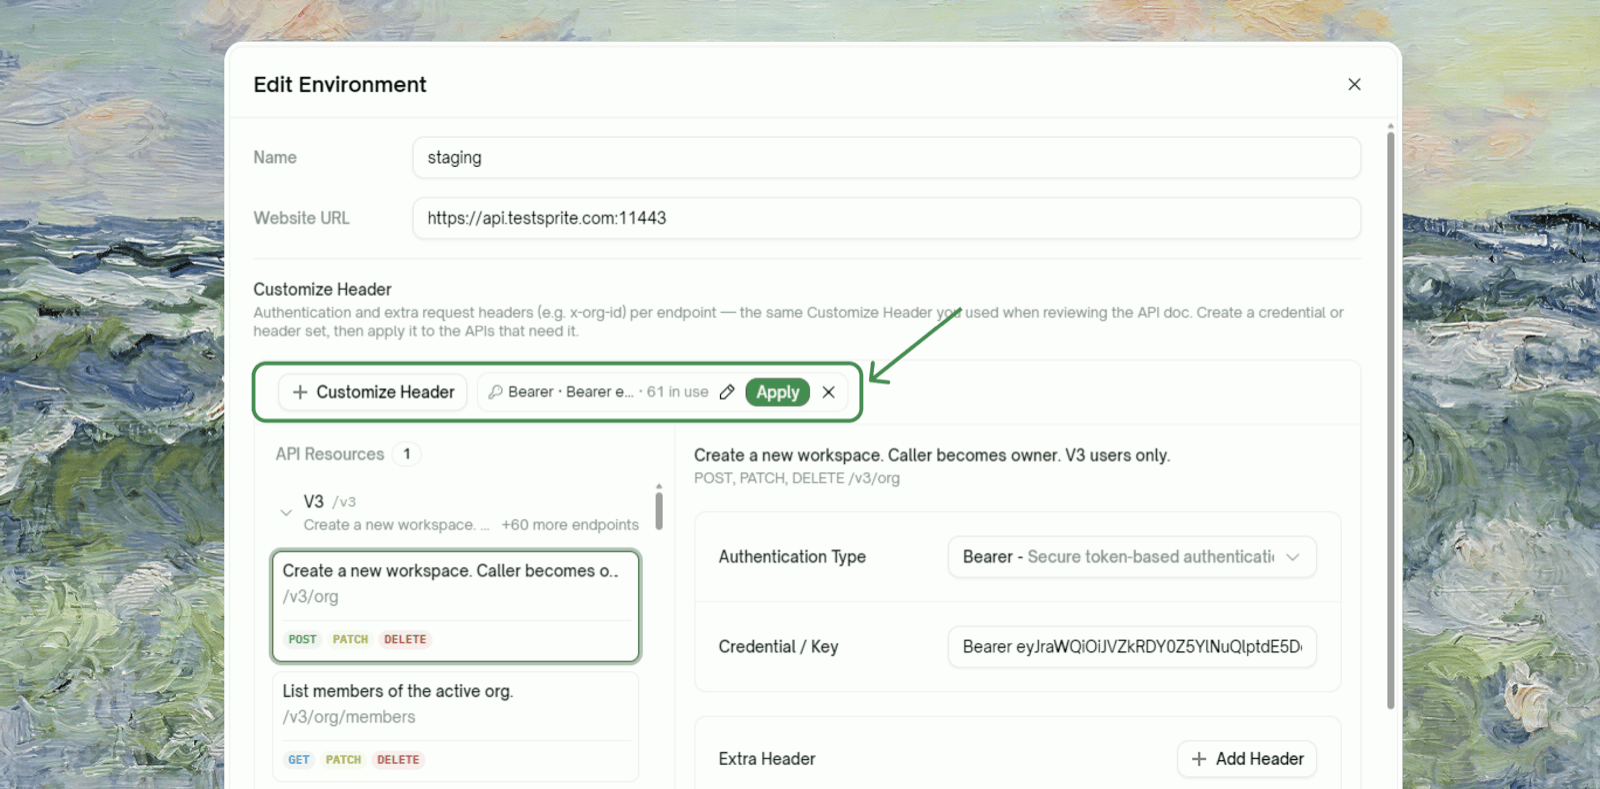 Create a credential or header set once, then apply it to the endpoints that need it:
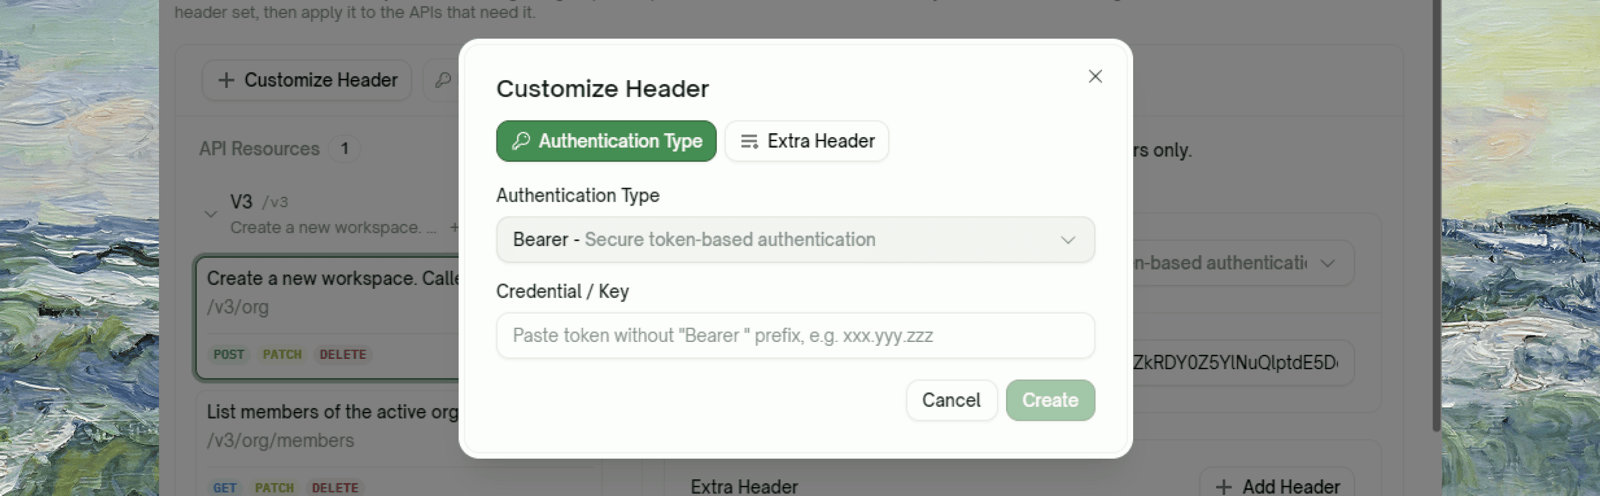
A credential set: `Bearer` / `API Key` / `Basic` plus the credential value. Apply it to every endpoint that authenticates this way — endpoints left without one fall back to the environment-level authentication chosen at creation.
Create a credential or header set once, then apply it to the endpoints that need it:
A credential set: `Bearer` / `API Key` / `Basic` plus the credential value. Apply it to every endpoint that authenticates this way — endpoints left without one fall back to the environment-level authentication chosen at creation.
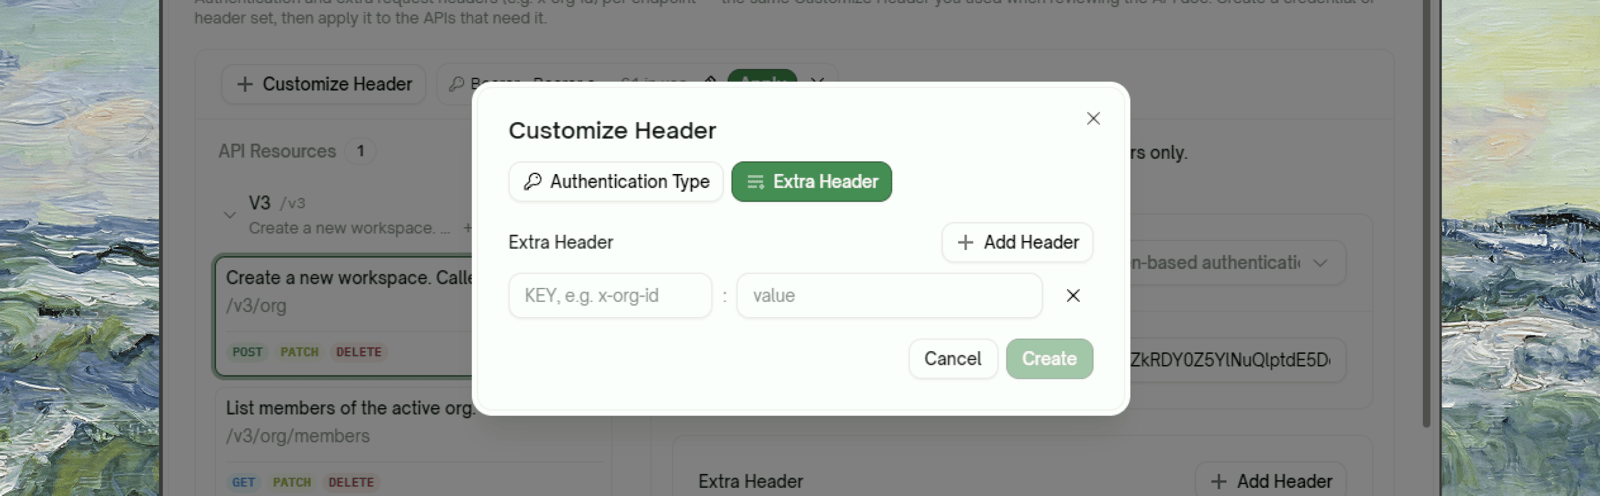
 Plain request headers (e.g. `x-org-id`) sent alongside the credential on the endpoints you apply them to. Different header sets can stack on the same endpoint.
 Each chip in the strip shows how many endpoints currently carry it (`61 in use`); **Apply** opens an endpoint picker, and selecting an endpoint in the list shows exactly which credential and headers its tests will send.
## Managing Multiple Environments
* **One environment is always Active** (marked with a badge in the list). Runs you trigger from the portal execute against the Active environment.
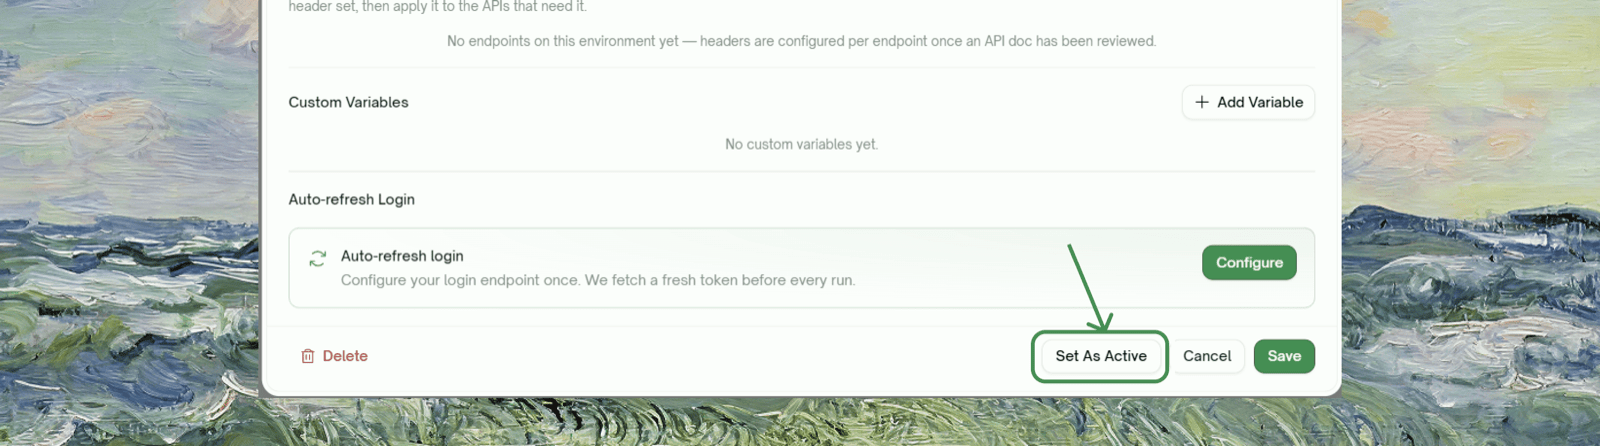
* Open an environment and click **Set As Active** to switch.
* Every project keeps at least one environment — the last one can't be deleted.
* Deleting an environment doesn't affect existing tests; they simply resolve against whichever environment is Active when they next run.
Point non-production environments at real deployments you own, and be deliberate before making `production` the Active environment: API tests send real requests, and tests that create or delete records will do so against whatever the Active environment points at.
## Running the Same Suite Against Different Environments
Because tests are stored with placeholders, "run against staging instead" is a configuration change, not a test change:
Set the target environment as **Active**, then trigger the run. Every URL, credential, and `VAR_{key}` resolves from that environment.
Each chip in the strip shows how many endpoints currently carry it (`61 in use`); **Apply** opens an endpoint picker, and selecting an endpoint in the list shows exactly which credential and headers its tests will send.
## Managing Multiple Environments
* **One environment is always Active** (marked with a badge in the list). Runs you trigger from the portal execute against the Active environment.
* Open an environment and click **Set As Active** to switch.
* Every project keeps at least one environment — the last one can't be deleted.
* Deleting an environment doesn't affect existing tests; they simply resolve against whichever environment is Active when they next run.
Point non-production environments at real deployments you own, and be deliberate before making `production` the Active environment: API tests send real requests, and tests that create or delete records will do so against whatever the Active environment points at.
## Running the Same Suite Against Different Environments
Because tests are stored with placeholders, "run against staging instead" is a configuration change, not a test change:
Set the target environment as **Active**, then trigger the run. Every URL, credential, and `VAR_{key}` resolves from that environment.
 A [Test List](/web-portal/maintenance/test-lists) can pin an environment **per project** it contains, and a schedule runs its test list with those pins — so your nightly can run against staging while your Active environment stays on dev, with neither interfering with the other.
## What Belongs Where
Not every value that varies should be a custom variable. The rule of thumb: **identity and secrets go in the authentication configuration; everything else that varies per deployment goes in variables or the URL field.**
| Value | Put it in | Why |
| :- | :- | :- |
| Base URL / domain | The environment's **Website URL** field | It's what every request is joined onto |
| Tenant ID, org ID, region, feature toggles | **Custom Variables** | Plain configuration — safe to display, resolved into tests as `VAR_{key}` |
| Tokens, API keys, passwords | **Customize Header → Authentication Type** (or [Auto-Auth](/web-portal/core/api/auto-auth)) | Credentials are stored and injected through a dedicated path: masked in the UI, redacted from exported code, and rotatable in one place without touching variables |
| A tenant header every request must carry (e.g. `x-org-id`) | **Customize Header → Extra Header** | Headers ride alongside the credential on every request — a variable can't attach itself to a request on its own |
Putting a token in a custom variable technically works, but you lose masking, export redaction, and one-click rotation — and anyone skimming the environment dialog can read it. Keep secrets in the authentication configuration.
## Related
Fetch a fresh token before every run instead of pasting expiring credentials
Runtime values that flow between tests — the counterpart to static environment variables
Curated suites with per-project environment pins for schedules
This documentation is built and hosted on [Mintlify](https://mintlify.com), a developer documentation platform.
A [Test List](/web-portal/maintenance/test-lists) can pin an environment **per project** it contains, and a schedule runs its test list with those pins — so your nightly can run against staging while your Active environment stays on dev, with neither interfering with the other.
## What Belongs Where
Not every value that varies should be a custom variable. The rule of thumb: **identity and secrets go in the authentication configuration; everything else that varies per deployment goes in variables or the URL field.**
| Value | Put it in | Why |
| :- | :- | :- |
| Base URL / domain | The environment's **Website URL** field | It's what every request is joined onto |
| Tenant ID, org ID, region, feature toggles | **Custom Variables** | Plain configuration — safe to display, resolved into tests as `VAR_{key}` |
| Tokens, API keys, passwords | **Customize Header → Authentication Type** (or [Auto-Auth](/web-portal/core/api/auto-auth)) | Credentials are stored and injected through a dedicated path: masked in the UI, redacted from exported code, and rotatable in one place without touching variables |
| A tenant header every request must carry (e.g. `x-org-id`) | **Customize Header → Extra Header** | Headers ride alongside the credential on every request — a variable can't attach itself to a request on its own |
Putting a token in a custom variable technically works, but you lose masking, export redaction, and one-click rotation — and anyone skimming the environment dialog can read it. Keep secrets in the authentication configuration.
## Related
Fetch a fresh token before every run instead of pasting expiring credentials
Runtime values that flow between tests — the counterpart to static environment variables
Curated suites with per-project environment pins for schedules
This documentation is built and hosted on [Mintlify](https://mintlify.com), a developer documentation platform.