Edit, refine, add, and delete test cases: change a test yourself or have TestSprite’s testing agent change it, batch-edit the plan, or regenerate it from your sources.
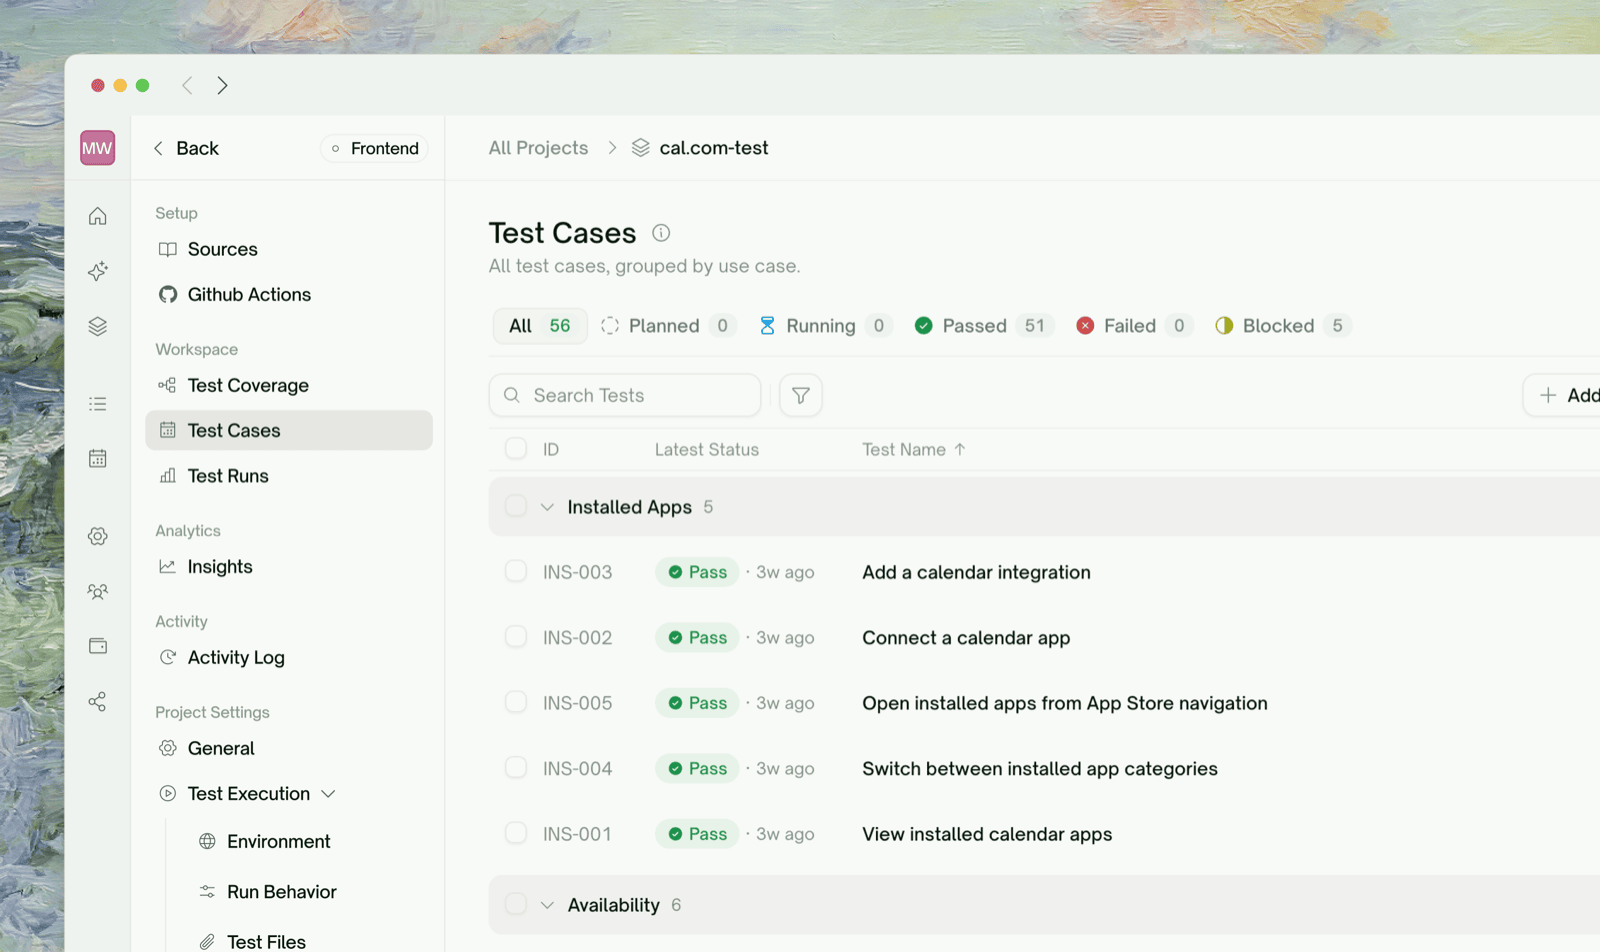
The Test Cases page lists every test in the project, grouped by use case. You can change a test yourself or have TestSprite’s testing agent change it for you. Edits only count once the test re-runs, so saving a single case is Save & Run.
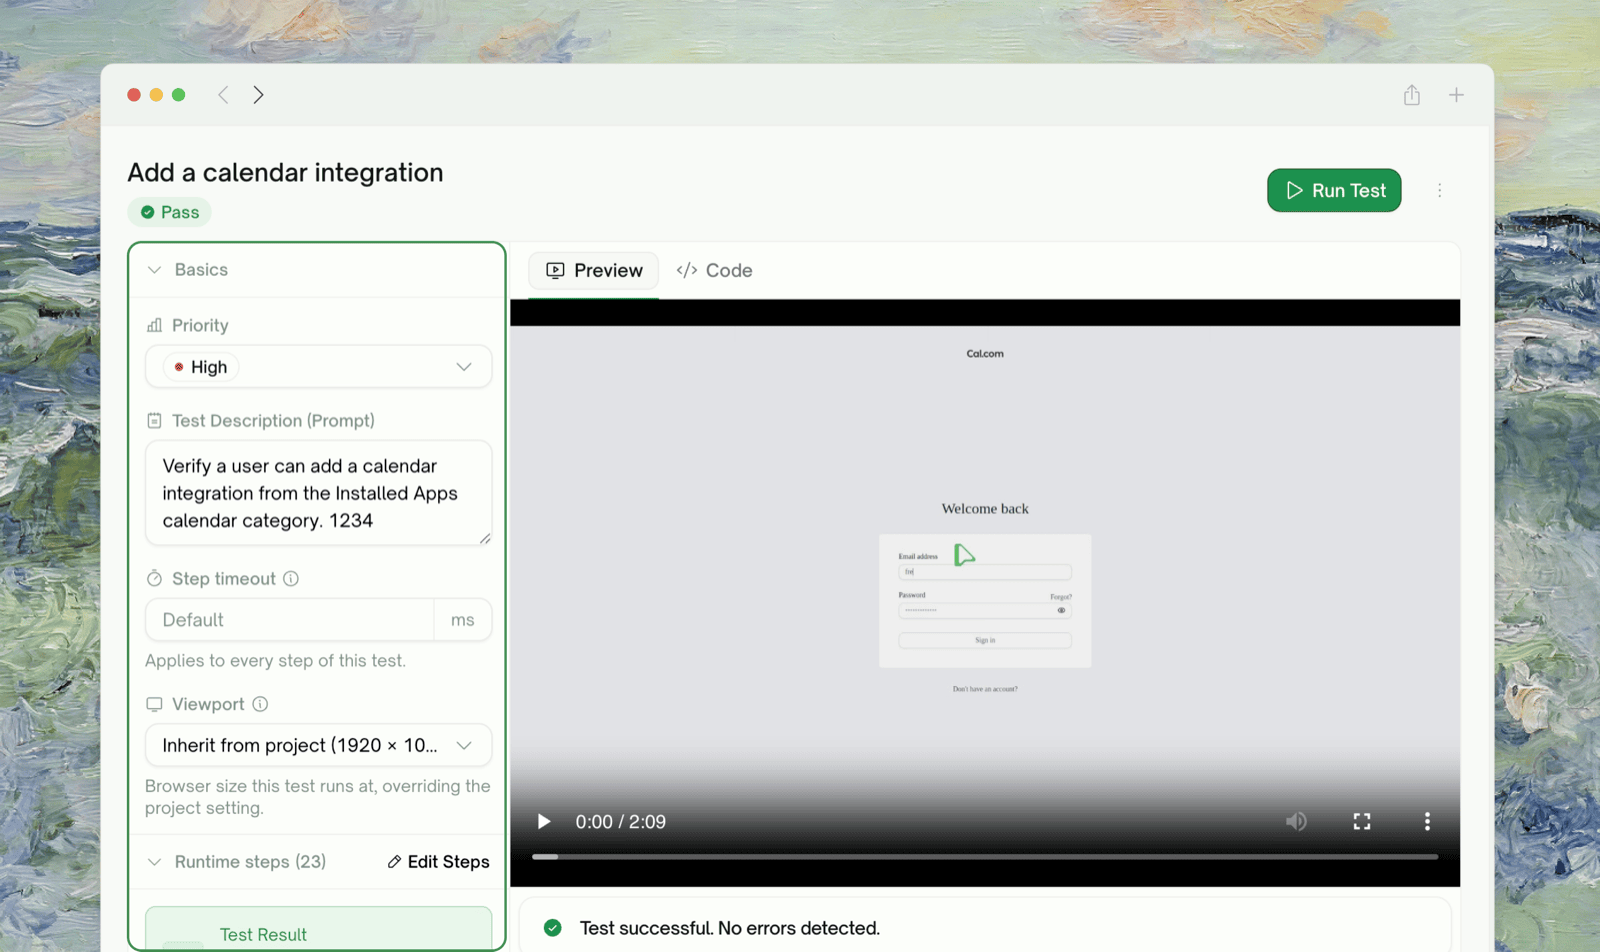
Click any row to open the test case as a drawer over the list, expandable to a full page. What you can change, and where:
What
Where
Priority
The Basics section: High / Medium / Low
Test Description (Prompt)
The Basics section: the natural-language statement of what the test verifies, which the run is judged against
Steps
The Edit steps modal (see below)
Code
The Code tab
Editing the description is the most common refinement. Rewrite what the test should verify, click Save & Run, and TestSprite updates the steps to match and re-runs that test. Be specific:
Before
Verify user can log in with valid credentials.
After
Verify the Sign In link directs users to the login page, thatsubmitting email "test@example.com" + password "test123" lands themon the dashboard, and that the navbar avatar shows after login.
For API tests, Save & Run replays the existing stored code. Click Regenerate under the prompt instead whenever your edit changes what the code must do; it rewrites the code from your edited prompt, then runs.Refine one or two tests at a time, re-run, and confirm before moving on; it’s much easier to debug than editing twenty at once.
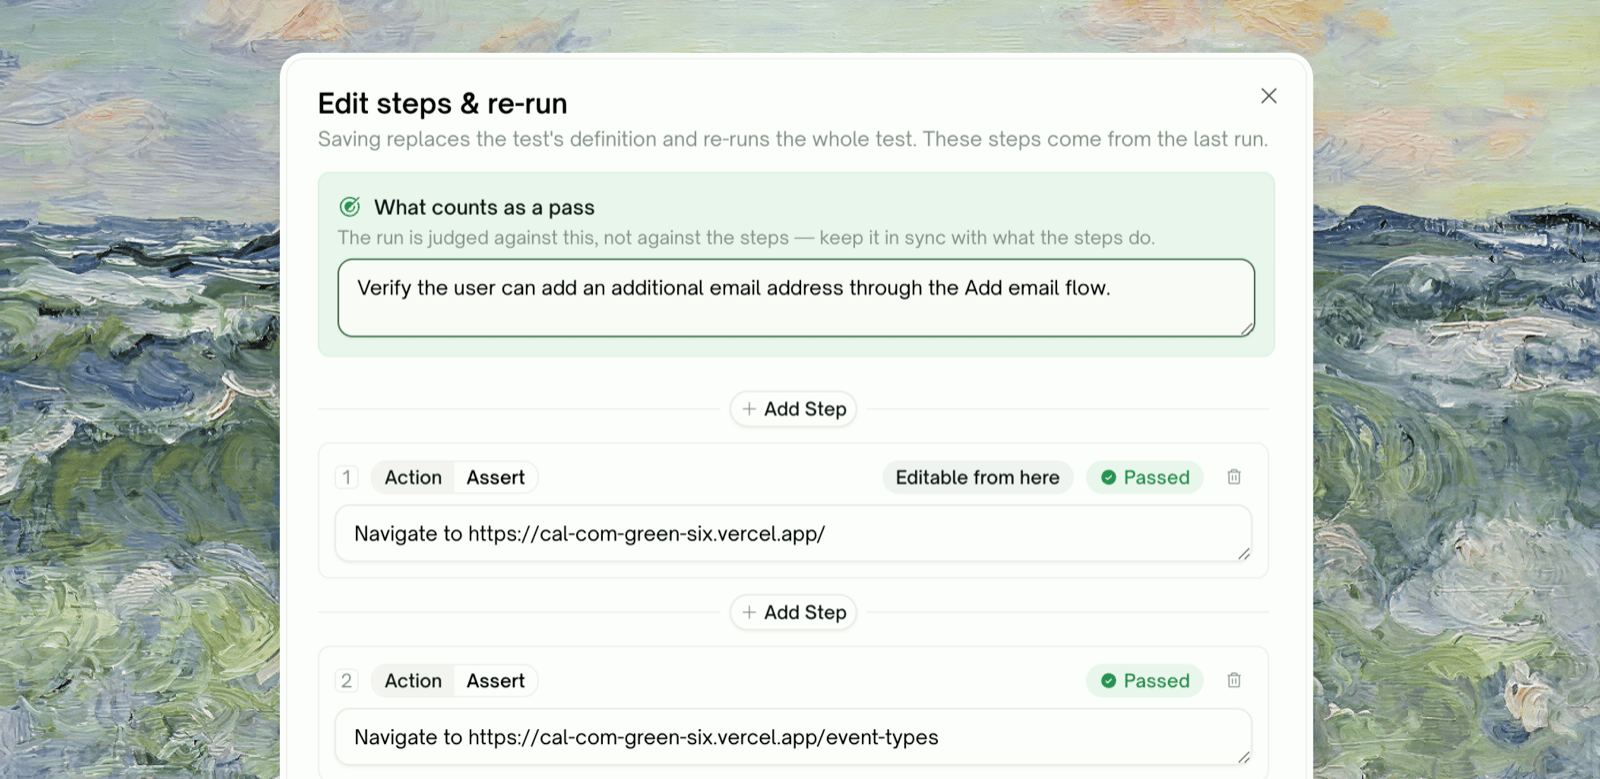
The Edit steps modal lets you rewrite the flow from any step onward. Steps before the one you picked stay locked (they still run, just aren’t editable); everything after is free text. Add, remove, or rewrite steps, each typed as an action or an assertion, and adjust the pass criterion in the same modal. Saving starts a run with the new steps immediately. For UI tests, edited steps run directly, with no code-generation step in between. See Edit & Rerun for the other ways to re-run.For UI tests, Auto-Heal also absorbs UI drift on reruns, so a moved button doesn’t need an edit.
When you don’t know why a test failed, open Chats beside the test and ask, for example “Why did this fail?”, “What is this test checking?”, or “How do I fix this?”. The assistant answers from the test’s steps, the run’s recording, and the failure trace, and any change it proposes arrives as a card you approve first (see Approving Actions). It doesn’t see your application source code or PRD by default.
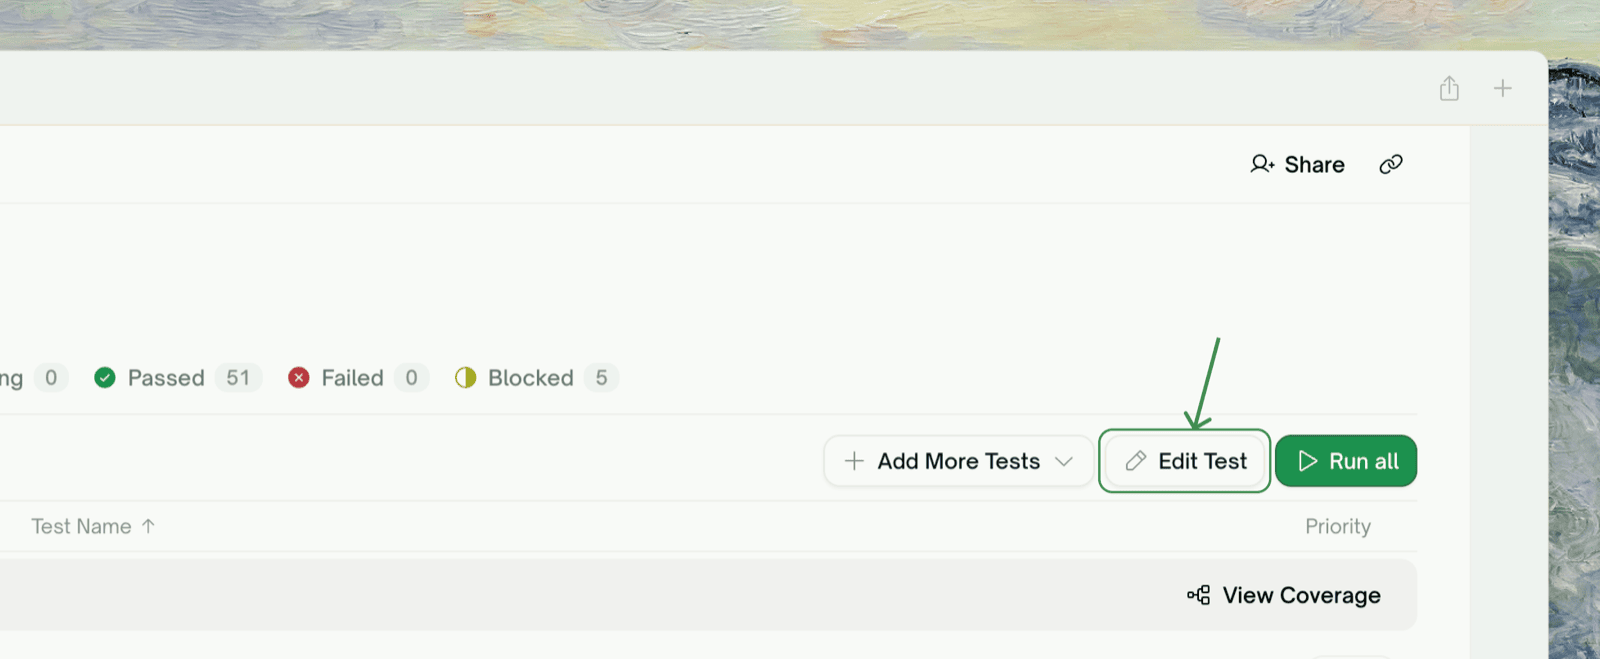
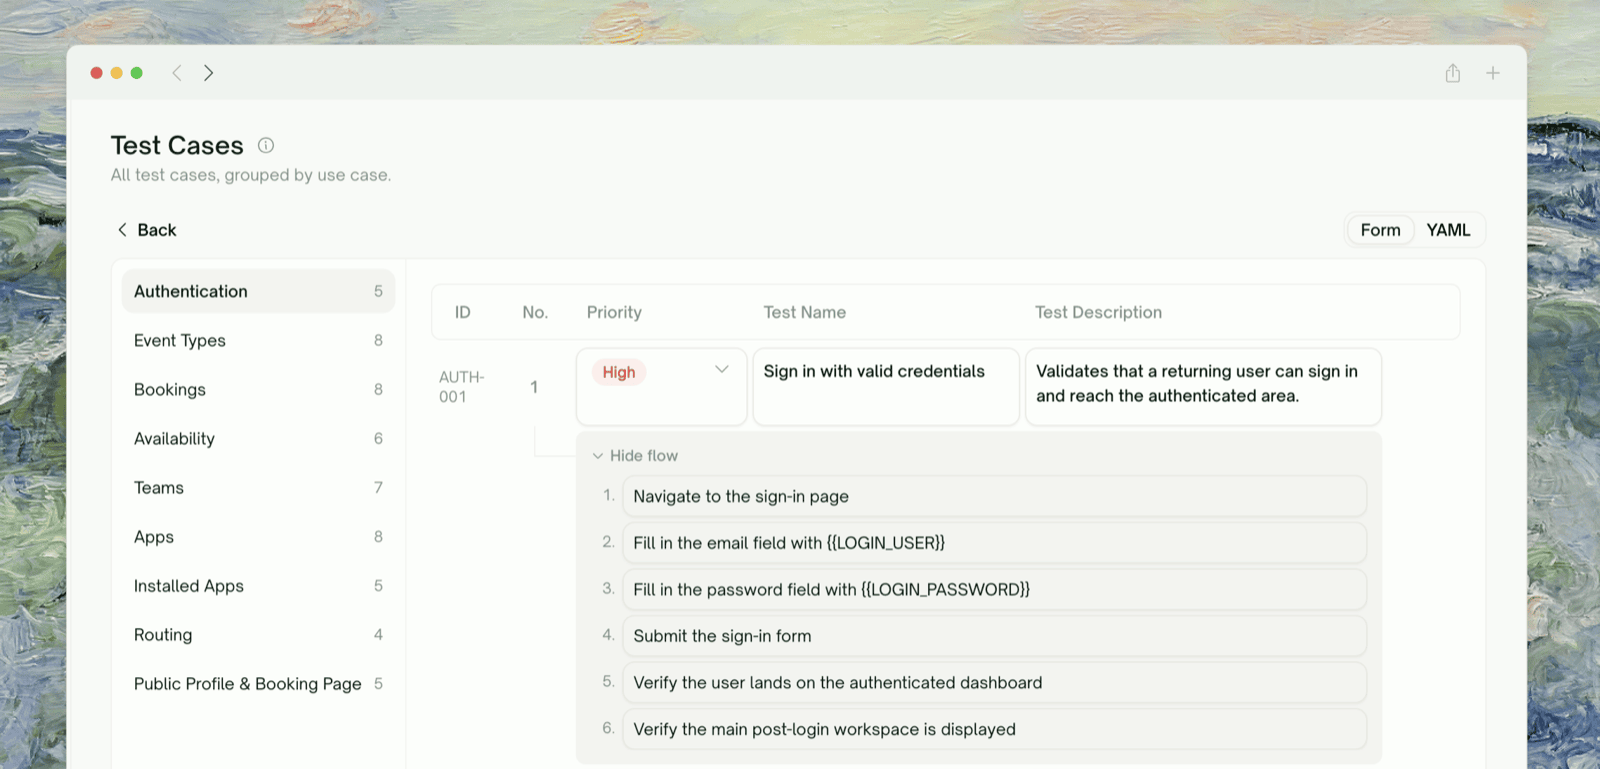
Click Edit Test on the toolbar to open the batch editor: every test case in the plan on one screen, with a use-case nav on the left. It has two modes:
Form mode
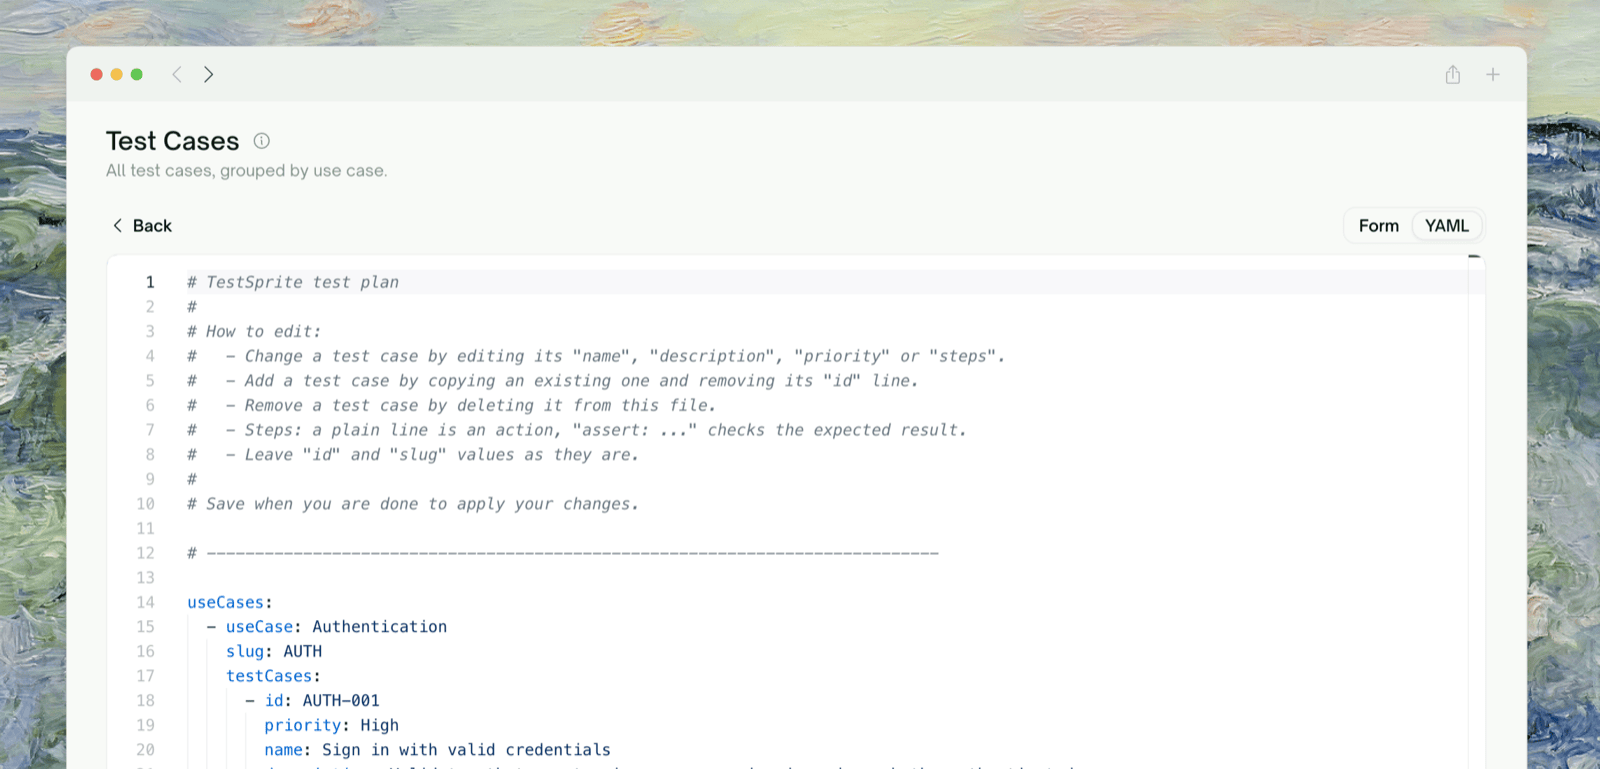
YAML mode
Every case as a row with test name, priority, description, and each flow step editable in place. Best for touching a handful of cases in context.Save writes only the rows you changed and reports per case if any row fails, so a partial save never silently loses the rest.
The whole plan as one YAML document. Best for sweeping edits: renumbering steps across many cases, find-and-replace on a URL, or pasting cases between projects.
useCases:
  - useCase: Authentication
    slug: authentication
    testCases:
      - id: TC001
        priority: High
        name: Login with valid credentials
        description: Verify that submitting valid credentials lands the
          user on the dashboard.
        steps:
          - Navigate to the login page
          - Enter "user@example.com" and the test password
          - Click the Sign In button
          - assert: The dashboard page is displayed
The rules (also in the editor’s header comment):
A plain step line is an action; assert: ... marks an assertion.
Add a case by copying an existing one and removing its id line.
Remove a case by deleting its block.
Leave id and slug values as they are; they map your edits back to existing cases.
Switching modes discards unsaved edits in the mode you’re leaving; the editor warns you first.
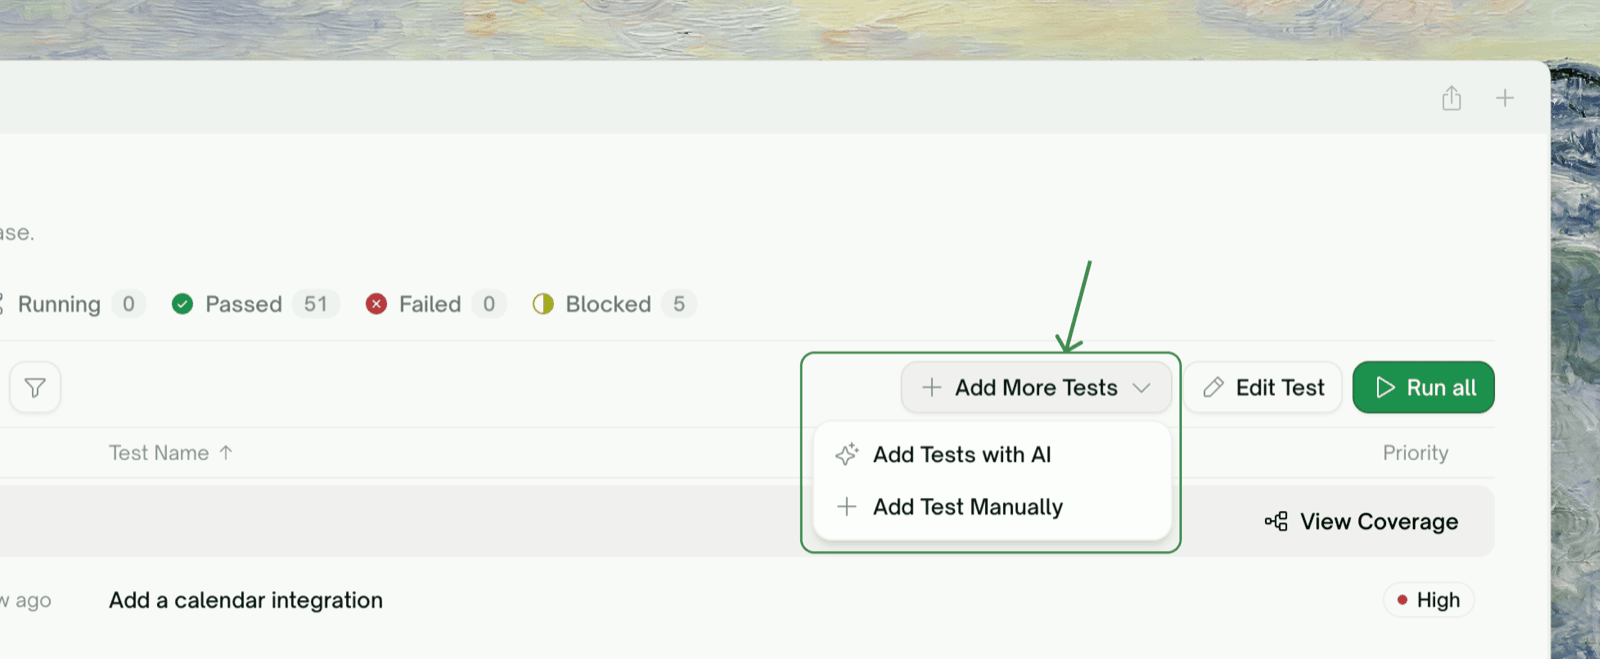
The Add More Tests dropdown on the toolbar has both paths:
Add Tests with AI: describe what you want covered (optionally scoped to one use case), and TestSprite’s testing agent proposes a batch. Before anything is created, you can edit each proposal’s title, description, priority, and steps, untick the ones you don’t want, or hand-add rows.
Add Test Manually: a form with use case, title, priority, description, and a step list (action or assertion per step).
You can also add from the Coverage Map, per use case or with the per-feature ✨ AI shortcut.
When your app has changed so much that the plan is more outdated than fixable (a major redesign, or a new API contract across many endpoints), rebuild it. Open Test Coverage, click Regenerate from sources, and confirm. TestSprite’s testing agent discards the current use cases and extracts a new set from the project’s sources, in the same project. Then plan tests from the new use cases and run them as usual.
Regenerating can’t be undone: all existing use cases and their generated test cases are removed. To keep the old suite alongside the new one, create a new project instead.
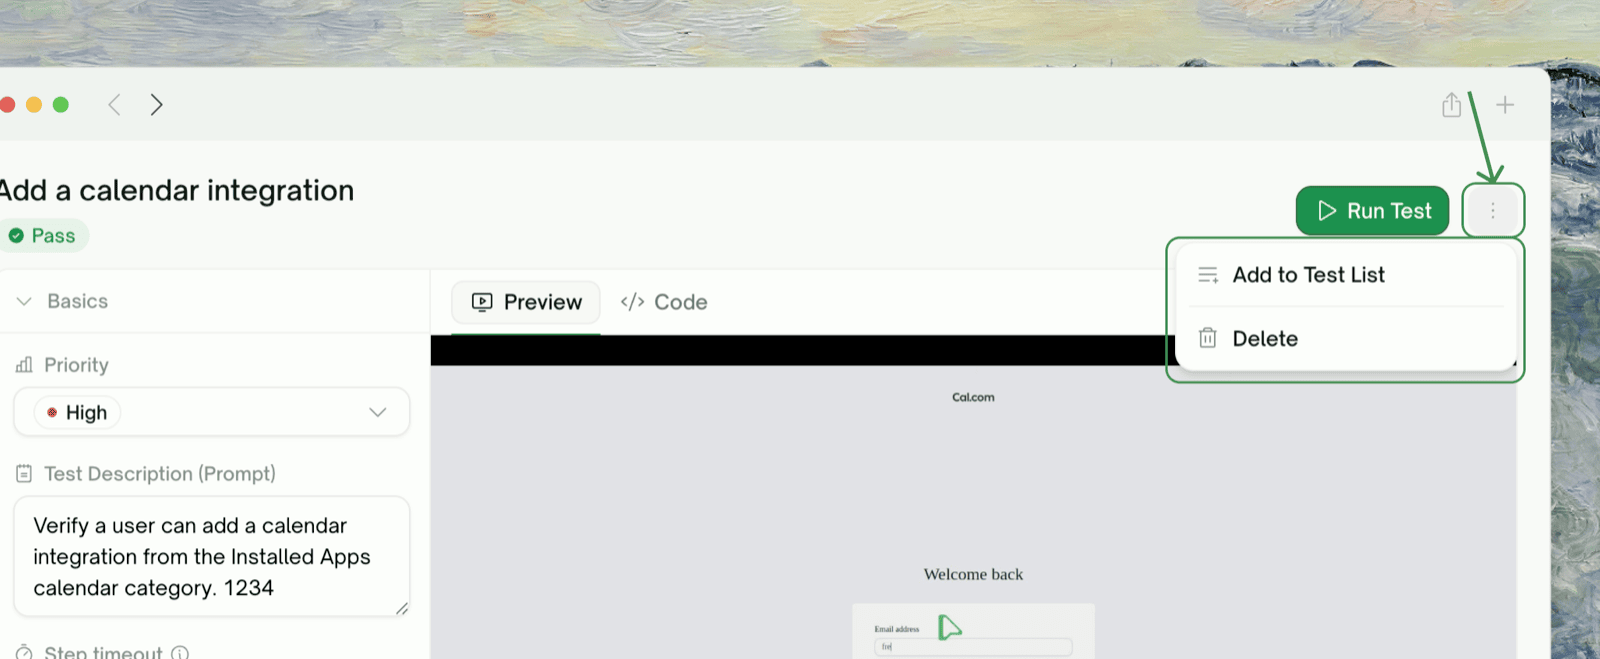
One case: the trash icon in its drawer, or the row’s context menu. A case that has never run is labeled “Remove from plan”; one with run history warns you the history goes with it.
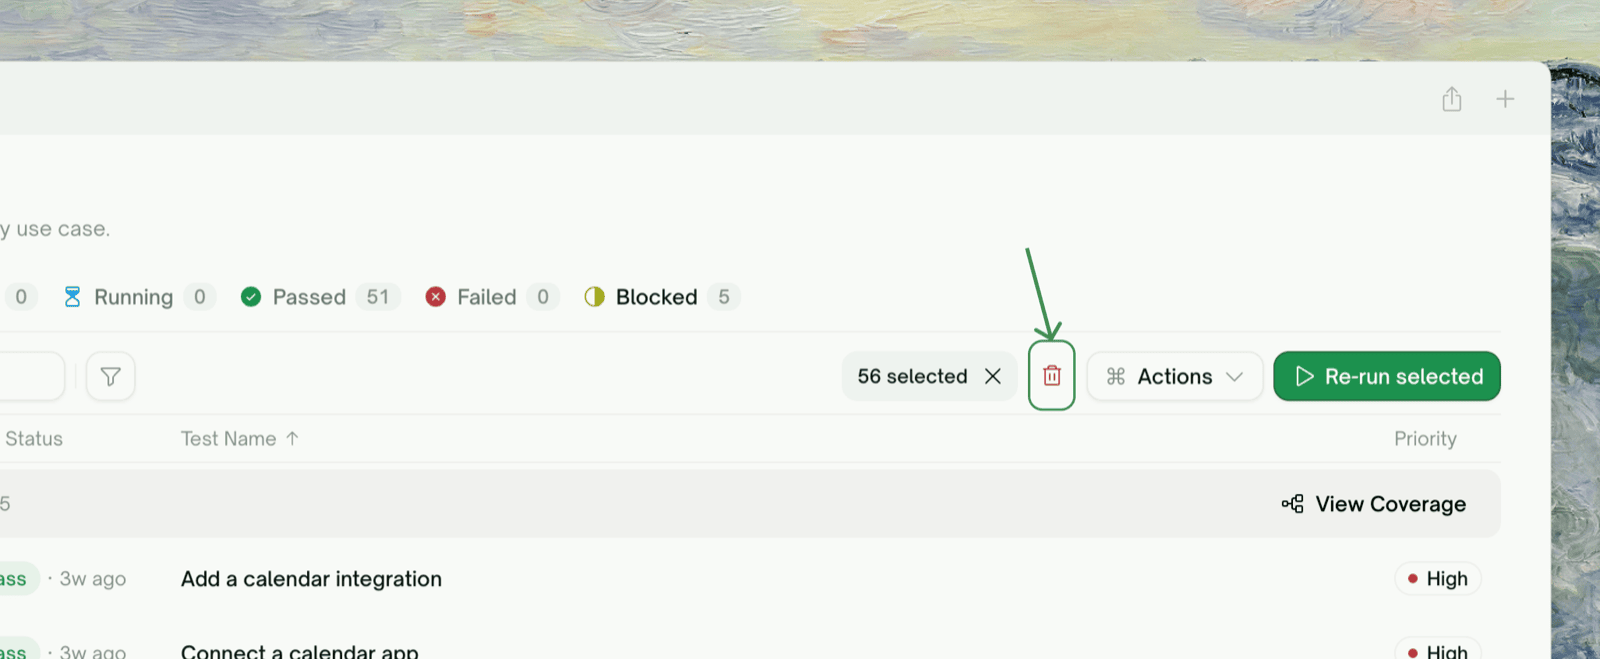
Many cases: select rows and use the trash button in the toolbar.
Deleting a test case permanently removes its run history too. If you might want the history later, deprioritize the case instead.
{"docsConfig":{"theme":"mint","$schema":"https://mintlify.com/docs.json","name":"TestSprite Documentation","colors":{"primary":"#54B365","light":"#54B365","dark":"#54B365"},"logo":{"light":"https://mintcdn.com/testspriteinc/-Pguo2A-jFFq2l4c/logo/light-mode.svg?fit=max\u0026auto=format\u0026n=-Pguo2A-jFFq2l4c\u0026q=85\u0026s=ae3fa561b9ee31984d80d787a7fa166e","dark":"https://mintcdn.com/testspriteinc/-Pguo2A-jFFq2l4c/logo/dark-mode.svg?fit=max\u0026auto=format\u0026n=-Pguo2A-jFFq2l4c\u0026q=85\u0026s=b8554ece60a00f55f9ce274355c66df8"},"favicon":{"light":"https://mintcdn.com/testspriteinc/3tFsKENc_ol65zBe/favicon-light.svg?fit=max\u0026auto=format\u0026n=3tFsKENc_ol65zBe\u0026q=85\u0026s=f9f0ae65cbbf1b93530a042cda417060","dark":"https://mintcdn.com/testspriteinc/3tFsKENc_ol65zBe/favicon.svg?fit=max\u0026auto=format\u0026n=3tFsKENc_ol65zBe\u0026q=85\u0026s=e8840d7f1d55131c5e93a60d9ef34334"},"appearance":{"default":"system","strict":false},"background":{"color":{"light":"#F9FCF9","dark":"#181818"}},"navbar":{"primary":{"type":"button","label":"Sign In","href":"https://www.testsprite.com/auth/cognito/sign-in"}},"footer":{"socials":{"x":"https://x.com/Test_Sprite","github":"https://github.com/TestSprite/Docs","linkedin":"https://linkedin.com/company/testsprite","discord":"https://discord.gg/QQB9tJ973e"}},"fonts":{"heading":{"family":"IBM Plex Mono"},"body":{"family":"OpenSauceTwo","weight":400,"source":"https://testsprite-website-font.s3.us-east-1.amazonaws.com/fonts/OpenSauceTwoVF.woff2","format":"woff2"}},"contextual":{"options":["copy"],"display":"header"},"styling":{"latex":false},"navigation":{"global":{"anchors":[{"anchor":"Website","icon":"globe","href":"https://www.testsprite.com/"},{"anchor":"Community","icon":"comments","href":"https://discord.gg/QQB9tJ973e"},{"anchor":"Contact Us","icon":"address-book","href":"https://calendly.com/contact-hmul/schedule"}]},"pages":[]}},"deployment":{"deploymentMetadataValue":{"subdomain":"testspriteinc","hasAudioNarration":false,"actualSubdomain":"testspriteinc","customDomains":["docs.testsprite.com"],"gitSource":{"type":"github","owner":"testsprite","repo":"docs","deployBranch":"v1.0","contentDirectory":"","isPrivate":false,"mountPath":"","label":""},"chroma":{"liveDeploymentHistoryId":"6adbed1f17b7e6fbc7daa94b","collectionId":"b26d7474-8ad4-45dc-9958-a9871991adeb","schemaVersion":"v3","latestBuiltDeploymentHistoryId":"6adbed1f17b7e6fbc7daa94b"},"feedback":{"thumbs":true,"edits":true,"issues":true},"entitlements":{},"buildId":"6adbed1f17b7e6fbc7daa94b","clientVersion":"0.0.3966","searchFilterCounts":[{"language":"default","tag":"Core","count":62},{"language":"default","tag":"Web Portal","count":44},{"language":"default","tag":"MCP Server","count":25},{"language":"default","tag":"CLI","count":23},{"language":"default","tag":"Getting Started","count":16},{"language":"default","tag":"API Testing","count":11},{"language":"default","tag":"UI Testing","count":10},{"language":"default","tag":"Automation \u0026 Integrations","count":8},{"language":"default","tag":"Concepts","count":7},{"language":"default","tag":"Tests","count":7}]},"assistantConfig":{},"hasChatPermissions":false,"hasWebMcpPermissions":false,"toggles":[{"name":"kill-isr","enabled":true,"variant":{"name":"disabled","enabled":false,"feature_enabled":true},"impressionData":false},{"name":"agent-mintlify-slack","enabled":true,"variant":{"name":"disabled","enabled":false,"feature_enabled":true},"impressionData":false},{"name":"editor-v7-file-tree","enabled":true,"variant":{"name":"disabled","enabled":false,"feature_enabled":true},"impressionData":false},{"name":"agent-integrations-settings","enabled":true,"variant":{"name":"disabled","enabled":false,"feature_enabled":true},"impressionData":false},{"name":"automations-pr-grouping","enabled":true,"variant":{"name":"disabled","enabled":false,"feature_enabled":true},"impressionData":false},{"name":"custom-prefix","enabled":true,"variant":{"name":"disabled","enabled":false,"feature_enabled":true},"impressionData":false},{"name":"analytics-v7","enabled":true,"variant":{"name":"disabled","enabled":false,"feature_enabled":true},"impressionData":false},{"name":"user-flows-analytics","enabled":true,"variant":{"name":"disabled","enabled":false,"feature_enabled":true},"impressionData":false},{"name":"no-publish-flow","enabled":true,"variant":{"name":"disabled","enabled":false,"feature_enabled":true},"impressionData":false},{"name":"workos-onboarding","enabled":true,"variant":{"name":"disabled","enabled":false,"feature_enabled":true},"impressionData":false},{"name":"llms-txt-v2","enabled":true,"variant":{"name":"disabled","enabled":false,"feature_enabled":true},"impressionData":false},{"name":"pause-universal-search-reconcile","enabled":true,"variant":{"name":"disabled","enabled":false,"feature_enabled":true},"impressionData":false},{"name":"snapshot-serving-live","enabled":true,"variant":{"name":"disabled","enabled":false,"feature_enabled":true},"impressionData":false},{"name":"stripTemperatureMiddleware","enabled":true,"variant":{"name":"disabled","enabled":false,"feature_enabled":true},"impressionData":false},{"name":"per-site-search-delta","enabled":true,"variant":{"name":"disabled","enabled":false,"feature_enabled":true},"impressionData":false},{"name":"support-platform-pylon-zendesk","enabled":true,"variant":{"name":"disabled","enabled":false,"feature_enabled":true},"impressionData":false},{"name":"snapshot-serving","enabled":true,"variant":{"name":"disabled","enabled":false,"feature_enabled":true},"impressionData":false},{"name":"instant-rollback","enabled":true,"variant":{"name":"disabled","enabled":false,"feature_enabled":true},"impressionData":false},{"name":"granular-notifications-server","enabled":true,"variant":{"name":"disabled","enabled":false,"feature_enabled":true},"impressionData":false},{"name":"granular-notifications","enabled":true,"variant":{"name":"disabled","enabled":false,"feature_enabled":true},"impressionData":false},{"name":"editor-private-page-search","enabled":true,"variant":{"name":"disabled","enabled":false,"feature_enabled":true},"impressionData":false},{"name":"automations-fable","enabled":true,"variant":{"name":"disabled","enabled":false,"feature_enabled":true},"impressionData":false},{"name":"fixed-ai-action-pricing","enabled":true,"variant":{"name":"disabled","enabled":false,"feature_enabled":true},"impressionData":false},{"name":"automation-resolve-merge-conflict","enabled":true,"variant":{"name":"disabled","enabled":false,"feature_enabled":true},"impressionData":false},{"name":"scoped-publishing","enabled":true,"variant":{"name":"disabled","enabled":false,"feature_enabled":true},"impressionData":false},{"name":"mintql","enabled":true,"variant":{"name":"disabled","enabled":false,"feature_enabled":true},"impressionData":false},{"name":"page-level-analytics","enabled":true,"variant":{"name":"disabled","enabled":false,"feature_enabled":true},"impressionData":false},{"name":"editor-version-history-v2","enabled":true,"variant":{"name":"disabled","enabled":false,"feature_enabled":true},"impressionData":false},{"name":"editor-nav-generations","enabled":true,"variant":{"name":"disabled","enabled":false,"feature_enabled":true},"impressionData":false},{"name":"billing-page-v2","enabled":true,"variant":{"name":"disabled","enabled":false,"feature_enabled":true},"impressionData":false},{"name":"workspace-projects","enabled":true,"variant":{"name":"disabled","enabled":false,"feature_enabled":true},"impressionData":false},{"name":"assistant-v5","enabled":true,"variant":{"name":"disabled","enabled":false,"feature_enabled":true},"impressionData":false},{"name":"byok-sep-25","enabled":true,"variant":{"name":"disabled","enabled":false,"feature_enabled":true},"impressionData":false},{"name":"fork-pr-previews","enabled":true,"variant":{"name":"disabled","enabled":false,"feature_enabled":true},"impressionData":false},{"name":"revalidation-jwt","enabled":true,"variant":{"name":"disabled","enabled":false,"feature_enabled":true},"impressionData":false},{"name":"vite-origin","enabled":true,"variant":{"name":"disabled","enabled":false,"feature_enabled":true},"impressionData":false},{"name":"editor-agent-model-picker","enabled":true,"variant":{"name":"disabled","enabled":false,"feature_enabled":true},"impressionData":false},{"name":"billing-updated-9-15","enabled":true,"variant":{"name":"disabled","enabled":false,"feature_enabled":true},"impressionData":false},{"name":"hobby-abuse-scan","enabled":true,"variant":{"name":"disabled","enabled":false,"feature_enabled":true},"impressionData":false},{"name":"dashboard-inbox","enabled":true,"variant":{"name":"disabled","enabled":false,"feature_enabled":true},"impressionData":false}],"isAtlas":false,"googleFontsInlined":true},"customCss":[{"filePath":"styles/border-radius.css","content":":root{--border-radius-sm:2px;--border-radius-md:4px;--border-radius-lg:6px;--border-radius-xl:8px;--border-radius-2xl:10px}.rounded-full{border-radius:var(--border-radius-lg)!important}.rounded-sm{border-radius:var(--border-radius-sm)!important}.rounded,.rounded-md{border-radius:var(--border-radius-md)!important}.rounded-lg,div[class*=Frame] img,div[class*=frame] img,section[class*=Frame] img,section[class*=frame] img{border-radius:var(--border-radius-lg)!important}.rounded-xl{border-radius:var(--border-radius-xl)!important}.rounded-2xl,.rounded-3xl{border-radius:var(--border-radius-2xl)!important}article iframe,div[class*=Frame] iframe,div[class*=content] iframe,div[class*=frame] iframe,iframe.aspect-video,iframe.rounded-xl,iframe.w-full,iframe[class*=rounded],iframe[className],iframe[class],main iframe,section iframe,section[class*=Frame] iframe,section[class*=frame] iframe,video{border-radius:var(--border-radius-lg)!important;overflow:hidden!important}.button,[class*=Button],a[role=button],button,header a[role=button],header button,nav a[role=button],nav button{border-radius:var(--border-radius-md)!important}.icon-button,[class*=IconButton],button[class*=icon]{border-radius:var(--border-radius-sm)!important}[class*=CardGroup],[class*=card-group],div[class*=Columns],div[class*=columns]{border-radius:0!important}.card,a[class*=Card],a[class*=card]{border-radius:var(--border-radius-lg)!important}.feature-card,[class*=Feature]:not([class*=group]),[class*=feature]:not([class*=group]),article[class*=Card]:not([class*=Group]),div[class*=Card]:not([class*=Group]):not([class*=Columns]),section[class*=Card]:not([class*=Group]){border-radius:var(--border-radius-lg)!important}.code-block,[class*=codeblock],code[class*=language-],div[class*=CodeBlock],pre,pre[class*=language-]{border-radius:var(--border-radius-md)!important}code:not([class*=language-]),code:not(pre code){border-radius:var(--border-radius-sm)!important}[class*=CopyButton],[class*=Sidebar] a,[class*=Sidebar] a[class*=active],[class*=code-toolbar],[class*=sidebar] a,[class*=sidebar] a[class*=active],aside[class*=nav] a,button[class*=copy],nav a[class*=active],nav[class*=nav] a{border-radius:var(--border-radius-sm)!important}.code-block [data-fade-overlay]{display:none!important}.code-block [data-component-part=scroll-area-viewport][data-overflow-x-end]{-webkit-mask-image:linear-gradient(to right,#000 calc(100% - 120px),transparent calc(100% - 40px));mask-image:linear-gradient(to right,#000 calc(100% - 120px),transparent calc(100% - 40px))}.info,.note,.tip,.warning,[class*=Alert],[class*=Callout],[class*=alert],[class*=callout],aside,footer [class*=container],footer section,header [class*=container]{border-radius:var(--border-radius-lg)!important}[class*=Image],[class*=Input],[class*=image],[class*=input],img,input[type=email],input[type=number],input[type=password],input[type=search],input[type=tel],input[type=text],input[type=url],picture,select,textarea{border-radius:var(--border-radius-md)!important}[class*=Search] input,[class*=search] input,input[placeholder*=Search],input[placeholder*=search]{border-radius:var(--border-radius-xl)!important}[class*=Frame],[class*=frame],article[class*=Frame],article[class*=frame],body frame,body frameset,div[class*=Frame-container],div[class*=Frame-wrapper],div[class*=Frame],div[class*=frame-container],div[class*=frame-wrapper],div[class*=frame],div[style*=border],div[style*=frame],embed,frame,frame[style],frameset,frameset[style],html frame,html frameset,iframe,iframe[style*=border],iframe[style*=frame],iframe[style],object,section[class*=Frame],section[class*=frame]{border-radius:var(--border-radius-lg)!important;overflow:hidden!important}frame,frameset,iframe{border:0!important}frame *,frameset *,iframe *{border-radius:inherit!important}[class*=Tab],[class*=tab],[role=tab]{border-radius:var(--border-radius-sm)!important}[class*=TabPanel],[role=tabpanel]{border-radius:var(--border-radius-md)!important}[class*=Dialog],[class*=Modal],[class*=dialog],[class*=modal],[role=alertdialog],[role=dialog]{border-radius:var(--border-radius-xl)!important}[class*=Backdrop],[class*=Overlay],[class*=backdrop],[class*=overlay]{backdrop-filter:blur(8px)}.badge,.pill,[class*=Badge],[class*=Tag],[class*=badge],[class*=tag]{border-radius:var(--border-radius-xl)!important}[class*=Status],[class*=status],span[class*=indicator]{border-radius:50%!important}[class*=Dropdown],[class*=Menu],[class*=Popover],[class*=dropdown],[class*=menu],[class*=popover],[role=menu]{border-radius:var(--border-radius-md)!important}[class*=MenuItem],[class*=Tooltip],[class*=menuitem],[class*=tooltip],[role=menuitem],[role=tooltip]{border-radius:var(--border-radius-sm)!important}[class*=Progress],[class*=progress],progress{border-radius:var(--border-radius-xl)!important}[class*=Loader],[class*=Spinner],[class*=loader],[class*=spinner]{border-radius:50%!important}[class*=Divider],[class*=Separator],[class*=anchor] a,[class*=divider],a[class*=anchor],hr{border-radius:var(--border-radius-sm)!important}[class*=Step],[class*=step]{border-radius:var(--border-radius-lg)!important}[class*=ParamField],[class*=ResponseField],[class*=param-field],[class*=response-field]{border-radius:var(--border-radius-md)!important}@media (max-width:768px){:root{--border-radius-sm:4px;--border-radius-md:8px;--border-radius-lg:12px;--border-radius-xl:16px;--border-radius-2xl:20px}}kbd{white-space:nowrap!important}@media (prefers-color-scheme:dark){kbd{background-color:#2f3033!important;color:#f9fafb!important;border:1px solid #3a3a3a!important}}.dark kbd,[data-theme=dark] kbd{background-color:#2f3033!important;color:#f9fafb!important;border:1px solid #3a3a3a!important}#sidebar ul.sidebar-group>li>ul{border-left:1px solid rgb(0 0 0/.1);margin-left:calc(1.5rem - .5px);padding-left:.375rem}#sidebar ul.sidebar-group>li>ul a{padding-left:.5rem!important}.dark #sidebar ul.sidebar-group>li>ul,[data-theme=dark] #sidebar ul.sidebar-group>li>ul,html.dark #sidebar ul.sidebar-group>li>ul{border-left-color:rgb(255 255 255/.14)}#sidebar,#sidebar .sidebar-group-header,#sidebar a,#sidebar button,#table-of-contents,#table-of-contents a,#table-of-contents div,#table-of-contents span{font-size:13px;line-height:1.45}#sidebar .sidebar-group-header,.steps .step>div>p.font-semibold{font-weight:500}*,::after,::before,html{scrollbar-width:none;-ms-overflow-style:none}::-webkit-scrollbar{width:0!important;height:0!important;display:none!important}#sidebar a,#sidebar ul.sidebar-group>li>button{border-radius:var(--border-radius-xl)!important}.card .prose{font-size:14px;line-height:1.5}"}],"page":{"pagePath":"web-portal/core/working-with-test/managing-test-cases","slug":"/web-portal/core/working-with-test/managing-test-cases","pageMetadata":{"title":"Managing Test Cases","description":"Edit, refine, add, and delete test cases: change a test yourself or have TestSprite's testing agent change it, batch-edit the plan, or regenerate it from your sources.","href":"/web-portal/core/working-with-test/managing-test-cases"},"description":{"compiledSource":"\"use strict\";\nconst {jsx: _jsx} = arguments[0];\nconst {useMDXComponents: _provideComponents} = arguments[0];\nfunction _createMdxContent(props) {\n const _components = {\n p: \"p\",\n ..._provideComponents(),\n ...props.components\n };\n return _jsx(_components.p, {\n children: \"Edit, refine, add, and delete test cases: change a test yourself or have TestSprite’s testing agent change it, batch-edit the plan, or regenerate it from your sources.\"\n });\n}\nfunction MDXContent(props = {}) {\n const {wrapper: MDXLayout} = {\n ..._provideComponents(),\n ...props.components\n };\n return MDXLayout ? _jsx(MDXLayout, {\n ...props,\n children: _jsx(_createMdxContent, {\n ...props\n })\n }) : _createMdxContent(props);\n}\nreturn {\n default: MDXContent\n};\n","frontmatter":{},"scope":{}},"pageType":"default","mdx":{"mdxSource":{"compiledSource":"\"use strict\";const{Fragment:_Fragment,jsx:_jsx,jsxs:_jsxs}=arguments[0];const{useMDXComponents:_provideComponents}=arguments[0];function _createMdxContent(props){const _components={a:`a`,code:`code`,em:`em`,li:`li`,p:`p`,pre:`pre`,span:`span`,strong:`strong`,tbody:`tbody`,td:`td`,th:`th`,thead:`thead`,tr:`tr`,ul:`ul`,..._provideComponents(),...props.components},{Card,CodeBlock,Columns,Frame,Heading,OptimizedImage,Tab,Table,Tabs,Warning}=_components;if(!Card)_missingMdxReference(`Card`,true);if(!CodeBlock)_missingMdxReference(`CodeBlock`,true);if(!Columns)_missingMdxReference(`Columns`,true);if(!Frame)_missingMdxReference(`Frame`,true);if(!Heading)_missingMdxReference(`Heading`,true);if(!OptimizedImage)_missingMdxReference(`OptimizedImage`,true);if(!Tab)_missingMdxReference(`Tab`,true);if(!Table)_missingMdxReference(`Table`,true);if(!Tabs)_missingMdxReference(`Tabs`,true);if(!Warning)_missingMdxReference(`Warning`,true);return _jsxs(_Fragment,{children:[_jsx(Frame,{children:_jsx(OptimizedImage,{src:`https://mintcdn.com/testspriteinc/NgwJ2RcRMRwjh7Vv/images/managing-test-case-overview.png?fit=max\u0026auto=format\u0026n=NgwJ2RcRMRwjh7Vv\u0026q=85\u0026s=683553b9ebb0b8289180a303dd32d57f`,alt:`The Test Cases list, grouped by use case with per-row status`,\"data-og-width\":`1600`,width:`1600`,\"data-og-height\":`952`,height:`952`,\"data-path\":`images/managing-test-case-overview.png`,\"data-optimize\":`true`,\"data-opv\":`3`,srcset:`https://mintcdn.com/testspriteinc/NgwJ2RcRMRwjh7Vv/images/managing-test-case-overview.png?w=280\u0026fit=max\u0026auto=format\u0026n=NgwJ2RcRMRwjh7Vv\u0026q=85\u0026s=6cdbc38dca33223fb9b488091431f8ff 280w, https://mintcdn.com/testspriteinc/NgwJ2RcRMRwjh7Vv/images/managing-test-case-overview.png?w=560\u0026fit=max\u0026auto=format\u0026n=NgwJ2RcRMRwjh7Vv\u0026q=85\u0026s=8acb62d3c9add5958b4257ff938681bb 560w, https://mintcdn.com/testspriteinc/NgwJ2RcRMRwjh7Vv/images/managing-test-case-overview.png?w=840\u0026fit=max\u0026auto=format\u0026n=NgwJ2RcRMRwjh7Vv\u0026q=85\u0026s=c48f3f13741b54b82e7acdeb13aca308 840w, https://mintcdn.com/testspriteinc/NgwJ2RcRMRwjh7Vv/images/managing-test-case-overview.png?w=1100\u0026fit=max\u0026auto=format\u0026n=NgwJ2RcRMRwjh7Vv\u0026q=85\u0026s=fa5eeec22d65d6ea81144b7a12a76ba4 1100w, https://mintcdn.com/testspriteinc/NgwJ2RcRMRwjh7Vv/images/managing-test-case-overview.png?w=1650\u0026fit=max\u0026auto=format\u0026n=NgwJ2RcRMRwjh7Vv\u0026q=85\u0026s=c53d362a2e0f73c22fae173b25a2db50 1650w, https://mintcdn.com/testspriteinc/NgwJ2RcRMRwjh7Vv/images/managing-test-case-overview.png?w=2500\u0026fit=max\u0026auto=format\u0026n=NgwJ2RcRMRwjh7Vv\u0026q=85\u0026s=c66d48856bb27fd63cad99ebd469f728 2500w`})}),`\n`,_jsxs(_components.p,{children:[`The `,_jsx(`kbd`,{children:`Test Cases`}),` page lists every test in the project, grouped by use case. You can change a test yourself or have TestSprite’s testing agent change it for you. Edits only count once the test re-runs, so saving a single case is `,_jsx(_components.strong,{children:`Save \u0026 Run`}),`.`]}),`\n`,_jsxs(Table,{children:[_jsx(_components.thead,{children:_jsxs(_components.tr,{children:[_jsx(_components.th,{style:{textAlign:`left`},children:`To…`}),_jsx(_components.th,{style:{textAlign:`left`},children:`Use`})]})}),_jsxs(_components.tbody,{children:[_jsxs(_components.tr,{children:[_jsx(_components.td,{style:{textAlign:`left`},children:`Refocus or extend one test`}),_jsx(_components.td,{style:{textAlign:`left`},children:_jsx(_components.a,{href:`#editing-a-single-test-case`,children:`Edit its description`})})]}),_jsxs(_components.tr,{children:[_jsx(_components.td,{style:{textAlign:`left`},children:`Rewrite a test’s flow step by step`}),_jsx(_components.td,{style:{textAlign:`left`},children:_jsx(_components.a,{href:`#editing-steps`,children:`Edit its steps`})})]}),_jsxs(_components.tr,{children:[_jsx(_components.td,{style:{textAlign:`left`},children:`Understand a failure and get a fix`}),_jsx(_components.td,{style:{textAlign:`left`},children:_jsx(_components.a,{href:`#asking-ai-for-a-fix`,children:`Ask AI in Chats`})})]}),_jsxs(_components.tr,{children:[_jsx(_components.td,{style:{textAlign:`left`},children:`Change many tests at once`}),_jsx(_components.td,{style:{textAlign:`left`},children:_jsx(_components.a,{href:`#batch-editing`,children:`Batch editing`})})]}),_jsxs(_components.tr,{children:[_jsx(_components.td,{style:{textAlign:`left`},children:`Add coverage`}),_jsx(_components.td,{style:{textAlign:`left`},children:_jsx(_components.a,{href:`#adding-test-cases`,children:`Adding test cases`})})]}),_jsxs(_components.tr,{children:[_jsx(_components.td,{style:{textAlign:`left`},children:`Start over after a major app change`}),_jsx(_components.td,{style:{textAlign:`left`},children:_jsx(_components.a,{href:`#regenerating-from-sources`,children:`Regenerate from sources`})})]})]})]}),`\n`,_jsx(Heading,{level:`2`,id:`editing-a-single-test-case`,children:`Editing a Single Test Case`}),`\n`,_jsx(Frame,{children:_jsx(OptimizedImage,{src:`https://mintcdn.com/testspriteinc/NgwJ2RcRMRwjh7Vv/images/managing-test-case-edit-single.png?fit=max\u0026auto=format\u0026n=NgwJ2RcRMRwjh7Vv\u0026q=85\u0026s=679decdfc8fa9fcc19e81ff39216e4e8`,alt:`A test case open as a drawer: Basics, Runtime steps, and the Preview pane`,\"data-og-width\":`1600`,width:`1600`,\"data-og-height\":`952`,height:`952`,\"data-path\":`images/managing-test-case-edit-single.png`,\"data-optimize\":`true`,\"data-opv\":`3`,srcset:`https://mintcdn.com/testspriteinc/NgwJ2RcRMRwjh7Vv/images/managing-test-case-edit-single.png?w=280\u0026fit=max\u0026auto=format\u0026n=NgwJ2RcRMRwjh7Vv\u0026q=85\u0026s=57df937f93f8a2b2c7c7ca2ba2622b62 280w, https://mintcdn.com/testspriteinc/NgwJ2RcRMRwjh7Vv/images/managing-test-case-edit-single.png?w=560\u0026fit=max\u0026auto=format\u0026n=NgwJ2RcRMRwjh7Vv\u0026q=85\u0026s=99632ed55855aeb6bf03bd9c090c4eae 560w, https://mintcdn.com/testspriteinc/NgwJ2RcRMRwjh7Vv/images/managing-test-case-edit-single.png?w=840\u0026fit=max\u0026auto=format\u0026n=NgwJ2RcRMRwjh7Vv\u0026q=85\u0026s=614ca51443d989075fbc80dc0164423e 840w, https://mintcdn.com/testspriteinc/NgwJ2RcRMRwjh7Vv/images/managing-test-case-edit-single.png?w=1100\u0026fit=max\u0026auto=format\u0026n=NgwJ2RcRMRwjh7Vv\u0026q=85\u0026s=57f583c08c23ac505fd2f9b3accc1f88 1100w, https://mintcdn.com/testspriteinc/NgwJ2RcRMRwjh7Vv/images/managing-test-case-edit-single.png?w=1650\u0026fit=max\u0026auto=format\u0026n=NgwJ2RcRMRwjh7Vv\u0026q=85\u0026s=cc333fd1924a71a81b67de382efc423a 1650w, https://mintcdn.com/testspriteinc/NgwJ2RcRMRwjh7Vv/images/managing-test-case-edit-single.png?w=2500\u0026fit=max\u0026auto=format\u0026n=NgwJ2RcRMRwjh7Vv\u0026q=85\u0026s=e46c3f9c442e01ea5799650b76beba98 2500w`})}),`\n`,_jsx(_components.p,{children:`Click any row to open the test case as a drawer over the list, expandable to a full page. What you can change, and where:`}),`\n`,_jsxs(Table,{children:[_jsx(_components.thead,{children:_jsxs(_components.tr,{children:[_jsx(_components.th,{style:{textAlign:`left`},children:`What`}),_jsx(_components.th,{style:{textAlign:`left`},children:`Where`})]})}),_jsxs(_components.tbody,{children:[_jsxs(_components.tr,{children:[_jsx(_components.td,{style:{textAlign:`left`},children:_jsx(_components.strong,{children:`Priority`})}),_jsx(_components.td,{style:{textAlign:`left`},children:`The Basics section: High / Medium / Low`})]}),_jsxs(_components.tr,{children:[_jsx(_components.td,{style:{textAlign:`left`},children:_jsx(_components.strong,{children:`Test Description (Prompt)`})}),_jsx(_components.td,{style:{textAlign:`left`},children:`The Basics section: the natural-language statement of what the test verifies, which the run is judged against`})]}),_jsxs(_components.tr,{children:[_jsx(_components.td,{style:{textAlign:`left`},children:_jsx(_components.strong,{children:`Steps`})}),_jsxs(_components.td,{style:{textAlign:`left`},children:[`The `,_jsx(`kbd`,{children:`Edit steps`}),` modal (see below)`]})]}),_jsxs(_components.tr,{children:[_jsx(_components.td,{style:{textAlign:`left`},children:_jsx(_components.strong,{children:`Code`})}),_jsx(_components.td,{style:{textAlign:`left`},children:`The Code tab`})]})]})]}),`\n`,_jsxs(_components.p,{children:[`Editing the description is the most common refinement. Rewrite what the test should verify, click `,_jsx(`kbd`,{children:`Save \u0026 Run`}),`, and TestSprite updates the steps to match and re-runs that test. Be specific:`]}),`\n`,_jsx(Frame,{children:_jsx(OptimizedImage,{src:`https://mintcdn.com/testspriteinc/ReL5WaX10_vGG0UW/images/refine-edit-description.png?fit=max\u0026auto=format\u0026n=ReL5WaX10_vGG0UW\u0026q=85\u0026s=f91ff1ae95b70a3d13e7face95c1e5d6`,alt:`Editing a test's description in its detail view`,\"data-og-width\":`3284`,width:`3284`,\"data-og-height\":`1044`,height:`1044`,\"data-path\":`images/refine-edit-description.png`,\"data-optimize\":`true`,\"data-opv\":`3`,srcset:`https://mintcdn.com/testspriteinc/ReL5WaX10_vGG0UW/images/refine-edit-description.png?w=280\u0026fit=max\u0026auto=format\u0026n=ReL5WaX10_vGG0UW\u0026q=85\u0026s=4e5c6e14f83f430070ae022d37580496 280w, https://mintcdn.com/testspriteinc/ReL5WaX10_vGG0UW/images/refine-edit-description.png?w=560\u0026fit=max\u0026auto=format\u0026n=ReL5WaX10_vGG0UW\u0026q=85\u0026s=90d4c32c74f89eff30a5217bc8e7b126 560w, https://mintcdn.com/testspriteinc/ReL5WaX10_vGG0UW/images/refine-edit-description.png?w=840\u0026fit=max\u0026auto=format\u0026n=ReL5WaX10_vGG0UW\u0026q=85\u0026s=2ed52be082ce3504725084bfa32d0f14 840w, https://mintcdn.com/testspriteinc/ReL5WaX10_vGG0UW/images/refine-edit-description.png?w=1100\u0026fit=max\u0026auto=format\u0026n=ReL5WaX10_vGG0UW\u0026q=85\u0026s=f4397e39f035d7098f166779b71a2540 1100w, https://mintcdn.com/testspriteinc/ReL5WaX10_vGG0UW/images/refine-edit-description.png?w=1650\u0026fit=max\u0026auto=format\u0026n=ReL5WaX10_vGG0UW\u0026q=85\u0026s=5dea4a560d3af5157903fb3f954b51c2 1650w, https://mintcdn.com/testspriteinc/ReL5WaX10_vGG0UW/images/refine-edit-description.png?w=2500\u0026fit=max\u0026auto=format\u0026n=ReL5WaX10_vGG0UW\u0026q=85\u0026s=a355d069e7838a15db12ccf35d942b6a 2500w`})}),`\n`,_jsx(CodeBlock,{filename:`Before`,numberOfLines:`2`,language:`text`,children:_jsx(_components.pre,{className:`shiki shiki-themes github-light-default dark-plus`,style:{backgroundColor:`#ffffff`,\"--shiki-dark-bg\":`#0B0C0E`,color:`#1f2328`,\"--shiki-dark\":`#D4D4D4`},language:`text`,children:_jsxs(_components.code,{language:`text`,numberOfLines:`2`,children:[_jsx(_components.span,{className:`line`,children:_jsx(_components.span,{children:`Verify user can log in with valid credentials.`})}),`\n`,_jsx(_components.span,{className:`line`,children:_jsx(_components.span,{})})]})})}),`\n`,_jsx(CodeBlock,{filename:`After`,numberOfLines:`4`,language:`text`,children:_jsx(_components.pre,{className:`shiki shiki-themes github-light-default dark-plus`,style:{backgroundColor:`#ffffff`,\"--shiki-dark-bg\":`#0B0C0E`,color:`#1f2328`,\"--shiki-dark\":`#D4D4D4`},language:`text`,children:_jsxs(_components.code,{language:`text`,numberOfLines:`4`,children:[_jsx(_components.span,{className:`line`,children:_jsx(_components.span,{children:`Verify the Sign In link directs users to the login page, that`})}),`\n`,_jsx(_components.span,{className:`line`,children:_jsx(_components.span,{children:`submitting email \"test@example.com\" + password \"test123\" lands them`})}),`\n`,_jsx(_components.span,{className:`line`,children:_jsx(_components.span,{children:`on the dashboard, and that the navbar avatar shows after login.`})}),`\n`,_jsx(_components.span,{className:`line`,children:_jsx(_components.span,{})})]})})}),`\n`,_jsxs(_components.p,{children:[`For API tests, `,_jsx(`kbd`,{children:`Save \u0026 Run`}),` replays the existing stored code. Click `,_jsx(`kbd`,{children:`Regenerate`}),` under the prompt instead whenever your edit changes what the code must do; it rewrites the code from your edited prompt, then runs.`]}),`\n`,_jsx(_components.p,{children:`Refine one or two tests at a time, re-run, and confirm before moving on; it’s much easier to debug than editing twenty at once.`}),`\n`,_jsx(Heading,{level:`3`,id:`editing-steps`,children:`Editing steps`}),`\n`,_jsx(Frame,{children:_jsx(OptimizedImage,{src:`https://mintcdn.com/testspriteinc/_BbYEfcR7H2VaTOC/images/ui-testing-step-edit-in-editor.png?fit=max\u0026auto=format\u0026n=_BbYEfcR7H2VaTOC\u0026q=85\u0026s=27ae77bb2253497f4aa74834a03b5a5d`,alt:`The Edit steps \u0026 re-run dialog: the pass criterion above the editable step rows`,\"data-og-width\":`1600`,width:`1600`,\"data-og-height\":`779`,height:`779`,\"data-path\":`images/ui-testing-step-edit-in-editor.png`,\"data-optimize\":`true`,\"data-opv\":`3`,srcset:`https://mintcdn.com/testspriteinc/_BbYEfcR7H2VaTOC/images/ui-testing-step-edit-in-editor.png?w=280\u0026fit=max\u0026auto=format\u0026n=_BbYEfcR7H2VaTOC\u0026q=85\u0026s=91171faae06f77177077d4885f4f4895 280w, https://mintcdn.com/testspriteinc/_BbYEfcR7H2VaTOC/images/ui-testing-step-edit-in-editor.png?w=560\u0026fit=max\u0026auto=format\u0026n=_BbYEfcR7H2VaTOC\u0026q=85\u0026s=6b2174e1d69b677c11114afd2d019619 560w, https://mintcdn.com/testspriteinc/_BbYEfcR7H2VaTOC/images/ui-testing-step-edit-in-editor.png?w=840\u0026fit=max\u0026auto=format\u0026n=_BbYEfcR7H2VaTOC\u0026q=85\u0026s=d5dfc015842e1263ea0ddd0d7f242168 840w, https://mintcdn.com/testspriteinc/_BbYEfcR7H2VaTOC/images/ui-testing-step-edit-in-editor.png?w=1100\u0026fit=max\u0026auto=format\u0026n=_BbYEfcR7H2VaTOC\u0026q=85\u0026s=eae26449e0e3ba89142f2143d7d83b64 1100w, https://mintcdn.com/testspriteinc/_BbYEfcR7H2VaTOC/images/ui-testing-step-edit-in-editor.png?w=1650\u0026fit=max\u0026auto=format\u0026n=_BbYEfcR7H2VaTOC\u0026q=85\u0026s=3bc3a789d32a6991f55c2bcb252f254d 1650w, https://mintcdn.com/testspriteinc/_BbYEfcR7H2VaTOC/images/ui-testing-step-edit-in-editor.png?w=2500\u0026fit=max\u0026auto=format\u0026n=_BbYEfcR7H2VaTOC\u0026q=85\u0026s=b73e6800b488434b7be191d6dd30bafb 2500w`})}),`\n`,_jsxs(_components.p,{children:[`The `,_jsx(`kbd`,{children:`Edit steps`}),` modal lets you rewrite the flow from any step onward. Steps `,_jsx(_components.strong,{children:`before`}),` the one you picked stay locked (they still run, just aren’t editable); everything after is free text. Add, remove, or rewrite steps, each typed as an `,_jsx(_components.em,{children:`action`}),` or an `,_jsx(_components.em,{children:`assertion`}),`, and adjust the pass criterion in the same modal. Saving starts a run with the new steps immediately. For UI tests, edited steps run directly, with no code-generation step in between. See `,_jsx(_components.a,{href:`/web-portal/core/ui/ui-rerun`,children:`Edit \u0026 Rerun`}),` for the other ways to re-run.`]}),`\n`,_jsxs(_components.p,{children:[`For UI tests, `,_jsx(_components.a,{href:`/web-portal/core/ui/auto-heal`,children:`Auto-Heal`}),` also absorbs UI drift on reruns, so a moved button doesn’t need an edit.`]}),`\n`,_jsx(Heading,{level:`2`,id:`asking-ai-for-a-fix`,children:`Asking AI for a Fix`}),`\n`,_jsx(Frame,{children:_jsx(OptimizedImage,{src:`https://mintcdn.com/testspriteinc/CImpC64Ju-sB5348/images/refining-chat.png?fit=max\u0026auto=format\u0026n=CImpC64Ju-sB5348\u0026q=85\u0026s=66c14353f6d35bd1adcd9beb061cdf9b`,alt:`The Chats panel open beside a test case`,\"data-og-width\":`1600`,width:`1600`,\"data-og-height\":`952`,height:`952`,\"data-path\":`images/refining-chat.png`,\"data-optimize\":`true`,\"data-opv\":`3`,srcset:`https://mintcdn.com/testspriteinc/CImpC64Ju-sB5348/images/refining-chat.png?w=280\u0026fit=max\u0026auto=format\u0026n=CImpC64Ju-sB5348\u0026q=85\u0026s=856dbe68484b0135cbf780b736d19da5 280w, https://mintcdn.com/testspriteinc/CImpC64Ju-sB5348/images/refining-chat.png?w=560\u0026fit=max\u0026auto=format\u0026n=CImpC64Ju-sB5348\u0026q=85\u0026s=de684ee1158170320b0ce4c7b7eaf388 560w, https://mintcdn.com/testspriteinc/CImpC64Ju-sB5348/images/refining-chat.png?w=840\u0026fit=max\u0026auto=format\u0026n=CImpC64Ju-sB5348\u0026q=85\u0026s=b24d86170580e5e4c4cd7dae81d9b8c2 840w, https://mintcdn.com/testspriteinc/CImpC64Ju-sB5348/images/refining-chat.png?w=1100\u0026fit=max\u0026auto=format\u0026n=CImpC64Ju-sB5348\u0026q=85\u0026s=74fba76a9d49d950343336ff640ee6de 1100w, https://mintcdn.com/testspriteinc/CImpC64Ju-sB5348/images/refining-chat.png?w=1650\u0026fit=max\u0026auto=format\u0026n=CImpC64Ju-sB5348\u0026q=85\u0026s=cbbb36ab4f99627027e9b84e8dec8edf 1650w, https://mintcdn.com/testspriteinc/CImpC64Ju-sB5348/images/refining-chat.png?w=2500\u0026fit=max\u0026auto=format\u0026n=CImpC64Ju-sB5348\u0026q=85\u0026s=f90209c8b9b19e588eba1302cf57dcb4 2500w`})}),`\n`,_jsxs(_components.p,{children:[`When you don’t know why a test failed, open `,_jsx(`kbd`,{children:`Chats`}),` beside the test and ask, for example `,_jsx(_components.em,{children:`“Why did this fail?”`}),`, `,_jsx(_components.em,{children:`“What is this test checking?”`}),`, or `,_jsx(_components.em,{children:`“How do I fix this?”`}),`. The assistant answers from the test’s steps, the run’s recording, and the failure trace, and any change it proposes arrives as a card you approve first (see `,_jsx(_components.a,{href:`/web-portal/ai-chat/approving-actions`,children:`Approving Actions`}),`). It doesn’t see your application source code or PRD by default.`]}),`\n`,_jsx(Heading,{level:`2`,id:`batch-editing`,children:`Batch Editing`}),`\n`,_jsxs(_components.p,{children:[`Click `,_jsx(`kbd`,{children:`Edit Test`}),` on the toolbar to open the batch editor: every test case in the plan on one screen, with a use-case nav on the left. It has two modes:`]}),`\n`,_jsx(Frame,{children:_jsx(OptimizedImage,{src:`https://mintcdn.com/testspriteinc/NgwJ2RcRMRwjh7Vv/images/managing-test-case-batch-click-edit.png?fit=max\u0026auto=format\u0026n=NgwJ2RcRMRwjh7Vv\u0026q=85\u0026s=947074e51ef57c7d1ffc6cae3fa2b531`,alt:`The Edit Test button on the Test Cases toolbar`,\"data-og-width\":`1600`,width:`1600`,\"data-og-height\":`659`,height:`659`,\"data-path\":`images/managing-test-case-batch-click-edit.png`,\"data-optimize\":`true`,\"data-opv\":`3`,srcset:`https://mintcdn.com/testspriteinc/NgwJ2RcRMRwjh7Vv/images/managing-test-case-batch-click-edit.png?w=280\u0026fit=max\u0026auto=format\u0026n=NgwJ2RcRMRwjh7Vv\u0026q=85\u0026s=935112d78bd3d8e4c1a7d11e396c9b89 280w, https://mintcdn.com/testspriteinc/NgwJ2RcRMRwjh7Vv/images/managing-test-case-batch-click-edit.png?w=560\u0026fit=max\u0026auto=format\u0026n=NgwJ2RcRMRwjh7Vv\u0026q=85\u0026s=57220b3e47941ac9197849ed78f7ae36 560w, https://mintcdn.com/testspriteinc/NgwJ2RcRMRwjh7Vv/images/managing-test-case-batch-click-edit.png?w=840\u0026fit=max\u0026auto=format\u0026n=NgwJ2RcRMRwjh7Vv\u0026q=85\u0026s=4d584efd8f33ff02389d6c5aa9ce1cf9 840w, https://mintcdn.com/testspriteinc/NgwJ2RcRMRwjh7Vv/images/managing-test-case-batch-click-edit.png?w=1100\u0026fit=max\u0026auto=format\u0026n=NgwJ2RcRMRwjh7Vv\u0026q=85\u0026s=4b952aa093400221d0a2246bae473e20 1100w, https://mintcdn.com/testspriteinc/NgwJ2RcRMRwjh7Vv/images/managing-test-case-batch-click-edit.png?w=1650\u0026fit=max\u0026auto=format\u0026n=NgwJ2RcRMRwjh7Vv\u0026q=85\u0026s=f9745dd32e87ae2005deb10cc4b8f9d2 1650w, https://mintcdn.com/testspriteinc/NgwJ2RcRMRwjh7Vv/images/managing-test-case-batch-click-edit.png?w=2500\u0026fit=max\u0026auto=format\u0026n=NgwJ2RcRMRwjh7Vv\u0026q=85\u0026s=c245fe2a0202d2f1f2bbc8e413fb06ea 2500w`})}),`\n`,_jsxs(Tabs,{children:[_jsxs(Tab,{title:`Form mode`,id:`form-mode`,children:[_jsx(Frame,{children:_jsx(OptimizedImage,{src:`https://mintcdn.com/testspriteinc/NgwJ2RcRMRwjh7Vv/images/managing-test-case-batch-form.png?fit=max\u0026auto=format\u0026n=NgwJ2RcRMRwjh7Vv\u0026q=85\u0026s=001665a813f1a3235b58a2b8bccdbaac`,alt:`Form mode: every case as an editable row with its steps expanded`,\"data-og-width\":`1600`,width:`1600`,\"data-og-height\":`769`,height:`769`,\"data-path\":`images/managing-test-case-batch-form.png`,\"data-optimize\":`true`,\"data-opv\":`3`,srcset:`https://mintcdn.com/testspriteinc/NgwJ2RcRMRwjh7Vv/images/managing-test-case-batch-form.png?w=280\u0026fit=max\u0026auto=format\u0026n=NgwJ2RcRMRwjh7Vv\u0026q=85\u0026s=017d363a5904b237aeeaaf6e1cad34c9 280w, https://mintcdn.com/testspriteinc/NgwJ2RcRMRwjh7Vv/images/managing-test-case-batch-form.png?w=560\u0026fit=max\u0026auto=format\u0026n=NgwJ2RcRMRwjh7Vv\u0026q=85\u0026s=47d2faf73bbeed20fd0abdc5a7e8f44e 560w, https://mintcdn.com/testspriteinc/NgwJ2RcRMRwjh7Vv/images/managing-test-case-batch-form.png?w=840\u0026fit=max\u0026auto=format\u0026n=NgwJ2RcRMRwjh7Vv\u0026q=85\u0026s=dea3ff1c1305cee14aff3ba9a9bbb2c1 840w, https://mintcdn.com/testspriteinc/NgwJ2RcRMRwjh7Vv/images/managing-test-case-batch-form.png?w=1100\u0026fit=max\u0026auto=format\u0026n=NgwJ2RcRMRwjh7Vv\u0026q=85\u0026s=dcdcd819d8e80c7e78c3009a304e8188 1100w, https://mintcdn.com/testspriteinc/NgwJ2RcRMRwjh7Vv/images/managing-test-case-batch-form.png?w=1650\u0026fit=max\u0026auto=format\u0026n=NgwJ2RcRMRwjh7Vv\u0026q=85\u0026s=56e5f201b1f611715ac53c9e643f7ca7 1650w, https://mintcdn.com/testspriteinc/NgwJ2RcRMRwjh7Vv/images/managing-test-case-batch-form.png?w=2500\u0026fit=max\u0026auto=format\u0026n=NgwJ2RcRMRwjh7Vv\u0026q=85\u0026s=0c703c229a5a9667688a34a6cc638908 2500w`})}),_jsxs(_components.p,{children:[`Every case as a row with `,_jsx(_components.strong,{children:`test name, priority, description, and each flow step`}),` editable in place. Best for touching a handful of cases in context.`]}),_jsx(_components.p,{children:`Save writes only the rows you changed and reports per case if any row fails, so a partial save never silently loses the rest.`})]}),_jsxs(Tab,{title:`YAML mode`,id:`yaml-mode`,children:[_jsx(Frame,{children:_jsx(OptimizedImage,{src:`https://mintcdn.com/testspriteinc/NgwJ2RcRMRwjh7Vv/images/managing-test-case-batch-yaml.png?fit=max\u0026auto=format\u0026n=NgwJ2RcRMRwjh7Vv\u0026q=85\u0026s=3c4344e73194ac697b7c84c5afe42206`,alt:`YAML mode: the whole plan as one editable document`,\"data-og-width\":`1600`,width:`1600`,\"data-og-height\":`769`,height:`769`,\"data-path\":`images/managing-test-case-batch-yaml.png`,\"data-optimize\":`true`,\"data-opv\":`3`,srcset:`https://mintcdn.com/testspriteinc/NgwJ2RcRMRwjh7Vv/images/managing-test-case-batch-yaml.png?w=280\u0026fit=max\u0026auto=format\u0026n=NgwJ2RcRMRwjh7Vv\u0026q=85\u0026s=4f61c4990890b5de3298df47ec2467a1 280w, https://mintcdn.com/testspriteinc/NgwJ2RcRMRwjh7Vv/images/managing-test-case-batch-yaml.png?w=560\u0026fit=max\u0026auto=format\u0026n=NgwJ2RcRMRwjh7Vv\u0026q=85\u0026s=8494f785ac88684e033b6b440b56ec6f 560w, https://mintcdn.com/testspriteinc/NgwJ2RcRMRwjh7Vv/images/managing-test-case-batch-yaml.png?w=840\u0026fit=max\u0026auto=format\u0026n=NgwJ2RcRMRwjh7Vv\u0026q=85\u0026s=ce2d40a8299eacce61b95144f3648d33 840w, https://mintcdn.com/testspriteinc/NgwJ2RcRMRwjh7Vv/images/managing-test-case-batch-yaml.png?w=1100\u0026fit=max\u0026auto=format\u0026n=NgwJ2RcRMRwjh7Vv\u0026q=85\u0026s=cf993118c63e038063c16357ff1ec73c 1100w, https://mintcdn.com/testspriteinc/NgwJ2RcRMRwjh7Vv/images/managing-test-case-batch-yaml.png?w=1650\u0026fit=max\u0026auto=format\u0026n=NgwJ2RcRMRwjh7Vv\u0026q=85\u0026s=427cb5968c7fcb3c7efb25f62219c673 1650w, https://mintcdn.com/testspriteinc/NgwJ2RcRMRwjh7Vv/images/managing-test-case-batch-yaml.png?w=2500\u0026fit=max\u0026auto=format\u0026n=NgwJ2RcRMRwjh7Vv\u0026q=85\u0026s=5ef9aecff04ceadfa25fdbbe9e19df08 2500w`})}),_jsx(_components.p,{children:`The whole plan as one YAML document. Best for sweeping edits: renumbering steps across many cases, find-and-replace on a URL, or pasting cases between projects.`}),_jsx(CodeBlock,{filename:``,numberOfLines:`14`,language:`yaml`,children:_jsx(_components.pre,{className:`shiki shiki-themes github-light-default dark-plus`,style:{backgroundColor:`#ffffff`,\"--shiki-dark-bg\":`#0B0C0E`,color:`#1f2328`,\"--shiki-dark\":`#D4D4D4`},language:`yaml`,children:_jsxs(_components.code,{language:`yaml`,numberOfLines:`14`,children:[_jsxs(_components.span,{className:`line`,children:[_jsx(_components.span,{style:{color:`#116329`,\"--shiki-dark\":`#569CD6`},children:`useCases`}),_jsx(_components.span,{style:{color:`#1F2328`,\"--shiki-dark\":`#D4D4D4`},children:`:`})]}),`\n`,_jsxs(_components.span,{className:`line`,children:[_jsx(_components.span,{style:{color:`#1F2328`,\"--shiki-dark\":`#D4D4D4`},children:` - `}),_jsx(_components.span,{style:{color:`#116329`,\"--shiki-dark\":`#569CD6`},children:`useCase`}),_jsx(_components.span,{style:{color:`#1F2328`,\"--shiki-dark\":`#D4D4D4`},children:`: `}),_jsx(_components.span,{style:{color:`#0A3069`,\"--shiki-dark\":`#CE9178`},children:`Authentication`})]}),`\n`,_jsxs(_components.span,{className:`line`,children:[_jsx(_components.span,{style:{color:`#116329`,\"--shiki-dark\":`#569CD6`},children:` slug`}),_jsx(_components.span,{style:{color:`#1F2328`,\"--shiki-dark\":`#D4D4D4`},children:`: `}),_jsx(_components.span,{style:{color:`#0A3069`,\"--shiki-dark\":`#CE9178`},children:`authentication`})]}),`\n`,_jsxs(_components.span,{className:`line`,children:[_jsx(_components.span,{style:{color:`#116329`,\"--shiki-dark\":`#569CD6`},children:` testCases`}),_jsx(_components.span,{style:{color:`#1F2328`,\"--shiki-dark\":`#D4D4D4`},children:`:`})]}),`\n`,_jsxs(_components.span,{className:`line`,children:[_jsx(_components.span,{style:{color:`#1F2328`,\"--shiki-dark\":`#D4D4D4`},children:` - `}),_jsx(_components.span,{style:{color:`#116329`,\"--shiki-dark\":`#569CD6`},children:`id`}),_jsx(_components.span,{style:{color:`#1F2328`,\"--shiki-dark\":`#D4D4D4`},children:`: `}),_jsx(_components.span,{style:{color:`#0A3069`,\"--shiki-dark\":`#CE9178`},children:`TC001`})]}),`\n`,_jsxs(_components.span,{className:`line`,children:[_jsx(_components.span,{style:{color:`#116329`,\"--shiki-dark\":`#569CD6`},children:` priority`}),_jsx(_components.span,{style:{color:`#1F2328`,\"--shiki-dark\":`#D4D4D4`},children:`: `}),_jsx(_components.span,{style:{color:`#0A3069`,\"--shiki-dark\":`#CE9178`},children:`High`})]}),`\n`,_jsxs(_components.span,{className:`line`,children:[_jsx(_components.span,{style:{color:`#116329`,\"--shiki-dark\":`#569CD6`},children:` name`}),_jsx(_components.span,{style:{color:`#1F2328`,\"--shiki-dark\":`#D4D4D4`},children:`: `}),_jsx(_components.span,{style:{color:`#0A3069`,\"--shiki-dark\":`#CE9178`},children:`Login with valid credentials`})]}),`\n`,_jsxs(_components.span,{className:`line`,children:[_jsx(_components.span,{style:{color:`#116329`,\"--shiki-dark\":`#569CD6`},children:` description`}),_jsx(_components.span,{style:{color:`#1F2328`,\"--shiki-dark\":`#D4D4D4`},children:`: `}),_jsx(_components.span,{style:{color:`#0A3069`,\"--shiki-dark\":`#CE9178`},children:`Verify that submitting valid credentials lands the`})]}),`\n`,_jsx(_components.span,{className:`line`,children:_jsx(_components.span,{style:{color:`#0A3069`,\"--shiki-dark\":`#CE9178`},children:` user on the dashboard.`})}),`\n`,_jsxs(_components.span,{className:`line`,children:[_jsx(_components.span,{style:{color:`#116329`,\"--shiki-dark\":`#569CD6`},children:` steps`}),_jsx(_components.span,{style:{color:`#1F2328`,\"--shiki-dark\":`#D4D4D4`},children:`:`})]}),`\n`,_jsxs(_components.span,{className:`line`,children:[_jsx(_components.span,{style:{color:`#1F2328`,\"--shiki-dark\":`#D4D4D4`},children:` - `}),_jsx(_components.span,{style:{color:`#0A3069`,\"--shiki-dark\":`#CE9178`},children:`Navigate to the login page`})]}),`\n`,_jsxs(_components.span,{className:`line`,children:[_jsx(_components.span,{style:{color:`#1F2328`,\"--shiki-dark\":`#D4D4D4`},children:` - `}),_jsx(_components.span,{style:{color:`#0A3069`,\"--shiki-dark\":`#CE9178`},children:`Enter \"user@example.com\" and the test password`})]}),`\n`,_jsxs(_components.span,{className:`line`,children:[_jsx(_components.span,{style:{color:`#1F2328`,\"--shiki-dark\":`#D4D4D4`},children:` - `}),_jsx(_components.span,{style:{color:`#0A3069`,\"--shiki-dark\":`#CE9178`},children:`Click the Sign In button`})]}),`\n`,_jsxs(_components.span,{className:`line`,children:[_jsx(_components.span,{style:{color:`#1F2328`,\"--shiki-dark\":`#D4D4D4`},children:` - `}),_jsx(_components.span,{style:{color:`#116329`,\"--shiki-dark\":`#569CD6`},children:`assert`}),_jsx(_components.span,{style:{color:`#1F2328`,\"--shiki-dark\":`#D4D4D4`},children:`: `}),_jsx(_components.span,{style:{color:`#0A3069`,\"--shiki-dark\":`#CE9178`},children:`The dashboard page is displayed`})]}),`\n`]})})}),_jsx(_components.p,{children:`The rules (also in the editor’s header comment):`}),_jsxs(_components.ul,{children:[`\n`,_jsxs(_components.li,{children:[`A plain step line is an `,_jsx(_components.strong,{children:`action`}),`; `,_jsx(_components.code,{children:`assert: ...`}),` marks an `,_jsx(_components.strong,{children:`assertion`}),`.`]}),`\n`,_jsxs(_components.li,{children:[_jsx(_components.strong,{children:`Add`}),` a case by copying an existing one and removing its `,_jsx(_components.code,{children:`id`}),` line.`]}),`\n`,_jsxs(_components.li,{children:[_jsx(_components.strong,{children:`Remove`}),` a case by deleting its block.`]}),`\n`,_jsxs(_components.li,{children:[`Leave `,_jsx(_components.code,{children:`id`}),` and `,_jsx(_components.code,{children:`slug`}),` values as they are; they map your edits back to existing cases.`]}),`\n`]})]})]}),`\n`,_jsx(_components.p,{children:`Switching modes discards unsaved edits in the mode you’re leaving; the editor warns you first.`}),`\n`,_jsx(Heading,{level:`2`,id:`adding-test-cases`,children:`Adding Test Cases`}),`\n`,_jsxs(_components.p,{children:[`The `,_jsx(`kbd`,{children:`Add More Tests`}),` dropdown on the toolbar has both paths:`]}),`\n`,_jsx(Frame,{children:_jsx(OptimizedImage,{src:`https://mintcdn.com/testspriteinc/NgwJ2RcRMRwjh7Vv/images/managing-test-case-add-more.png?fit=max\u0026auto=format\u0026n=NgwJ2RcRMRwjh7Vv\u0026q=85\u0026s=515c5ae031bc10bc70dab5402f03373c`,alt:`The Add More Tests dropdown, with the AI and manual paths`,\"data-og-width\":`1600`,width:`1600`,\"data-og-height\":`659`,height:`659`,\"data-path\":`images/managing-test-case-add-more.png`,\"data-optimize\":`true`,\"data-opv\":`3`,srcset:`https://mintcdn.com/testspriteinc/NgwJ2RcRMRwjh7Vv/images/managing-test-case-add-more.png?w=280\u0026fit=max\u0026auto=format\u0026n=NgwJ2RcRMRwjh7Vv\u0026q=85\u0026s=7b3836c2166411deff17254829324a26 280w, https://mintcdn.com/testspriteinc/NgwJ2RcRMRwjh7Vv/images/managing-test-case-add-more.png?w=560\u0026fit=max\u0026auto=format\u0026n=NgwJ2RcRMRwjh7Vv\u0026q=85\u0026s=78cfbbebebbd74f7bb02b7ebd39161a0 560w, https://mintcdn.com/testspriteinc/NgwJ2RcRMRwjh7Vv/images/managing-test-case-add-more.png?w=840\u0026fit=max\u0026auto=format\u0026n=NgwJ2RcRMRwjh7Vv\u0026q=85\u0026s=0be6b3e25faba644f843b06238db068b 840w, https://mintcdn.com/testspriteinc/NgwJ2RcRMRwjh7Vv/images/managing-test-case-add-more.png?w=1100\u0026fit=max\u0026auto=format\u0026n=NgwJ2RcRMRwjh7Vv\u0026q=85\u0026s=996967411a6d8518050b68ccfa9944e1 1100w, https://mintcdn.com/testspriteinc/NgwJ2RcRMRwjh7Vv/images/managing-test-case-add-more.png?w=1650\u0026fit=max\u0026auto=format\u0026n=NgwJ2RcRMRwjh7Vv\u0026q=85\u0026s=44b41dd5b33eb31347decbfb6858192c 1650w, https://mintcdn.com/testspriteinc/NgwJ2RcRMRwjh7Vv/images/managing-test-case-add-more.png?w=2500\u0026fit=max\u0026auto=format\u0026n=NgwJ2RcRMRwjh7Vv\u0026q=85\u0026s=cb15276a768ffb77cdb62bf56b0ee373 2500w`})}),`\n`,_jsxs(_components.ul,{children:[`\n`,_jsxs(_components.li,{children:[_jsx(_components.strong,{children:`Add Tests with AI`}),`: describe what you want covered (optionally scoped to one use case), and TestSprite’s testing agent proposes a batch. Before anything is created, you can edit each proposal’s title, description, priority, and steps, untick the ones you don’t want, or hand-add rows.`]}),`\n`,_jsxs(_components.li,{children:[_jsx(_components.strong,{children:`Add Test Manually`}),`: a form with use case, title, priority, description, and a step list (action or assertion per step).`]}),`\n`]}),`\n`,_jsxs(_components.p,{children:[`You can also add from the `,_jsx(_components.a,{href:`/web-portal/core/working-with-test/coverage-map`,children:`Coverage Map`}),`, per use case or with the per-feature ✨ AI shortcut.`]}),`\n`,_jsx(Heading,{level:`2`,id:`regenerating-from-sources`,children:`Regenerating from Sources`}),`\n`,_jsxs(_components.p,{children:[`When your app has changed so much that the plan is more outdated than fixable (a major redesign, or a new API contract across many endpoints), rebuild it. Open `,_jsx(`kbd`,{children:`Test Coverage`}),`, click `,_jsx(`kbd`,{children:`Regenerate from sources`}),`, and confirm. TestSprite’s testing agent discards the current use cases and extracts a new set from the project’s sources, in the same project. Then plan tests from the new use cases and run them as usual.`]}),`\n`,_jsx(Frame,{children:_jsx(OptimizedImage,{src:`https://mintcdn.com/testspriteinc/CImpC64Ju-sB5348/images/refining-regenerate.png?fit=max\u0026auto=format\u0026n=CImpC64Ju-sB5348\u0026q=85\u0026s=218b16a11001975d5962a0d37ffe9119`,alt:`Regenerate From Sources on the Test Coverage page`,\"data-og-width\":`1600`,width:`1600`,\"data-og-height\":`625`,height:`625`,\"data-path\":`images/refining-regenerate.png`,\"data-optimize\":`true`,\"data-opv\":`3`,srcset:`https://mintcdn.com/testspriteinc/CImpC64Ju-sB5348/images/refining-regenerate.png?w=280\u0026fit=max\u0026auto=format\u0026n=CImpC64Ju-sB5348\u0026q=85\u0026s=a16f85e67f4e8138eabb9a0c7f3c2013 280w, https://mintcdn.com/testspriteinc/CImpC64Ju-sB5348/images/refining-regenerate.png?w=560\u0026fit=max\u0026auto=format\u0026n=CImpC64Ju-sB5348\u0026q=85\u0026s=56d7de8015a87b7a54e4acfba8aa2824 560w, https://mintcdn.com/testspriteinc/CImpC64Ju-sB5348/images/refining-regenerate.png?w=840\u0026fit=max\u0026auto=format\u0026n=CImpC64Ju-sB5348\u0026q=85\u0026s=9714d603f13c31cfa2978df3a85615f7 840w, https://mintcdn.com/testspriteinc/CImpC64Ju-sB5348/images/refining-regenerate.png?w=1100\u0026fit=max\u0026auto=format\u0026n=CImpC64Ju-sB5348\u0026q=85\u0026s=2a51bcfa7cbe5c85cfd23816af640bc6 1100w, https://mintcdn.com/testspriteinc/CImpC64Ju-sB5348/images/refining-regenerate.png?w=1650\u0026fit=max\u0026auto=format\u0026n=CImpC64Ju-sB5348\u0026q=85\u0026s=b8815d853e7f891f61d047eff3931de6 1650w, https://mintcdn.com/testspriteinc/CImpC64Ju-sB5348/images/refining-regenerate.png?w=2500\u0026fit=max\u0026auto=format\u0026n=CImpC64Ju-sB5348\u0026q=85\u0026s=ebd98faebcf2446c6d31aa24a11ed8b6 2500w`})}),`\n`,_jsx(Warning,{children:_jsx(_components.p,{children:`Regenerating can’t be undone: all existing use cases and their generated test cases are removed. To keep the old suite alongside the new one, create a new project instead.`})}),`\n`,_jsx(Heading,{level:`2`,id:`deleting-test-cases`,children:`Deleting Test Cases`}),`\n`,_jsxs(_components.ul,{children:[`\n`,_jsxs(_components.li,{children:[_jsx(_components.strong,{children:`One case`}),`: the trash icon in its drawer, or the row’s context menu. A case that has never run is labeled “Remove from plan”; one with run history warns you the history goes with it.`]}),`\n`]}),`\n`,_jsx(Frame,{children:_jsx(OptimizedImage,{src:`https://mintcdn.com/testspriteinc/NgwJ2RcRMRwjh7Vv/images/managing-test-case-delete-one.png?fit=max\u0026auto=format\u0026n=NgwJ2RcRMRwjh7Vv\u0026q=85\u0026s=a6f46467c3024e20120af1370cfc9352`,alt:`Deleting a single case from its row`,\"data-og-width\":`1600`,width:`1600`,\"data-og-height\":`659`,height:`659`,\"data-path\":`images/managing-test-case-delete-one.png`,\"data-optimize\":`true`,\"data-opv\":`3`,srcset:`https://mintcdn.com/testspriteinc/NgwJ2RcRMRwjh7Vv/images/managing-test-case-delete-one.png?w=280\u0026fit=max\u0026auto=format\u0026n=NgwJ2RcRMRwjh7Vv\u0026q=85\u0026s=1f2d810286151a5f3c8b0281cf9c4d27 280w, https://mintcdn.com/testspriteinc/NgwJ2RcRMRwjh7Vv/images/managing-test-case-delete-one.png?w=560\u0026fit=max\u0026auto=format\u0026n=NgwJ2RcRMRwjh7Vv\u0026q=85\u0026s=127b95764aad807a3f3990dd9c1b43b9 560w, https://mintcdn.com/testspriteinc/NgwJ2RcRMRwjh7Vv/images/managing-test-case-delete-one.png?w=840\u0026fit=max\u0026auto=format\u0026n=NgwJ2RcRMRwjh7Vv\u0026q=85\u0026s=2aab7c681272f9f1108cd4102b46a06b 840w, https://mintcdn.com/testspriteinc/NgwJ2RcRMRwjh7Vv/images/managing-test-case-delete-one.png?w=1100\u0026fit=max\u0026auto=format\u0026n=NgwJ2RcRMRwjh7Vv\u0026q=85\u0026s=0f5aa7009d2df1e58c4f1fe2d231be3b 1100w, https://mintcdn.com/testspriteinc/NgwJ2RcRMRwjh7Vv/images/managing-test-case-delete-one.png?w=1650\u0026fit=max\u0026auto=format\u0026n=NgwJ2RcRMRwjh7Vv\u0026q=85\u0026s=f60b703d095b10e83eb829b16d16ffc3 1650w, https://mintcdn.com/testspriteinc/NgwJ2RcRMRwjh7Vv/images/managing-test-case-delete-one.png?w=2500\u0026fit=max\u0026auto=format\u0026n=NgwJ2RcRMRwjh7Vv\u0026q=85\u0026s=5ca92afd947928e053f27c7212372e8d 2500w`})}),`\n`,_jsxs(_components.ul,{children:[`\n`,_jsxs(_components.li,{children:[_jsx(_components.strong,{children:`Many cases`}),`: select rows and use the trash button in the toolbar.`]}),`\n`]}),`\n`,_jsx(Frame,{children:_jsx(OptimizedImage,{src:`https://mintcdn.com/testspriteinc/NgwJ2RcRMRwjh7Vv/images/managing-test-case-delete-batch.png?fit=max\u0026auto=format\u0026n=NgwJ2RcRMRwjh7Vv\u0026q=85\u0026s=65486bda9325c34bbe0a5b776554603c`,alt:`Deleting several selected cases from the toolbar`,\"data-og-width\":`1600`,width:`1600`,\"data-og-height\":`659`,height:`659`,\"data-path\":`images/managing-test-case-delete-batch.png`,\"data-optimize\":`true`,\"data-opv\":`3`,srcset:`https://mintcdn.com/testspriteinc/NgwJ2RcRMRwjh7Vv/images/managing-test-case-delete-batch.png?w=280\u0026fit=max\u0026auto=format\u0026n=NgwJ2RcRMRwjh7Vv\u0026q=85\u0026s=5d806e6d49eb19a4d17846d3a6211ce5 280w, https://mintcdn.com/testspriteinc/NgwJ2RcRMRwjh7Vv/images/managing-test-case-delete-batch.png?w=560\u0026fit=max\u0026auto=format\u0026n=NgwJ2RcRMRwjh7Vv\u0026q=85\u0026s=cbd4d7a7a5b2b8ef8414bdb2903df503 560w, https://mintcdn.com/testspriteinc/NgwJ2RcRMRwjh7Vv/images/managing-test-case-delete-batch.png?w=840\u0026fit=max\u0026auto=format\u0026n=NgwJ2RcRMRwjh7Vv\u0026q=85\u0026s=a7536b5464c41c2b5c7edada79ba19db 840w, https://mintcdn.com/testspriteinc/NgwJ2RcRMRwjh7Vv/images/managing-test-case-delete-batch.png?w=1100\u0026fit=max\u0026auto=format\u0026n=NgwJ2RcRMRwjh7Vv\u0026q=85\u0026s=1ba3633e87f4603fb2fca50ff38be49d 1100w, https://mintcdn.com/testspriteinc/NgwJ2RcRMRwjh7Vv/images/managing-test-case-delete-batch.png?w=1650\u0026fit=max\u0026auto=format\u0026n=NgwJ2RcRMRwjh7Vv\u0026q=85\u0026s=eb60e7905b76ae158861b3c2124289aa 1650w, https://mintcdn.com/testspriteinc/NgwJ2RcRMRwjh7Vv/images/managing-test-case-delete-batch.png?w=2500\u0026fit=max\u0026auto=format\u0026n=NgwJ2RcRMRwjh7Vv\u0026q=85\u0026s=a8ecf9a219a3314c4652ed22fb2548ec 2500w`})}),`\n`,_jsx(Warning,{children:_jsx(_components.p,{children:`Deleting a test case permanently removes its run history too. If you might want the history later, deprioritize the case instead.`})}),`\n`,_jsx(Heading,{level:`2`,id:`where-to-go-next`,children:`Where to Go Next`}),`\n`,_jsxs(Columns,{cols:2,children:[_jsx(Card,{title:`Coverage Map`,href:`/web-portal/core/working-with-test/coverage-map`,icon:`sitemap`,children:_jsx(_components.p,{children:`Manage the plan visually, use case by use case`})}),_jsx(Card,{title:`Edit \u0026 Rerun`,href:`/web-portal/core/ui/ui-rerun`,icon:`arrow-rotate-right`,children:_jsx(_components.p,{children:`Every way to re-run a UI test`})})]})]})}function MDXContent(props={}){const{wrapper:MDXLayout}={..._provideComponents(),...props.components};return MDXLayout?_jsx(MDXLayout,{...props,children:_jsx(_createMdxContent,{...props})}):_createMdxContent(props)}return{default:MDXContent};function _missingMdxReference(id,component){throw new Error(`Expected `+(component?`component`:`object`)+\" `\"+id+\"` to be defined: you likely forgot to import, pass, or provide it.\")}","frontmatter":{},"scope":{"config":{},"pageMetadata":{"title":"Managing Test Cases","description":"Edit, refine, add, and delete test cases: change a test yourself or have TestSprite's testing agent change it, batch-edit the plan, or regenerate it from your sources.","href":"/web-portal/core/working-with-test/managing-test-cases"}}},"mdxSourceWithNoJs":null},"mdxExtracts":{"tableOfContents":[{"title":"Editing a Single Test Case","slug":"editing-a-single-test-case","depth":2,"children":[{"title":"Editing steps","slug":"editing-steps","depth":3,"children":[]}]},{"title":"Asking AI for a Fix","slug":"asking-ai-for-a-fix","depth":2,"children":[]},{"title":"Batch Editing","slug":"batch-editing","depth":2,"children":[]},{"title":"Adding Test Cases","slug":"adding-test-cases","depth":2,"children":[]},{"title":"Regenerating from Sources","slug":"regenerating-from-sources","depth":2,"children":[]},{"title":"Deleting Test Cases","slug":"deleting-test-cases","depth":2,"children":[]},{"title":"Where to Go Next","slug":"where-to-go-next","depth":2,"children":[]}],"codeExamples":{}},"jsLinks":[],"subdomain":"testspriteinc","siteName":"TestSprite Documentation","title":"Managing Test Cases - TestSprite Documentation","navMaps":{"firstHrefInVersion":{},"firstHrefInLanguage":{}},"lastModified":"2026-10-09T01:16:08.015Z","originalFileLocation":"web-portal/core/working-with-test/managing-test-cases.mdx"},"headHtml":"\u003cscript data-mint-head>(function(){var d=document.documentElement,p=null;if(!p){try{p=localStorage.getItem(\"isDarkMode\")}catch(e){}if(p==='true')p='dark';else if(p==='false')p='light';if(p!=='light'\u0026\u0026p!=='dark'\u0026\u0026p!=='system')p=\"system\"}var r=p==='system'?(matchMedia(\"(prefers-color-scheme: dark)\").matches?'dark':'light'):p;d.classList.remove(r==='dark'?'light':'dark');d.classList.add(r);d.setAttribute(\"data-theme-preference\",p)})();\u003c/script>\u003cmeta data-mint-head name=\"description\" content=\"Edit, refine, add, and delete test cases: change a test yourself or have TestSprite\u0026#x27;s testing agent change it, batch-edit the plan, or regenerate it from your sources.\">\u003cmeta data-mint-head name=\"application-name\" content=\"TestSprite Documentation\">\u003cmeta data-mint-head name=\"generator\" content=\"Mintlify\">\u003clink data-mint-head rel=\"icon\" type=\"image/png\" sizes=\"192x192\" href=\"/mintlify-assets/_mintlify/favicons/testspriteinc/wPegTz1809S7PG91/_generated/favicon/android-chrome-192x192.png\" media=\"(prefers-color-scheme: light)\">\u003clink data-mint-head rel=\"apple-touch-icon\" type=\"image/png\" sizes=\"180x180\" href=\"/mintlify-assets/_mintlify/favicons/testspriteinc/wPegTz1809S7PG91/_generated/favicon/apple-touch-icon.png\">\u003clink data-mint-head rel=\"icon\" type=\"image/png\" sizes=\"16x16\" href=\"/mintlify-assets/_mintlify/favicons/testspriteinc/wPegTz1809S7PG91/_generated/favicon/favicon-16x16.png\" media=\"(prefers-color-scheme: light)\">\u003clink data-mint-head rel=\"icon\" type=\"image/png\" sizes=\"32x32\" href=\"/mintlify-assets/_mintlify/favicons/testspriteinc/wPegTz1809S7PG91/_generated/favicon/favicon-32x32.png\" media=\"(prefers-color-scheme: light)\">\u003clink data-mint-head rel=\"shortcut icon\" type=\"image/x-icon\" href=\"/mintlify-assets/_mintlify/favicons/testspriteinc/wPegTz1809S7PG91/_generated/favicon/favicon.ico\" media=\"(prefers-color-scheme: light)\">\u003clink data-mint-head rel=\"icon\" type=\"image/png\" sizes=\"192x192\" href=\"/mintlify-assets/_mintlify/favicons/testspriteinc/wPegTz1809S7PG91/_generated/favicon-dark/android-chrome-192x192.png\" media=\"(prefers-color-scheme: dark)\">\u003clink data-mint-head rel=\"icon\" type=\"image/png\" sizes=\"16x16\" href=\"/mintlify-assets/_mintlify/favicons/testspriteinc/wPegTz1809S7PG91/_generated/favicon-dark/favicon-16x16.png\" media=\"(prefers-color-scheme: dark)\">\u003clink data-mint-head rel=\"icon\" type=\"image/png\" sizes=\"32x32\" href=\"/mintlify-assets/_mintlify/favicons/testspriteinc/wPegTz1809S7PG91/_generated/favicon-dark/favicon-32x32.png\" media=\"(prefers-color-scheme: dark)\">\u003clink data-mint-head rel=\"shortcut icon\" type=\"image/x-icon\" href=\"/mintlify-assets/_mintlify/favicons/testspriteinc/wPegTz1809S7PG91/_generated/favicon-dark/favicon.ico\" media=\"(prefers-color-scheme: dark)\">\u003cmeta data-mint-head property=\"og:title\" content=\"Managing Test Cases - TestSprite Documentation\">\u003cmeta data-mint-head property=\"og:description\" content=\"Edit, refine, add, and delete test cases: change a test yourself or have TestSprite\u0026#x27;s testing agent change it, batch-edit the plan, or regenerate it from your sources.\">\u003cmeta data-mint-head property=\"og:site_name\" content=\"TestSprite Documentation\">\u003cmeta data-mint-head property=\"og:url\" content=\"https://docs.testsprite.com/web-portal/core/working-with-test/managing-test-cases\">\u003cmeta data-mint-head property=\"og:type\" content=\"website\">\u003cmeta data-mint-head property=\"og:image\" content=\"https://testspriteinc.mintlify.app/_mintlify/api/og/v2?division=Working+with+Tests\u0026amp;title=Managing+Test+Cases\u0026amp;description=Edit%2C+refine%2C+add%2C+and+delete+test+cases%3A+change+a+test+yourself+or+have+TestSprite%27s+testing+agent+change+it%2C+batch-edit+the+plan%2C+or+regenerate+it+from+your+s\u0026amp;theme=b4c5e5e16d412dca9f1c7cc3\u0026amp;signature=4fe0b70e738866f5775e36950816caa67adf936bde1a2b0235a1fe7d7657dd2a\">\u003cmeta data-mint-head property=\"og:image:width\" content=\"1200\">\u003cmeta data-mint-head property=\"og:image:height\" content=\"630\">\u003cmeta data-mint-head name=\"twitter:card\" content=\"summary_large_image\">\u003cmeta data-mint-head name=\"twitter:title\" content=\"Managing Test Cases - TestSprite Documentation\">\u003cmeta data-mint-head name=\"twitter:description\" content=\"Edit, refine, add, and delete test cases: change a test yourself or have TestSprite\u0026#x27;s testing agent change it, batch-edit the plan, or regenerate it from your sources.\">\u003cmeta data-mint-head name=\"twitter:image\" content=\"https://testspriteinc.mintlify.app/_mintlify/api/og/v2?division=Working+with+Tests\u0026amp;title=Managing+Test+Cases\u0026amp;description=Edit%2C+refine%2C+add%2C+and+delete+test+cases%3A+change+a+test+yourself+or+have+TestSprite%27s+testing+agent+change+it%2C+batch-edit+the+plan%2C+or+regenerate+it+from+your+s\u0026amp;theme=b4c5e5e16d412dca9f1c7cc3\u0026amp;signature=4fe0b70e738866f5775e36950816caa67adf936bde1a2b0235a1fe7d7657dd2a\">\u003cmeta data-mint-head name=\"twitter:image:width\" content=\"1200\">\u003cmeta data-mint-head name=\"twitter:image:height\" content=\"630\">\u003cmeta data-mint-head name=\"msapplication-config\" content=\"/mintlify-assets/_mintlify/favicons/testspriteinc/wPegTz1809S7PG91/_generated/favicon/browserconfig.xml\">\u003cmeta data-mint-head name=\"apple-mobile-web-app-title\" content=\"TestSprite Documentation\">\u003cmeta data-mint-head name=\"msapplication-TileColor\" content=\"#54B365\">\u003clink data-mint-head rel=\"canonical\" href=\"https://docs.testsprite.com/web-portal/core/working-with-test/managing-test-cases\">\u003clink data-mint-head rel=\"alternate\" type=\"application/xml\" href=\"/sitemap.xml\">\u003clink data-mint-head rel=\"alternate\" type=\"text/markdown\" href=\"/web-portal/core/working-with-test/managing-test-cases.md\">\u003cscript data-mint-head type=\"application/ld+json\">{\"@context\":\"https://schema.org\",\"@graph\":[{\"@type\":\"Organization\",\"@id\":\"https://docs.testsprite.com/#organization\",\"name\":\"TestSprite Documentation\",\"url\":\"https://docs.testsprite.com\",\"logo\":{\"@type\":\"ImageObject\",\"url\":\"https://mintcdn.com/testspriteinc/-Pguo2A-jFFq2l4c/logo/light-mode.svg?fit=max\u0026auto=format\u0026n=-Pguo2A-jFFq2l4c\u0026q=85\u0026s=ae3fa561b9ee31984d80d787a7fa166e\"}},{\"@type\":\"WebSite\",\"@id\":\"https://docs.testsprite.com#website\",\"name\":\"TestSprite Documentation\",\"url\":\"https://docs.testsprite.com\",\"publisher\":{\"@id\":\"https://docs.testsprite.com/#organization\"}},{\"@type\":\"WebPage\",\"@id\":\"https://docs.testsprite.com/web-portal/core/working-with-test/managing-test-cases#webpage\",\"url\":\"https://docs.testsprite.com/web-portal/core/working-with-test/managing-test-cases\",\"name\":\"Managing Test Cases\",\"description\":\"Edit, refine, add, and delete test cases: change a test yourself or have TestSprite's testing agent change it, batch-edit the plan, or regenerate it from your sources.\",\"dateModified\":\"2026-10-09T01:16:08.015Z\",\"isPartOf\":{\"@id\":\"https://docs.testsprite.com#website\"},\"breadcrumb\":{\"@id\":\"https://docs.testsprite.com/web-portal/core/working-with-test/managing-test-cases#breadcrumb\"}},{\"@type\":\"BreadcrumbList\",\"@id\":\"https://docs.testsprite.com/web-portal/core/working-with-test/managing-test-cases#breadcrumb\",\"itemListElement\":[{\"@type\":\"ListItem\",\"position\":1,\"name\":\"Core\",\"item\":\"https://docs.testsprite.com/web-portal/core/ui/ui-testing\"},{\"@type\":\"ListItem\",\"position\":2,\"name\":\"Working with Tests\",\"item\":\"https://docs.testsprite.com/web-portal/core/working-with-test/test-detail\"},{\"@type\":\"ListItem\",\"position\":3,\"name\":\"Managing Test Cases\",\"item\":\"https://docs.testsprite.com/web-portal/core/working-with-test/managing-test-cases\"}]},{\"@type\":[\"Article\",\"TechArticle\"],\"@id\":\"https://docs.testsprite.com/web-portal/core/working-with-test/managing-test-cases#article\",\"headline\":\"Managing Test Cases\",\"name\":\"Managing Test Cases\",\"description\":\"Edit, refine, add, and delete test cases: change a test yourself or have TestSprite's testing agent change it, batch-edit the plan, or regenerate it from your sources.\",\"url\":\"https://docs.testsprite.com/web-portal/core/working-with-test/managing-test-cases\",\"mainEntityOfPage\":{\"@id\":\"https://docs.testsprite.com/web-portal/core/working-with-test/managing-test-cases#webpage\"},\"dateModified\":\"2026-10-09T01:16:08.015Z\",\"publisher\":{\"@id\":\"https://docs.testsprite.com/#organization\"},\"isPartOf\":{\"@id\":\"https://docs.testsprite.com#website\"}}]}\u003c/script>\u003cscript data-mint-head type=\"application/ld+json\">{\"@context\":\"https://schema.org\",\"@type\":\"WebSite\",\"name\":\"TestSprite Documentation\",\"creator\":{\"@type\":\"Organization\",\"name\":\"Mintlify\",\"url\":\"https://mintlify.com\"}}\u003c/script>","siteName":"TestSprite Documentation","nav":{"global":{"anchors":[{"anchor":"Website","icon":"globe","href":"https://www.testsprite.com/"},{"anchor":"Community","icon":"comments","href":"https://discord.gg/QQB9tJ973e"},{"anchor":"Contact Us","icon":"address-book","href":"https://calendly.com/contact-hmul/schedule"}]},"tabs":[{"tab":"Web Portal","icon":"window-maximize","groups":[{"group":"Getting Started","pages":[{"title":"Overview","icon":"clipboard-list","href":"/web-portal/getting-started/overview"},{"title":"Introduction","icon":"book-open","href":"/web-portal/getting-started/introduction"},{"group":"Concepts","icon":"book","expanded":true,"pages":[{"title":"Key Terms","href":"/web-portal/concepts/key-terms"},{"title":"Testing Lifecycle","href":"/web-portal/concepts/testing-lifecycle"}]}]},{"group":"Core","pages":[{"group":"UI Testing","icon":"window-maximize","expanded":true,"pages":[{"title":"Overview","href":"/web-portal/core/ui/ui-testing"},{"title":"Quickstart","href":"/web-portal/core/ui/quickstart"},{"title":"Authentication (UI)","href":"/web-portal/core/ui/ui-authentication"},{"title":"Feature Exploration","href":"/web-portal/core/ui/feature-exploration"},{"title":"Plan Generation \u0026 Editing","href":"/web-portal/core/ui/ui-plan-gen"},{"title":"Test Generation \u0026 Execution (UI)","href":"/web-portal/core/ui/ui-test-gen"},{"title":"Step-by-Step Replay","href":"/web-portal/core/ui/ui-step-by-step"},{"title":"Agent Actions","href":"/web-portal/core/ui/agent-actions"},{"title":"Edit \u0026 Rerun","href":"/web-portal/core/ui/ui-rerun"},{"title":"Auto-Heal","href":"/web-portal/core/ui/auto-heal"}]},{"group":"API Testing","icon":"terminal","expanded":true,"pages":[{"title":"Overview","href":"/web-portal/core/api/api-testing"},{"title":"Quickstart","href":"/web-portal/core/api/quickstart"},{"title":"API Discovery","href":"/web-portal/core/api/api-discovery"},{"title":"Plan Generation \u0026 Editing","href":"/web-portal/core/api/api-plan-gen"},{"title":"Endpoint Tests","href":"/web-portal/core/api/endpoint-tests"},{"title":"Integration Tests","href":"/web-portal/core/api/integration-tests"},{"title":"Dynamic Variables","href":"/web-portal/core/api/dynamic-variables"},{"title":"Dependency Chains","href":"/web-portal/core/api/dependency-chains"},{"title":"Auto Cleanup","href":"/web-portal/core/api/auto-cleanup"},{"title":"Auto-Auth","href":"/web-portal/core/api/auto-auth"},{"title":"Rerun","href":"/web-portal/core/api/api-rerun"}]},{"group":"Working with Tests","icon":"wrench","expanded":true,"pages":[{"title":"Test Detail Page","href":"/web-portal/core/working-with-test/test-detail"},{"title":"Coverage Map","description":"The Test Coverage view: see what's covered at a glance, edit use cases directly on the map, and review coverage gaps before a release.","href":"/web-portal/core/working-with-test/coverage-map"},{"title":"Managing Test Cases","href":"/web-portal/core/working-with-test/managing-test-cases"},{"title":"Test Runs \u0026 Reports","description":"Watch a run as it happens, then read its report and download it as a PDF for your PM, leadership, or a release record.","href":"/web-portal/results/test-report"},{"title":"Insights","href":"/web-portal/results/project-overview"}]},{"group":"Project Settings","icon":"gear","expanded":true,"pages":[{"title":"Environments","href":"/web-portal/setup/environments"},{"title":"Project Sources","href":"/web-portal/setup/project-sources"},{"title":"Run Behavior","href":"/web-portal/setup/execution-settings"}]},{"group":"AI Chat","icon":"comments","expanded":true,"pages":[{"title":"Overview","href":"/web-portal/ai-chat/overview"},{"title":"Approving Actions","href":"/web-portal/ai-chat/approving-actions"}]},{"group":"Automation \u0026 Integrations","icon":"plug","expanded":true,"pages":[{"title":"GitHub Integration","href":"/web-portal/integrations/github-integration"},{"title":"Test Lists","href":"/web-portal/maintenance/test-lists"},{"title":"Test Schedules","href":"/web-portal/maintenance/monitoring"},{"title":"Slack Notifications","sidebarTitle":"Notifications (Slack)","href":"/web-portal/integrations/slack-notifications"},{"title":"Ticketing","sidebarTitle":"Ticketing (Jira, Linear)","href":"/web-portal/integrations/ticketing"}]},{"group":"Workspace \u0026 Admin","icon":"users-gear","expanded":true,"pages":[{"title":"Workspaces","href":"/web-portal/admin/workspaces"},{"title":"Members \u0026 Roles","href":"/web-portal/admin/members-and-roles"},{"title":"Sharing a Project","href":"/web-portal/admin/sharing"},{"title":"API Keys","href":"/web-portal/admin/api-keys"}]}]}]},{"tab":"CLI","icon":"terminal","pages":[{"title":"CLI","href":"/cli/getting-started/overview"}]},{"tab":"MCP Server","icon":"square-terminal","pages":[{"title":"MCP Server","href":"/mcp/getting-started/introduction"}]},{"tab":"Learn","icon":"graduation-cap","pages":[{"title":"Learn","href":"/learn/mcp-demo"}]}]},"title":"Managing Test Cases - TestSprite Documentation","buildId":"dpl_cadrRc5H9XQiJQbDFN5mcYRs2PAj","deploymentId":"dpl_cadrRc5H9XQiJQbDFN5mcYRs2PAj","dynamics":["07c022d89b","a74be98ba7"],"chunks":["Frame-B0bJ23PC.js","DynamicMarkdown-UGQuxDKp.js","zoom-image-lightbox-B0E5HDf_.js","lightbox-handle-r17bVUz3.js"]}